If you’re looking for the perfect seasonal craft, the Swirly Easter Bunny Crochet Pattern is a charming and creative way to celebrate spring. This adorable bunny, with its whimsical swirls and soft textures, brings together the joy of Easter and the beauty of handmade crochet. Whether you’re an experienced crafter or just starting out, this project offers a fun and satisfying experience.
The Swirly Easter Bunny Crochet Pattern combines elegance with playfulness. With its curling shapes, floppy ears, and soft body, this bunny is more than just a decoration—it’s a keepsake. It can be made as a toy for little ones, a festive table centerpiece, or a thoughtful handmade gift that adds warmth to your holiday.
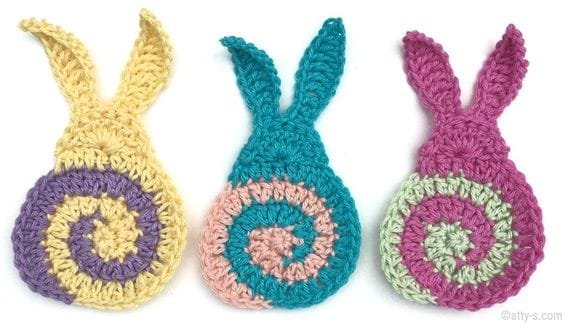
This pattern stands out from traditional bunny patterns due to its signature swirls. These decorative spirals give the bunny a lively, dynamic appearance, making it look like it hopped right out of a storybook. In this article, we’ll guide you through the elements of the Swirly Easter Bunny Crochet Pattern, tips to make your project shine, and frequently asked questions to help you along the way.
Choosing the Right Yarn and Tools
One of the most important aspects of the Swirly Easter Bunny Crochet Pattern is the type of yarn you select. Soft, medium-weight yarns work best for plush bunnies. Consider cotton blends or premium acrylic yarn for softness and durability.
Choosing a complementary hook size ensures your stitches are tight enough to maintain the bunny’s shape. A 3.5mm to 4mm hook usually works well for this pattern. Keep a set of stitch markers, a yarn needle, and stuffing materials nearby for finishing touches.
Color choice also plays a big role. Traditional pastels—lavender, mint green, baby pink—give a classic Easter feel, while bold colors can add a whimsical twist. Swirly accents can be done in a contrasting yarn color to make the design pop.
Swirls are often crocheted separately and sewn onto the body or integrated into the rounds. If you’re unfamiliar with swirl techniques, practicing on scrap yarn can help you master the motion before working on the main project.
It’s also important to keep your tension consistent throughout the pattern. Uneven tension can distort the bunny’s shape, making it look lopsided or under-stuffed. Take breaks to avoid wrist fatigue and keep your stitching relaxed but uniform.
Lastly, always check your gauge before starting. Although gauge is less critical for toys than for garments, it still affects the final size and symmetry of your Swirly Easter Bunny Crochet Pattern project.
Crafting the Bunny’s Body
The body of the Swirly Easter Bunny Crochet Pattern starts with a classic amigurumi oval. You’ll work in continuous spirals, increasing steadily to form the base and then tapering off to shape the body.
Using a stitch marker helps keep track of rounds. Since the body has a three-dimensional form, stuffing as you go prevents lumps and uneven shapes. Always use small tufts of stuffing and shape gently with your fingers.
Adding the swirls to the body is where the magic happens. These can be made using spiraled chains or decorative surface crochet techniques. Placing them symmetrically keeps the design balanced and pleasing to the eye.
Don’t overstuff the body—this can stretch the fabric and distort the swirls. Instead, aim for a soft but stable finish that allows the bunny to sit upright on its own.
For stability, you can insert a small weighted pouch inside the base using rice or beads, sealed inside a cloth bag. This will help your bunny stay in place if you plan to use it as a display.
Once the body is complete and the swirls are attached, finish the base with a seamless closing stitch using a yarn needle, weaving in all ends securely.
Shaping the Ears, Feet, and Tail
The ears of the Swirly Easter Bunny Crochet Pattern are a defining feature. Long and floppy, they’re made with rows or rounds that gradually increase and then decrease to form the right shape.
You can line the inside of the ears with a contrasting color swirl or stitch the swirl directly into the fabric for a more textured look. Keep both ears uniform in size and shape for visual balance.
Feet are created with a rounded base, slightly flattened for support. Swirl details can be added to the top of the feet to continue the pattern theme. The feet are then sewn firmly to the bottom of the body.
The tail is often a pom-pom or small round piece that provides a cute and cuddly final touch. You can even swirl two colors together for a multi-tone effect that complements the overall look.
When attaching parts, always pin them in place first. This gives you a chance to adjust positions before sewing them permanently. Symmetry is key, especially if you plan to gift or sell your finished bunny.
Each part should be reinforced with secure, invisible stitches. This not only improves durability but gives your bunny a neat, professional finish.
Don’t forget to weave in all loose ends thoroughly. Loose yarn can come undone over time, especially if the bunny is used as a toy.
Adding the Finishing Touches
To bring your Swirly Easter Bunny Crochet Pattern to life, small details make a big difference. Embroidered eyes, a nose, and a stitched smile give personality without the need for plastic parts.
Safety eyes can be used for older children, but embroidery is better for babies or decorative use. Choose embroidery floss or a tightly spun yarn in black or dark brown for the face.
Optional accessories like a small bowtie, a flower crown, or even a tiny crocheted Easter egg can be sewn onto the bunny for added charm. These details make your project stand out and feel more personalized.
If you’re giving your bunny as a gift, consider adding a handwritten tag with care instructions. A gentle hand wash and air dry is usually best for crochet toys.
Take a moment to photograph your finished bunny, especially if you plan to share it online or save it in a portfolio. Good lighting and a neutral background help showcase the texture and swirly details beautifully.
Lastly, enjoy your creation. The Swirly Easter Bunny Crochet Pattern isn’t just a craft—it’s a celebration of creativity and springtime joy.
FAQ – Swirly Easter Bunny Crochet Pattern
What skill level is needed for this pattern?
The Swirly Easter Bunny Crochet Pattern is best for confident beginners to intermediate crocheters. It uses basic stitches and shaping techniques, with a few decorative swirls that require a little patience.
Can I use any type of yarn?
Yes, but medium-weight yarn is recommended for best results. Cotton and soft acrylic yarns hold the bunny’s shape well and feel nice to the touch.
How long does it take to complete the pattern?
Depending on your speed and experience, it typically takes 6–8 hours to complete, including all parts and swirl decorations.
Is it safe for babies?
If you use embroidered features instead of safety eyes or plastic embellishments, the bunny is safe for infants and toddlers. Always double-check that all parts are securely attached.
Can I sell bunnies made with this pattern?
Yes, if the pattern allows for it. Many designers permit the sale of finished products, but always credit the original pattern creator and avoid reselling the pattern itself.
How do I make the swirls?
Swirls can be crocheted separately using chain stitches and sewn onto the body, or they can be integrated using surface crochet techniques. Practice makes perfect!
Conclusion
Creating your own Swirly Easter Bunny Crochet Pattern project is a joyful and rewarding experience. From choosing the perfect yarn to stitching delicate swirls, every part of the process adds a touch of magic to your spring crafting. Whether you’re making one for a loved one or for yourself, this bunny brings smiles and seasonal charm wherever it goes.
We hope this article helped you feel more confident and inspired to start your next project. If you’ve tried the Swirly Easter Bunny Crochet Pattern, we’d love to hear your thoughts. Please leave a sincere opinion and feel free to suggest improvements or share your creative variations!

