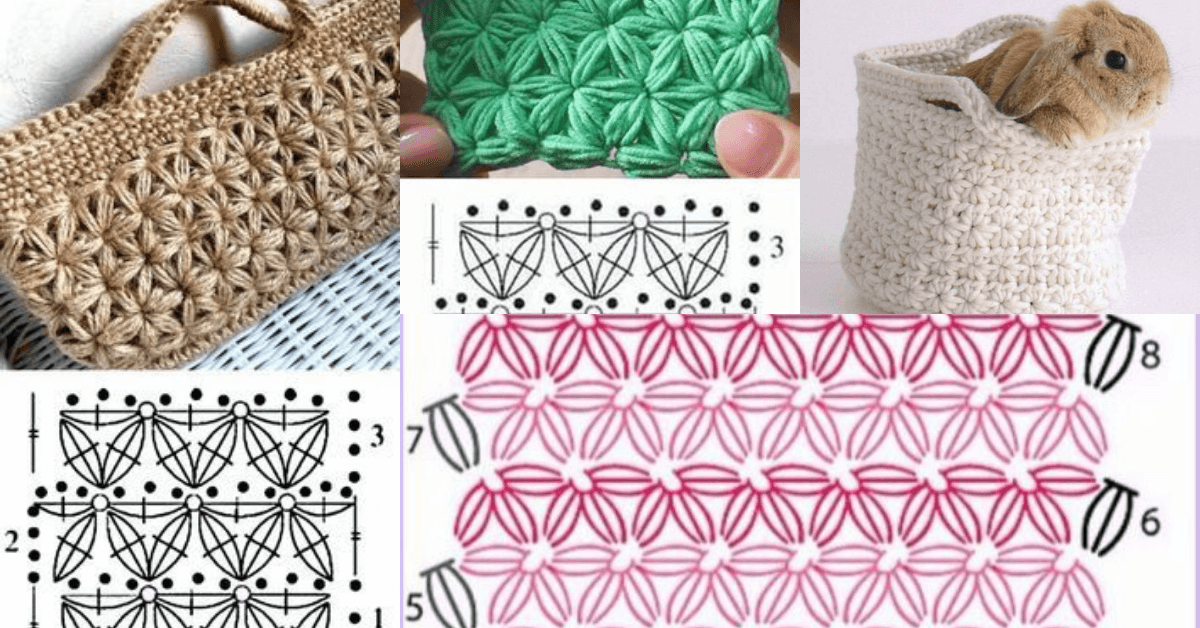
If you’re looking for a new and elegant knitting technique, star stitch knitting is a fantastic option to add texture and sophistication to your projects. This free pattern will guide you through how to incorporate the star stitch into your knitting, whether you’re a beginner looking to learn something new or an experienced knitter searching for a unique pattern.
The star stitch is known for its intricate, woven appearance, making it perfect for scarves, blankets, and other cozy creations. With this easy-to-follow tutorial, you’ll be crafting stunning star stitch patterns in no time.
This tutorial will walk you through each step of star stitch knitting. We will cover everything from the materials needed to detailed instructions and troubleshooting common issues.
As we go along, remember that knitting is a process that requires patience and practice, so don’t be discouraged if it takes a few tries to get the hang of the star stitch. By the end of this article, you’ll have a beautiful free pattern to use in your next project.
Let’s dive into the world of star stitch knitting and get started on a project that’s both visually appealing and fun to create!
1. Materials You’ll Need for Star Stitch Knitting
Before we get into the actual star stitch knitting pattern, it’s important to gather all the essential materials. Having everything ready will make the process smoother and more enjoyable.
- Yarn: To achieve the best results, it’s recommended to use a medium-weight yarn, such as worsted or aran. This weight allows the star stitch pattern to really stand out without being too bulky. You can experiment with different yarn textures and colors, but for beginners, solid colors will help you see the stitch definition more clearly.
- Knitting Needles: A pair of knitting needles that complements your yarn weight is key. For most medium-weight yarns, a size 6 or 7 needle (US sizes) is recommended. The type of needles—whether straight or circular—depends on your project. For flat knitting, straight needles work perfectly, while circular needles can be used for larger projects like blankets.
- Scissors: A sharp pair of scissors is essential for cutting your yarn when you’re finished with your project or changing colors during the knitting process.
- Tapestry Needle: This tool is helpful for weaving in loose ends once your project is complete. Make sure to choose a needle with a large enough eye to accommodate your yarn.
- Stitch Markers: Optional but highly recommended, especially if you’re knitting in the round or working with multiple patterns in the same project. They help you keep track of stitch counts and pattern repeats.
- Measuring Tape: To ensure your project reaches the desired dimensions, it’s helpful to have a measuring tape handy. This is particularly useful if you’re making garments or other items that need to fit a specific size.
2. How to Knit the Star Stitch
Now that we have our materials, let’s begin the star stitch knitting process. This unique stitch creates a textured, star-like appearance by working into multiple stitches at once. Follow these steps carefully to ensure the perfect star stitch pattern.
- Casting On: Start by casting on a multiple of four stitches plus one. This is essential for ensuring that the pattern works out evenly. For example, if you’re knitting a small swatch, you might cast on 21 stitches (20 for the pattern and one extra stitch).
- Row 1 (Wrong Side): Begin by purling all stitches across the row. This prepares your fabric for the right side of the star stitch to be visible on the next row.
- Row 2 (Right Side): This is where you’ll create the star stitch pattern. Start by inserting your needle into the next three stitches as if to knit, then pull the working yarn through these three stitches and knit them together. Afterward, yarn over and knit the same three stitches together again. You’ll have created a small cluster that resembles a star.
- Row 3 (Wrong Side): Purl all stitches across the row. This row serves to create a smooth, flat surface on the back of your fabric.
- Row 4 (Right Side): Repeat the same steps as in Row 2. The star stitch is worked over two rows, creating a beautifully textured pattern. Once you’ve completed the row, you’ll begin to see the star shapes emerging.
- Repeat the Pattern: Continue working rows 1 to 4 until your project reaches the desired length. The star stitch adds a lot of texture, so keep this in mind when planning the dimensions of your project. The more rows you knit, the more pronounced the pattern will become.
3. Troubleshooting Common Star Stitch Issues
While star stitch knitting is a relatively simple technique, there are a few common issues you might encounter along the way. Here’s how to troubleshoot them.
- Tight Stitches: One of the most common issues is tight stitches, which can make it difficult to pull the yarn through when knitting three stitches together. To avoid this, make sure you’re knitting with a relaxed tension and using needles that are appropriate for your yarn weight.
- Dropped Stitches: Since the star stitch involves working into multiple stitches at once, it’s easy to accidentally drop stitches. If this happens, carefully undo your work and pick up the dropped stitch using a crochet hook or smaller needle.
- Uneven Tension: The star stitch can sometimes result in uneven tension, with some stars looking tighter or looser than others. To correct this, take your time when knitting into three stitches and ensure you’re pulling the yarn through smoothly without tugging too tightly.
- Confusing Pattern Repeats: If you’re finding it hard to keep track of your rows and pattern repeats, try using stitch markers to mark the beginning and end of each repeat. This can be especially helpful when working on larger projects.
- Stiff Fabric: If your fabric feels too stiff or dense, try using a larger needle size to loosen up the stitches. This will create a more flexible, drapey fabric that’s perfect for scarves or shawls.
- Pattern Doesn’t Look Right: If your stars don’t seem to be forming properly, double-check your stitch count. You should have a multiple of four stitches plus one. If you’re off by even one stitch, the pattern won’t align correctly.
4. Creative Projects Using the Star Stitch
Now that you’ve mastered the basics of star stitch knitting, you might be wondering how to incorporate this beautiful texture into your knitting projects. Here are a few creative ideas to get you started.
- Star Stitch Scarf: A scarf is one of the best projects to showcase the star stitch. The repetitive pattern and texture will make your scarf both cozy and stylish. Choose a soft, medium-weight yarn to give the scarf a luxurious feel.
- Blankets and Throws: The star stitch works wonderfully for blankets because of its thick, textured finish. Whether you’re making a baby blanket or a full-sized throw, the star stitch will add visual interest and warmth.
- Hats and Beanies: Incorporating the star stitch into a hat pattern is a fun way to add texture to an otherwise simple project. The star stitch can be used as an accent around the brim or throughout the entire hat.
- Bags and Pouches: Create sturdy, stylish bags and pouches by using the star stitch. The texture gives your project extra durability and makes for a visually appealing accessory.
- Mittens and Gloves: For a unique twist on traditional mittens or gloves, consider using the star stitch on the cuffs or across the back of the hand. This small detail will elevate the overall design of your project.
- Home Decor: Use the star stitch to create textured pillows, placemats, or dishcloths. The durable, thick texture of the star stitch makes it perfect for items that see regular use.
FAQ
Q: What is the star stitch in knitting?
A: The star stitch is a knitting technique that creates a textured, star-like pattern by working into multiple stitches at once. It’s often used in scarves, blankets, and other cozy projects.
Q: Is the star stitch suitable for beginners?
A: Yes! While the star stitch might seem tricky at first, it’s a great pattern for beginners looking to expand their knitting skills. With practice, you’ll find it’s quite easy to master.
Q: What type of yarn is best for the star stitch?
A: Medium-weight yarns like worsted or aran are ideal for star stitch knitting. These weights allow the texture of the stitch to stand out while still being soft and flexible.
Q: Can I adjust the size of my star stitch project?
A: Absolutely! You can adjust the size of your project by increasing or decreasing the number of stitches you cast on, as long as you follow the multiple of four stitches plus one rule.
Q: Why do my stitches feel too tight when working the star stitch?
A: If your stitches feel too tight, try using a larger needle size or loosening your tension. This will make it easier to work into multiple stitches at once.
Q: Can I use the star stitch in knitting in the round?
A: Yes, the star stitch can be adapted for knitting in the round. Just make sure to adjust your stitch count and pattern to suit circular knitting techniques.
Join our VIP broadcast list and gain access to exclusive patterns, all for free. As a VIP member, you’ll receive the best patterns daily, delivered directly to your device. ✨📱 It’s a unique opportunity to stay up-to-date with the latest trends and designs, curated just for you. Don’t miss out on enhancing your projects and discovering new inspirations with the best patterns every day! 🎨🔝
Conclusion
In this Star stitch knitting – Free pattern tutorial, we explored how to create the stunning star stitch, a textured pattern that adds dimension and elegance to any project. From gathering materials to troubleshooting common issues, you now have all the knowledge needed to confidently knit the star stitch. Whether you decide to make a scarf, blanket, or bag, this stitch is sure to impress.
We’d love to hear your thoughts on this pattern! Let us know how your projects turned out, and feel free to leave any suggestions or feedback in the comments. Happy knitting!

