Solid Granny Square Crochet is a timeless and versatile project that every crocheter should try at least once. With its simple construction, yet endless possibilities, this crochet pattern is perfect for both beginners and seasoned crafters.
The solid granny square pattern has been a staple in crochet for generations, evolving into various designs and uses, including blankets, scarves, and even home decor.
In this guide, we will teach you how to make a solid granny square crochet with a free pattern that you can customize to your liking.
A solid granny square consists of a series of stitches worked in rounds, building up into a square shape.
Unlike the traditional granny square, which often has an open center, the solid granny square is entirely filled in, creating a smooth, cohesive design.It’s a great way to practice basic crochet stitches while creating a beautiful, textured pattern.
As you follow this tutorial, you will not only learn how to make a solid granny square, but also gain tips on customizing colors, joining squares, and turning your crochet project into something unique.
Whether you’re making a cozy blanket or a vibrant pillow cover, the solid granny square crochet is a perfect foundation for your next creative project.
1. Materials Needed for Solid Granny Square Crochet
Before diving into the crochet process, gather the necessary materials. Having everything on hand ensures that you can work efficiently without interruptions.
- Yarn: Choose a medium-weight yarn, such as worsted weight, for your project. Acrylic yarn is a popular choice due to its durability and variety of colors.
- Crochet Hook: A size H (5mm) crochet hook works well for most worsted-weight yarns. Adjust the hook size depending on your yarn choice.
- Scissors: Use a sharp pair of scissors to cut your yarn when needed.
- Yarn Needle: A yarn needle is essential for weaving in loose ends and joining squares together later.
- Stitch Markers: These can help you keep track of the first stitch in each round to ensure your square stays even.
If you are a beginner, it’s best to start with just one color of yarn to master the technique. Once you’re comfortable, you can start incorporating different colors for a more dynamic look. The solid granny square crochet is highly customizable, so feel free to experiment with your favorite colors and textures.
By choosing the right materials, you will ensure that your finished project has the perfect feel and durability. Let’s move on to the first step in creating your own solid granny square crochet!
2. Step-by-Step Guide to Creating a Solid Granny Square
Creating a solid granny square crochet involves working in rounds, beginning from the center and working outward. This technique creates a seamless, solid square with no gaps in the middle.
Step 1: Create a Slip Knot
Start by creating a slip knot with your yarn. Place the slip knot on your crochet hook to begin your first round.
Step 2: Chain 4
Chain 4 to form a small loop. This loop will serve as the base for your solid granny square. The chain-4 creates the first part of your round, from which you will build the rest of the square.
Step 3: Join the Round
Next, join the last chain to the first chain with a slip stitch, forming a small ring. This ring will be the center of your square, and you’ll build your stitches around it in the following rounds.
Step 4: Work the First Round
For the first round, chain 3 (this counts as your first double crochet stitch). Then, work 2 double crochet stitches into the ring. Continue making 3 double crochets into the ring until you have a total of 12 double crochets. Join the round with a slip stitch into the top of the beginning chain-3.
Step 5: Start the Second Round
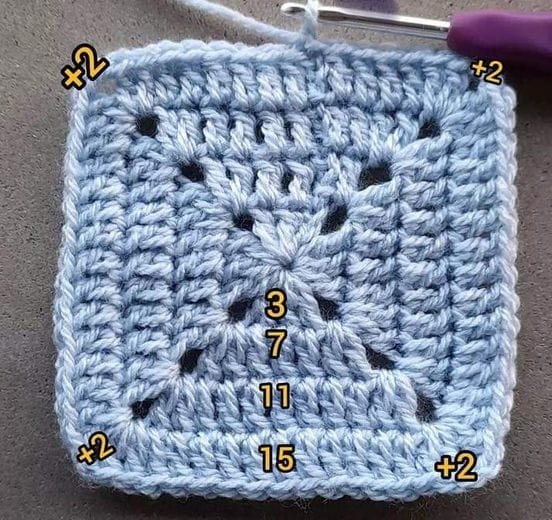
For the second round, chain 3 again (this counts as your first double crochet stitch). Then, work 2 double crochets into the same stitch as the chain-3. This creates the first corner of your square. After that, work 3 double crochets in each stitch, placing 3 double crochets into each of the 4 corner spaces. Join the round with a slip stitch into the top of the beginning chain-3.
Step 6: Repeat the Process
Repeat the process for as many rounds as needed to make your solid granny square the desired size. Typically, squares range from 5 to 10 rounds, depending on your project.
Once you finish the final round, cut the yarn and pull it through the loop to fasten off. Use a yarn needle to weave in the ends securely.
3. Customizing Your Solid Granny Square
Now that you know how to make a solid granny square crochet, it’s time to explore ways to customize your project. Customization allows you to create a square that fits your specific design preferences, whether you want a subtle, monochromatic look or a vibrant, multi-colored piece.
Color Choices
One of the most fun aspects of working with solid granny squares is choosing your colors. You can stick to one color for a classic look, or choose multiple colors to create a more dynamic design. Try using a color scheme that complements the room decor if you’re making a table topper, pillow, or blanket.
Changing Colors
To change colors, simply finish the last double crochet stitch of your round, then pull through the new color in the last step of the stitch. Continue with the new color for the next round. It’s a good idea to keep your color changes neat by cutting off the old color yarn and weaving in the ends carefully.
Creating a Pattern
If you want to make a more intricate pattern, consider alternating colors in the corners or creating stripes within each round. For example, you could make a solid granny square with alternating color blocks for each round, or try using a gradient effect with several shades of the same color.
4. Joining Solid Granny Squares Together
Once you’ve made several solid granny square crochet pieces, it’s time to join them together. There are several methods to join granny squares, but one of the most popular and easiest methods is the whipstitch join.
Method 1: Whipstitch Join
To join your squares, line up the edges of two squares, making sure the right sides are facing out. Thread a yarn needle with the same color yarn used in the square. Using a whipstitch, sew through both edges of the squares, making sure to match the stitches evenly. Continue stitching until the two squares are joined.
Method 2: Slip Stitch Join
Another method is the slip stitch join, which is faster and leaves a flatter seam. To do this, hold two squares together with the right sides facing. Insert your hook into the first stitch of both squares, and make a slip stitch. Continue this process, working through both edges of the squares until they are connected.
Method 3: Continuous Join-As-You-Go
For a seamless look, you can join your granny squares as you crochet. To do this, simply crochet the last stitch of one square into the first stitch of the next square, continuing until all squares are joined.
Whichever method you choose, be sure to weave in any loose ends to keep your project neat and secure.
FAQ: Solid Granny Square Crochet – Free Pattern
Q: What is a solid granny square?
A: A solid granny square is a crocheted square that is completely filled in, unlike traditional granny squares that have an open center. It’s worked in rounds with double crochet stitches.
Q: How many rounds should I make for a solid granny square?
A: The number of rounds depends on the size you want. Most solid granny squares have between 5 and 10 rounds.
Q: Can I use different yarn weights for my solid granny square?
A: Yes, you can use different yarn weights, but be sure to adjust your hook size accordingly. The most common yarn weight for solid granny squares is worsted weight.
Q: How do I join my solid granny squares together?
A: You can join squares using the whipstitch, slip stitch, or a continuous join-as-you-go method, depending on your preference.
Q: Can I use solid granny squares for blankets or other projects?
A: Absolutely! Solid granny squares are perfect for blankets, pillows, table runners, and even clothing items like shawls or scarves.
Q: How do I change colors in a solid granny square?
A: To change colors, complete the last stitch of the current color, then pull the new color through the stitch. Continue crocheting with the new color in the next round.
Join our VIP broadcast list and gain access to exclusive patterns, all for free. As a VIP member, you’ll receive the best patterns daily, delivered directly to your device. ✨📱 It’s a unique opportunity to stay up-to-date with the latest trends and designs, curated just for you. Don’t miss out on enhancing your projects and discovering new inspirations with the best patterns every day! 🎨🔝
Conclusion
The Solid Granny Square Crochet is a simple yet beautiful pattern that can be used in a variety of projects. Whether you’re making a blanket, pillow, or home decor piece, mastering this technique opens up a world of creative possibilities. With the steps and tips shared in this tutorial, you’ll be well on your way to creating stunning crochet pieces.
We’d love to hear how your project turned out! Please leave a comment with your thoughts, or share any suggestions for future tutorials. Happy crocheting!

