The Snowman Wind Spinner Tutorial is a creative crochet project that brings winter charm to your home or garden. Combining the coziness of crochet with the magic of holiday décor, this handmade spinner twirls beautifully in the breeze, creating a festive atmosphere.
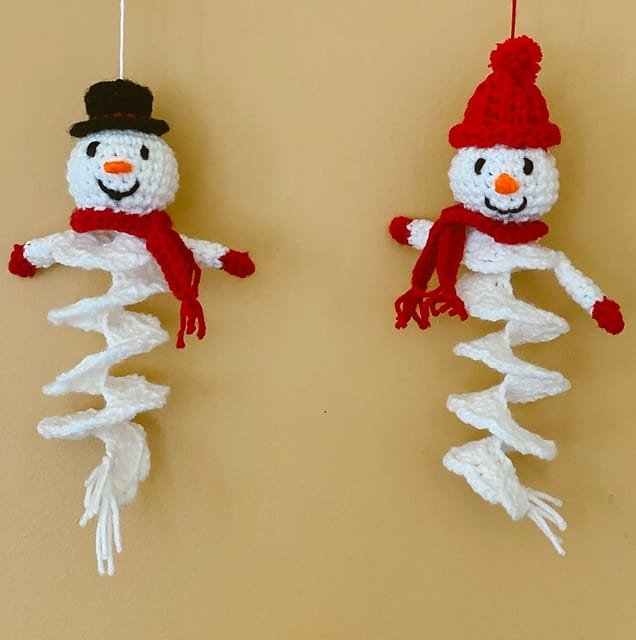
This Snowman Wind Spinner Tutorial guides you step-by-step to create an adorable snowman featuring spiral crochet elements, decorative scarves, buttons, and a cute hat.
Whether you hang it on your porch, balcony, or Christmas tree, this snowman spinner becomes a delightful eye-catcher during the winter months. It’s lightweight, durable, and full of personality — the perfect touch for your holiday setup.
Even if you are a beginner, this Snowman Wind Spinner Tutorial is easy to follow. It uses simple stitches, colorful yarn, and just a few materials. The result is a whimsical decoration that dances in the wind, bringing life to your outdoor or indoor winter décor.
Materials Needed
Before starting the Snowman Wind Spinner Tutorial, gather all the materials to ensure a smooth crafting experience.
-
Yarn: Medium-weight acrylic or cotton yarn in white (for the body), black (for hat and buttons), orange (for the nose), red or green (for scarf), and optional accent colors.
-
Hook: 4 mm or 4.5 mm crochet hook.
-
Fiberfill stuffing: For shaping the snowman’s head and body.
-
Yarn needle and scissors.
-
Plastic or metal ring: For hanging the spinner.
-
Optional: Safety eyes, small beads, or bells for decoration.
Use bright, weather-resistant yarn if you plan to hang your spinner outdoors. Acrylic yarn is recommended because it maintains color and shape even when exposed to sunlight or moisture.
Basic Crochet Techniques
The Snowman Wind Spinner Tutorial requires only fundamental crochet skills. Here’s what you’ll use:
-
Chain (ch) – the base of most crochet projects.
-
Single crochet (sc) – provides a firm, dense fabric.
-
Half-double crochet (hdc) – adds texture and flexibility.
-
Increase and decrease – for shaping round parts like the head.
-
Slip stitch (sl st) – for joining rounds neatly.
If you’re new to crochet, practice these stitches first. Maintaining even tension ensures that your spinner twists evenly and holds its form.
Creating the Snowman Head and Body
-
Start with the Head:
Use white yarn. Begin with a magic ring, working six single crochets into it. Continue in rounds, increasing evenly until the circle measures about 3 inches across. Crochet several rounds without increasing to form the sides of the head. -
Shape the Body:
Repeat the same process but make the base wider to create a gentle snowman shape — smaller at the top, larger at the bottom. -
Stuff and Join:
Before closing the final rounds, lightly stuff the head and body with fiberfill. Sew or crochet the two pieces together securely.
This base will form the top portion of your Snowman Wind Spinner Tutorial.
Making the Spiral Spinner
The signature element of the Snowman Wind Spinner Tutorial is its twisting spiral body that spins when the wind blows.
-
Foundation Chain:
With white yarn, chain about 80–100 stitches (you can adjust depending on desired length). -
Work Down the Chain:
Crochet 3 hdc in each stitch across the chain. This will cause the strip to curl naturally into a spiral. -
Add Color Bands:
Switch to red, blue, or silver yarn for festive stripes. Alternate colors every 15–20 stitches for a candy-cane effect. -
Attach the Spinner:
Sew the top of the spiral to the bottom of the snowman body. The spiral should hang freely so it can twist with the wind.
This technique creates the dynamic motion that makes your Snowman Wind Spinner Tutorial so captivating.
Accessories and Details
Adding cute accessories gives your crochet snowman its personality:
-
Hat:
Use black yarn to crochet a small cylinder and flat disc for a top hat. Sew it onto the snowman’s head. You can add a red stripe for a festive touch. -
Scarf:
With red or green yarn, chain 60 and work two rows of single crochet. Wrap the scarf around the neck and secure it with a few stitches. -
Face:
Use safety eyes or embroider small black circles for eyes. Create an orange carrot nose using a few stitches of orange yarn in a cone shape. Add a stitched smile for character. -
Buttons:
Crochet or sew on small black circles down the snowman’s front.
These finishing touches transform your spinner from simple décor into an adorable handmade masterpiece.
Assembly and Hanging
-
Attach the top of the snowman to a sturdy ring or loop using strong yarn or fishing line.
-
Make sure the connection is balanced so the spinner can rotate freely.
-
Test the spinner by hanging it near a fan or outdoors where it can catch the breeze.
The movement is what makes this Snowman Wind Spinner Tutorial magical — your snowman will appear to dance joyfully in the wind!
Customization Ideas
The Snowman Wind Spinner Tutorial allows endless creativity. Try these fun variations:
-
Rainbow Spinner: Use multicolored yarn for the spiral instead of plain white.
-
Snowflake Accents: Crochet small snowflakes to attach along the spiral for an extra wintery look.
-
Jingle Bells: Add small bells to the bottom for a soft, cheerful sound when it spins.
-
LED Lights: Weave tiny battery-powered lights through the spiral for nighttime sparkle.
-
Mini Spinners: Create smaller versions to hang on Christmas trees or gift packages.
These creative twists make your Snowman Wind Spinner Tutorial uniquely yours.
Tips for a Perfect Spinner
-
Maintain consistent stitch tension to ensure even spirals.
-
Use lightweight yarn so the spinner moves freely.
-
Avoid over-stuffing the head and body to keep them balanced.
-
If displaying outdoors, apply a light waterproof spray for extra protection.
-
Store indoors after the holiday season to preserve color and shape.
With these simple precautions, your spinner will last for many winters.
Why You’ll Love This Project
The Snowman Wind Spinner Tutorial is more than just a holiday craft — it’s an experience. It’s fun, fast, and incredibly satisfying. The design is versatile enough for all ages and makes a wonderful handmade gift.
This crochet spinner also teaches useful skills like shaping, color changing, and creating movement with stitches — valuable techniques for any crochet enthusiast. Plus, its whimsical design spreads joy wherever it spins!
FAQ – Snowman Wind Spinner Tutorial
1. Is the Snowman Wind Spinner Tutorial beginner-friendly?
Yes! The pattern uses basic stitches and simple shaping, making it suitable for all skill levels.
2. What type of yarn works best?
Acrylic yarn is ideal for outdoor use, while cotton yarn provides a clean, natural look for indoor décor.
3. How long does it take to finish?
Usually between 3–4 hours, depending on experience and spinner size.
4. Can I make the spinner larger?
Yes, simply extend your foundation chain and spiral rows.
5. Can it be washed?
Hand wash gently with cold water and let air dry to maintain structure.
6. How can I make it more festive?
Add snowflakes, jingle bells, or sparkle yarn to match your winter theme.
7. Does it actually spin in the wind?
Yes! The spiral body catches air easily and rotates beautifully with even a light breeze.
8. Can I use this pattern for other holidays?
Absolutely! Replace the snowman with a bunny or pumpkin for other seasonal versions.
Conclusion
The Snowman Wind Spinner Tutorial is a heart-warming crochet project that captures the spirit of winter through color, motion, and creativity. Combining simple stitches and playful design, this pattern produces a charming decoration that delights everyone who sees it.
Whether you hang it outside to dance in the wind or use it indoors as a cozy seasonal accent, the Snowman Wind Spinner Tutorial will brighten your space and showcase your crochet talent. Take your time, enjoy every stitch, and let your creativity guide you.
When you finish, share your results and let others know what you thought of this pattern. Your feedback and ideas inspire more crafters to bring handmade joy into their homes — one spinning snowman at a time.

