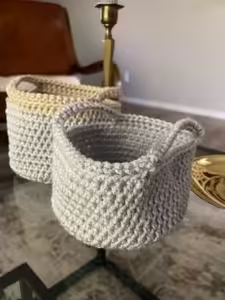
Creating a handmade basket is a rewarding craft project that offers both utility and aesthetic appeal. In this guide, we’ll walk you through a simple basket – free pattern that’s perfect for beginners and seasoned crafters alike.
Whether you’re looking to organize your space or add a personal touch to your decor, this guide will provide you with all the information you need to create a beautiful and functional basket.
With a straightforward design and easy-to-follow instructions, this simple basket pattern can be customized to suit your needs. From choosing the right yarn to finishing touches, we’ll cover every step in detail. So, let’s dive in and start crafting your very own basket!
1. Materials and Tools
To begin with our simple basket – free pattern, you’ll need a few essential materials and tools. Here’s a breakdown of what you’ll need:
- Yarn: Choose a yarn that is durable and has a good texture for basket-making. Cotton or acrylic yarns are excellent choices. For this pattern, we recommend a medium-weight yarn, but you can adjust based on your preference.
- Crochet Hook: Select a crochet hook that matches the yarn weight you’ve chosen. For medium-weight yarn, a size H (5 mm) crochet hook works well. Ensure your hook is comfortable to hold for extended periods.
- Scissors: You’ll need scissors for cutting the yarn. Make sure they are sharp and precise to ensure clean cuts.
- Yarn Needle: A yarn needle is essential for weaving in ends and sewing any parts of the basket together. Opt for a needle with a large eye to accommodate the yarn.
- Measuring Tape: Use a measuring tape to keep track of your basket’s dimensions as you work. This will help ensure your basket turns out the right size.
- Stitch Markers: While optional, stitch markers can be useful for keeping track of rounds and stitch counts, especially in the beginning stages of your project.
Now that you have all your materials ready, we can move on to the first step of our simple basket – free pattern.
2. Starting Your Basket
The initial step in creating your simple basket involves setting up the base. Follow these instructions to get started:
- Create a Magic Ring: Begin by making a magic ring, which serves as the foundation for your basket. This technique allows you to start crocheting in the round without leaving a gap in the center.
- Work the First Round: Crochet a set number of stitches into the magic ring. For this pattern, we suggest starting with 6 single crochets (sc) into the ring. Pull the tail of the yarn to close the ring, and continue working in the round.
- Increase Stitches: To form the base of the basket, you’ll need to increase the number of stitches in each round. Follow the pattern’s instructions for increasing stitches evenly to maintain a flat, circular base.
- Check Your Work: Periodically measure the diameter of your base to ensure it’s growing evenly. Adjust your increases if necessary to maintain the correct shape.
- Secure the Base: Once you’ve reached the desired size for the base, secure your work by joining the last stitch of the round with a slip stitch (sl st) to the first stitch.
- Move to the Sides: After securing the base, begin working on the sides of the basket. The pattern will guide you through transitioning from the base to the sides with the correct stitch pattern.
By following these steps, you’ll have a solid foundation for your basket. Let’s move on to the next section to shape and finish your simple basket.
3. Shaping and Designing
Once you’ve established the base, it’s time to shape and design your simple basket. This part of the process allows you to add personal touches and define the basket’s appearance:
- Add Rounds: Continue crocheting in rounds to build up the sides of the basket. The pattern will specify the number of rounds needed to achieve the desired height.
- Incorporate Stitch Patterns: To enhance the design, consider incorporating different stitch patterns such as half double crochet (hdc) or double crochet (dc). These stitches add texture and visual interest.
- Check Dimensions: Regularly measure the height and width of your basket as you work. Adjust your stitch pattern or add more rounds if needed to achieve the perfect shape.
- Create Handles: If your pattern includes handles, follow the instructions to create and attach them securely. Handles can be crocheted directly onto the basket or added separately and sewn on.
- Add Decorative Elements: Customize your basket with decorative elements such as bows, buttons, or appliques. These details can enhance the basket’s appearance and make it uniquely yours.
- Finishing Touches: Finally, weave in any loose yarn ends using a yarn needle. Ensure all ends are securely fastened to prevent unraveling.
With these steps, you’ll have a beautifully shaped and designed basket. Let’s move on to the final touches and care instructions for your simple basket.
4. Finishing and Care
To complete your simple basket and ensure its longevity, follow these finishing and care tips:
- Block the Basket: Blocking helps shape your basket and smooth out any uneven areas. Use a damp cloth to gently shape the basket and allow it to dry completely.
- Clean Your Basket: Depending on the yarn you used, your basket may be machine washable or require hand washing. Check the yarn label for care instructions and clean the basket accordingly.
- Store Properly: Store your basket in a cool, dry place to maintain its shape and prevent any damage. Avoid exposure to direct sunlight or moisture.
- Repair Any Issues: If you notice any loose stitches or wear over time, make necessary repairs using a yarn needle and matching yarn. This will help extend the life of your basket.
- Repurpose: If you ever want a new look, consider repurposing the basket for different uses. It can serve as a storage container, gift basket, or decorative piece.
- Enjoy Your Creation: Lastly, enjoy the satisfaction of having created your own handmade basket. Whether it’s for practical use or decoration, your basket will be a cherished item.
With these final steps, you’ve completed your simple basket project. We hope you found this guide helpful and enjoyable!
FAQ
1. Can I use a different type of yarn for this pattern?
Yes, you can use different types of yarn for this pattern. Just ensure the yarn is of similar weight and texture to achieve the best results. Adjust your hook size accordingly if you use a different yarn.
2. How do I adjust the size of my basket?
To adjust the size, modify the number of stitches and rounds according to the pattern instructions. For a larger basket, increase the base size and add more rounds for the sides.
3. Can I add a lining to my basket?
Yes, adding a fabric lining can enhance the appearance and functionality of your basket. Simply sew or glue the fabric to the inside of the basket, making sure it fits well.
4. What if my basket is uneven or wobbly?
If your basket is uneven, check for errors in stitch counts or increases. Block the basket to help even out the shape. If it’s wobbly, reinforce the sides by adding more rounds or adjusting the stitch pattern.
5. How can I make my basket more durable?
Using a sturdy yarn and reinforcing the base and sides will improve durability. You can also consider adding a stiffening agent or lining for additional support.
6. Can I make this basket with a different stitch pattern?
Absolutely! Feel free to experiment with different stitch patterns to create a unique look. Just ensure the pattern is compatible with the basket’s shape and structure.
Join our VIP broadcast list and gain access to exclusive patterns, all for free. As a VIP member, you’ll receive the best patterns daily, delivered directly to your device. ✨📱 It’s a unique opportunity to stay up-to-date with the latest trends and designs, curated just for you. Don’t miss out on enhancing your projects and discovering new inspirations with the best patterns every day! 🎨🔝
Conclusion
In this Simple Basket – Free Pattern: A Complete Guide, we’ve covered everything from materials and tools to finishing touches. You now have a comprehensive understanding of how to create a beautiful and functional basket from scratch.
We hope this guide has inspired you to try your hand at basket-making and add a personal touch to your home decor. If you have any feedback or suggestions, please leave a comment below. We’d love to hear about your experiences and any modifications you made to the pattern. Happy crafting!

