If you’re looking for a cheerful and colorful accessory to brighten up your wardrobe, this Rainbow Crochet Bag Pattern is exactly what you need. From beginners to experienced crafters, this project offers creativity, versatility, and a touch of whimsy that makes it a favorite among crochet lovers. The vibrant blend of colors brings joy and positivity, and the bag’s functionality makes it the perfect item to carry your essentials in style.
Creating your own Rainbow Crochet Bag isn’t just a fun way to spend an afternoon — it’s a great opportunity to improve your skills, express your personality, and make something both beautiful and practical. Whether you’re planning to use it as a market bag, beach tote, or everyday purse, this crochet pattern offers endless possibilities. With the right yarn and hook, you can turn simple stitches into a vibrant, eye-catching accessory.
In this guide, we’ll walk you through everything you need to know to create your own Rainbow Crochet Bag from scratch. We’ll cover the materials needed, recommended techniques, customization ideas, and helpful tips to make your project a success. By the end, you’ll be ready to show off your handcrafted rainbow masterpiece.
Choosing the Right Yarn and Tools
When starting your Rainbow Crochet Bag, selecting the right yarn and hook is crucial. A worsted weight cotton yarn is often recommended for bags, as it provides durability, structure, and vibrant color payoff. Cotton also holds its shape well and is easy to wash, making it ideal for daily use.
A standard 4.5 mm to 5.5 mm crochet hook usually works well with this type of yarn. Always check the label of your chosen yarn for the recommended hook size and adjust accordingly if your tension tends to be tight or loose. Using the correct hook size helps achieve even stitches and a sturdy finish.
Color choice plays a huge role in the look of your Rainbow Crochet Bag. You can follow the traditional rainbow color order or experiment with pastels, neons, or even ombré transitions. Arrange your colors ahead of time to plan a pleasing progression that reflects your style.
You’ll also need some basic crochet tools: a yarn needle for weaving in ends, scissors for trimming, and stitch markers if your pattern is worked in the round. Having a tape measure nearby helps ensure consistent sizing across your bag.
If you plan to line your bag or add a zipper or button closure, consider preparing these materials ahead of time. This way, you can incorporate them smoothly into your project without interrupting the creative flow.
With your materials ready and color palette chosen, you’re set to begin your Rainbow Crochet Bag journey. Take your time with the setup — the foundation of any great project begins with thoughtful preparation.
Step-by-Step Pattern Overview
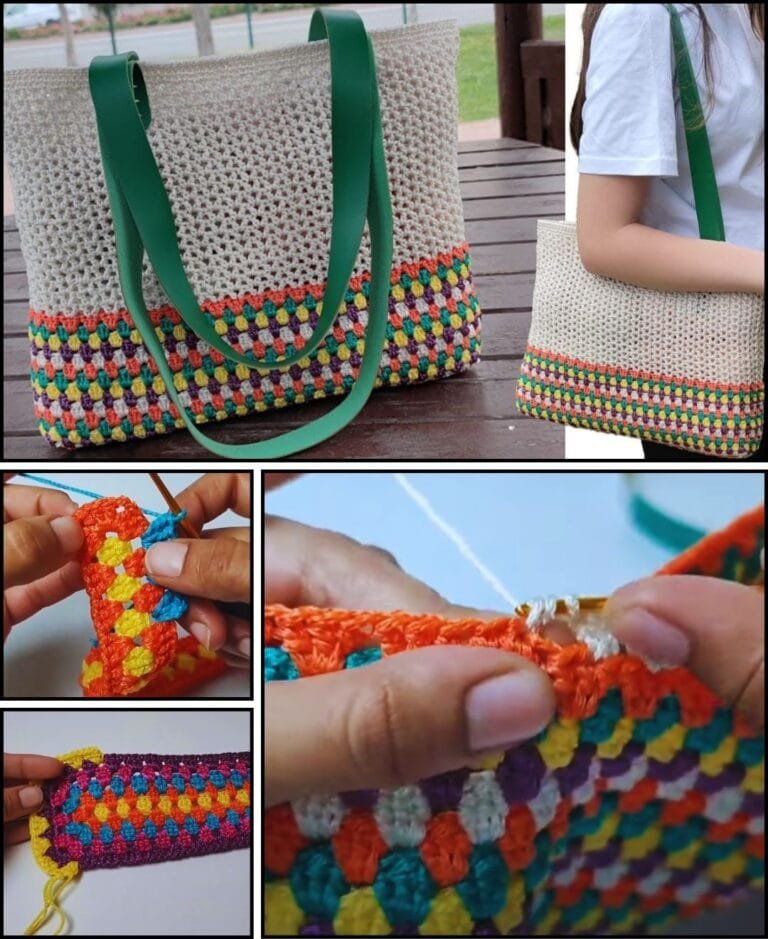
Most Rainbow Crochet Bag Patterns begin with a simple base, often a rectangle or oval made with single or half-double crochet stitches. These stitches provide structure and durability to support the bag’s contents.
Once the base is complete, you’ll typically work in the round to build the sides. This is where the fun begins — color changes! To create the rainbow effect, alternate yarn colors every few rows. Be sure to carry your yarn neatly on the inside or cut and weave in ends for a cleaner finish.
For beginners, using color-changing yarn can simplify this step while still delivering that rainbow look. These yarns automatically transition between colors as you work, creating smooth gradients with minimal effort.
Handles are another key element. You can crochet simple straps directly into the body of the bag or make separate handles to attach later. Reinforce them with extra rows or lining if you plan to carry heavier items.
Adding decorative elements such as tassels, pom-poms, or embroidered patches can personalize your bag even further. These touches make your Rainbow Crochet Bag truly one-of-a-kind and reflect your unique flair.
Once your bag is assembled, give it a gentle steam or block to set the shape. This final step helps smooth out uneven stitches and enhances the overall appearance of your colorful creation.
Customization Ideas and Design Variations
A great aspect of the Rainbow Crochet Bag Pattern is its adaptability. You can tailor the size to fit your needs — make a mini version for a child or a roomy tote for errands. Simply adjust the base dimensions and number of rows.
For a boho vibe, consider using a mesh stitch pattern for a breathable, lightweight bag. This design is perfect for beach days or farmer’s markets, and it works beautifully with rainbow yarns.
If you prefer a structured look, add a lining to the interior. Choose a bold or complementary fabric that enhances the rainbow aesthetic. This not only strengthens the bag but also adds a professional touch.
Want extra functionality? Add interior pockets for keys, phones, or makeup. Use coordinating fabric and stitch them into the lining before sewing it into the bag.
Experimenting with textures can also elevate your Rainbow Crochet Bag. Try bobble stitches, popcorns, or surface slip stitches to add dimension. These techniques bring interest to solid-colored sections or borders.
Lastly, play with shapes — transform your pattern into a crossbody, bucket, or even a backpack. The rainbow theme fits all forms and brings life to any design you choose to explore.
Tips for Success and Common Mistakes to Avoid
To get the best results with your Rainbow Crochet Bag Pattern, practice tension control. Uneven tension can distort the shape, especially when switching colors. Make a swatch before starting the full bag to check gauge and adjust your technique if needed.
Avoid tying knots when changing yarn colors — instead, use invisible joins or simply crochet over the ends to secure them neatly. This keeps your work looking clean and professional.
Count your stitches regularly, especially when working in the round. Missing or adding a stitch can skew the shape and size of your bag. Use stitch markers to help stay on track with row beginnings and pattern repeats.
Wash and block your finished bag, especially if it’s your first time working with the yarn. This can reveal any areas that need reinforcement and helps the final product hold its shape over time.
Don’t be afraid to undo and redo a section if something looks off. Crocheting is a forgiving craft, and a little patience goes a long way. The satisfaction of a well-made Rainbow Crochet Bag is worth the extra effort.
Most importantly, enjoy the process. Each stitch is part of your creative journey. Whether you’re making it for yourself, a friend, or even to sell, the joy and color you put into this project will shine through.
FAQ About Rainbow Crochet Bags
What yarn is best for a Rainbow Crochet Bag?
Cotton yarn is ideal due to its durability, shape retention, and bright color availability. Worsted weight cotton works especially well for bags that need structure.
Can beginners make a Rainbow Crochet Bag?
Absolutely! This project is great for beginners, especially if the pattern uses basic stitches like single and half-double crochet. Focus on neat tension and color changes to achieve the best results.
How many colors do I need for a rainbow effect?
Traditional rainbows use 7 colors (red, orange, yellow, green, blue, indigo, violet), but you can simplify with 4-6 shades or go wild with as many as you like. The key is creating a smooth, pleasing transition.
How do I change colors cleanly in crochet?
To change colors neatly, finish the last yarn-over of a stitch with the new color. Crochet over the ends or weave them in with a needle later for a tidy appearance.
Should I line my Rainbow Crochet Bag?
Lining is optional but recommended for structure and durability, especially if the stitch pattern has gaps or if you plan to carry small items that might slip through.
Can I machine wash a crochet bag?
If you used cotton yarn, most Rainbow Crochet Bags can be machine washed on a gentle cycle. Handwashing and laying flat to dry is always safest to preserve shape and color.
Conclusion
The Rainbow Crochet Bag Pattern is more than just a craft — it’s a joyful expression of color, creativity, and practicality. From selecting your yarn to adding personal design touches, each step of this project is a chance to showcase your unique style and skill. Whether you’re a beginner or a seasoned crocheter, creating your own rainbow bag is a fun, fulfilling experience.
We hope this guide inspired you to pick up your hook and dive into a colorful project. If you enjoyed this tutorial, please leave your honest feedback and share any suggestions or ideas you have for future articles. We love hearing from fellow crafters and continue growing with your input!

