If you’re looking to add a touch of elegance to your home decor, this Pretty Pinwheel Doily: A Free Crochet Pattern is the perfect project! With its intricate design and beautiful structure, this pattern is sure to impress anyone who sees it.
Doilies have long been a symbol of delicate craftsmanship, and they’re an excellent way to practice more intricate stitches while creating something truly beautiful. Whether you’re a beginner or an experienced crocheter, this Pretty Pinwheel Doily: A Free Crochet Pattern is a rewarding project to try.
Doilies have made a comeback in modern home decor, often used as table accents, framed wall art, or even repurposed into larger projects like blankets or shawls. With this Pretty Pinwheel Doily, you can create a timeless piece that adds a vintage flair to any room. The best part? It doesn’t take too much time or material to create, making it an ideal choice for a weekend crochet project.
In this Pretty Pinwheel Doily: A Free Crochet Pattern guide, we’ll walk you through the materials needed, the step-by-step instructions, and offer tips on how to personalize your doily to match your decor. Let’s dive into this elegant and enjoyable crochet project!
1. Materials You’ll Need for the Pretty Pinwheel Doily
Before starting your Pretty Pinwheel Doily, it’s important to gather all the necessary materials. Having the right tools and yarn ensures that your project will turn out beautifully and that you’ll enjoy the crochet process. Here’s what you’ll need:
- Yarn or Crochet Thread: For a delicate and detailed doily, crochet thread size 10 is ideal. You can choose from a wide variety of colors depending on your style, but white or cream are classic choices for a timeless look.
- Crochet Hook: A steel crochet hook in size 1.75 mm or 1.5 mm is commonly used with crochet thread size 10. This small hook size is perfect for creating the intricate stitches required for doilies.
- Scissors: A pair of sharp scissors will come in handy for trimming excess yarn or thread as you work through the project.
- Tapestry Needle: You’ll need a tapestry needle to weave in the ends of your thread once you’ve completed your doily.
- Blocking Materials: Blocking your doily will help give it a polished and professional finish. You can use pins and a foam board or towel to shape your doily while it dries after being lightly misted with water.
Having these materials ready before you start will ensure that your crochet process is smooth, and you’ll end up with a beautiful Pretty Pinwheel Doily that you can proudly display in your home.
2. Step-by-Step Instructions for the Pretty Pinwheel Doily
Now that you have all your materials, it’s time to begin crocheting your Pretty Pinwheel Doily. Follow these simple steps to create a lovely pinwheel pattern that will look stunning in any setting.
- Start with a Magic Circle: Begin by creating a magic circle. This will form the center of your doily. Work a series of double crochets into the circle to establish the foundation.
- Work in Rounds: For doilies, you’ll be working in rounds instead of rows. Continue building on the foundation by adding rounds of double crochets, chains, and slip stitches. This creates the circular shape of the doily.
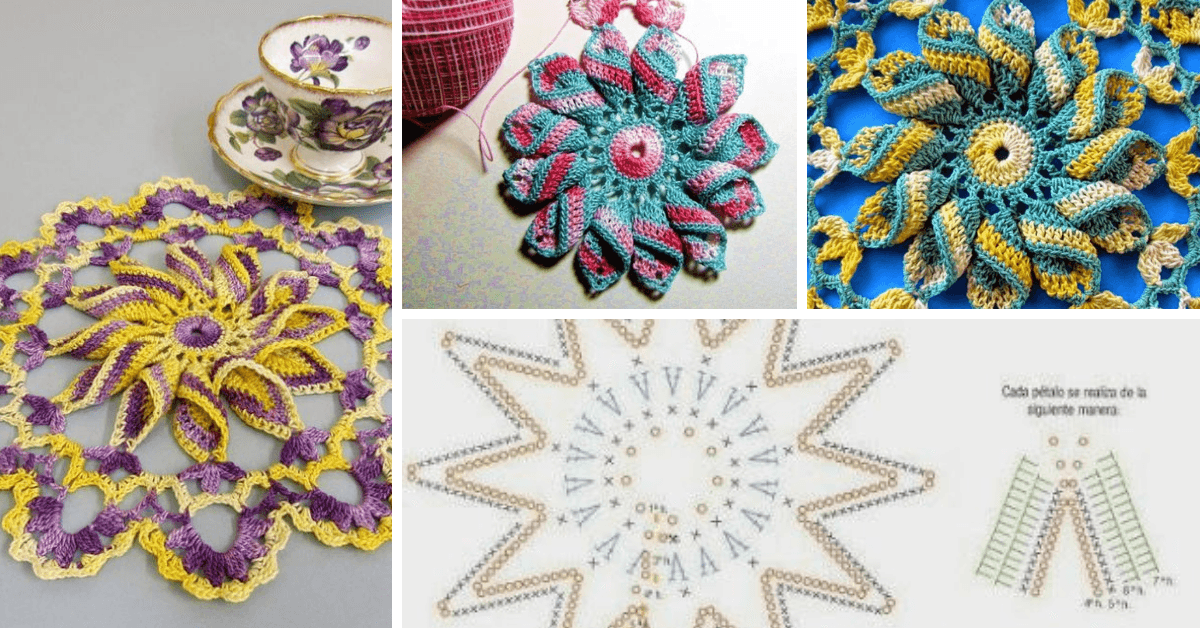
- Form the Pinwheel Pattern: To create the characteristic pinwheel design, alternate between sections of open and closed stitches. Use chain spaces and double crochets to form the delicate lace-like structure of the pinwheel.
- Increase Stitches in Each Round: As you work outward, be sure to increase the number of stitches in each round. This will prevent your doily from curling and ensure it lays flat.
- Add Decorative Edging: Once you’ve completed the body of the doily, finish off with a decorative edge. You can add picots, shells, or a simple scalloped edge to give your doily a polished look.
- Block Your Doily: After completing your doily, lightly mist it with water and pin it to a foam board or towel. Let it dry completely. Blocking helps to define the stitches and shape the doily.
By following these steps, you’ll have a stunning Pretty Pinwheel Doily that is ready to be used as a centerpiece, framed, or gifted to a loved one.
3. Customizing Your Pretty Pinwheel Doily
One of the best parts of working on the Pretty Pinwheel Doily: A Free Crochet Pattern is the opportunity to customize it. Here are some ideas to make your doily uniquely yours:
- Experiment with Colors: While traditional doilies are often white or cream, don’t be afraid to use color! Soft pastels, bold jewel tones, or even variegated threads can bring a modern twist to a classic pattern.
- Change the Size: If you want a larger or smaller doily, adjust the number of rounds you crochet. You can also experiment with thicker or thinner crochet threads or yarns to change the size and texture of your doily.
- Add Beads or Embellishments: To make your doily stand out, consider adding small beads to the thread as you crochet. This adds a touch of sparkle and sophistication to your finished piece.
- Use Different Edging Techniques: The edging of your doily is where you can really let your creativity shine. Instead of a simple scallop, try adding a picot edge or a more elaborate shell pattern.
- Mix and Match Stitch Patterns: While the pinwheel design is central to this pattern, you can incorporate other lace stitches or motifs into your rounds to create a unique pattern.
- Frame Your Doily: If you’re looking for a creative way to display your doily, consider framing it. This can turn your crochet piece into a piece of art that can be hung on the wall and admired by all who see it.
By personalizing your Pretty Pinwheel Doily, you can create a one-of-a-kind piece that reflects your own style and creativity.
4. Tips for Crocheting Intricate Doily Patterns
Working on detailed doily patterns like the Pretty Pinwheel Doily requires patience and attention to detail. Here are some tips to help you succeed with intricate crochet patterns:
- Read the Pattern Thoroughly: Before starting, make sure you understand the entire pattern. This will help you avoid mistakes and ensure that you don’t miss any important steps.
- Use a Stitch Marker: Since doilies are worked in the round, it can be helpful to use a stitch marker to keep track of where each round begins. This prevents you from accidentally losing your place.
- Take Your Time: Crocheting a doily is a slow and steady process. Rushing can lead to mistakes, so it’s best to take your time and enjoy the process.
- Check Your Gauge: While gauge isn’t as crucial for a decorative piece like a doily, checking your gauge can ensure that your stitches are consistent and even.
- Block Your Finished Doily: Blocking is an important step for doilies because it helps open up the lace pattern and ensures that your finished piece lies flat.
- Use Good Lighting: Intricate patterns require good visibility, especially when working with fine threads. Make sure you have plenty of light so you can see each stitch clearly.
By following these tips, you’ll be able to create a beautiful and intricate Pretty Pinwheel Doily with confidence and ease.
FAQ
Q1: How long does it take to crochet the Pretty Pinwheel Doily?
A: The time it takes to complete the doily depends on your crochet experience. On average, it may take a few hours to a couple of days to finish, depending on the complexity of the design and the size of the doily.
Q2: What type of thread is best for the Pretty Pinwheel Doily?
A: Crochet thread size 10 is typically used for doilies. It’s fine enough to create intricate details, but still sturdy enough to hold its shape.
Q3: Can I make the doily larger?
A: Yes! To make a larger doily, simply add more rounds to the pattern. You can also use a thicker yarn to create a bigger and more textured version of the doily.
Q4: How do I block my finished doily?
A: Blocking is essential for doilies to ensure they lay flat. After completing your doily, lightly mist it with water, pin it to a foam board or towel, and let it dry completely.
Q5: Is this pattern suitable for beginners?
A: This Pretty Pinwheel Doily is suitable for intermediate crocheters, as it involves working with fine thread and intricate stitches. However, determined beginners can also tackle this pattern with patience and practice.
Q6: Can I customize the colors in this pattern?
A: Absolutely! While white and cream are classic choices, you can use any color you like to match your home decor or personal style.
Join our VIP broadcast list and gain access to exclusive patterns, all for free. As a VIP member, you’ll receive the best patterns daily, delivered directly to your device. ✨📱 It’s a unique opportunity to stay up-to-date with the latest trends and designs, curated just for you. Don’t miss out on enhancing your projects and discovering new inspirations with the best patterns every day! 🎨🔝
Conclusion
The Pretty Pinwheel Doily: A Free Crochet Pattern is a wonderful way to challenge your crochet skills while creating a timeless and elegant piece. Whether you follow the pattern exactly or add your own personal touches, the end result will be a beautiful, handmade creation that you can be proud of. From gathering materials to finishing with a decorative edge, each step is simple yet rewarding.
We hope this guide has inspired you to try your hand at making a Pretty Pinwheel Doily. We’d love to hear about your experience with the pattern and any suggestions you have for future projects. Please share your thoughts in the comments below! Happy crocheting!

