The Poinsettia FREE Crochet Pattern: Easy Holiday DIY is the perfect project to brighten up your home during the holiday season. Whether you’re a beginner or an experienced crocheter, this pattern will guide you in creating a beautiful and festive poinsettia flower that you can use for decorations, gifts, or accessories.
The poinsettia, a symbol of Christmas, adds a vibrant touch to any occasion, and crocheting your own allows you to create something unique and personal.
Crochet patterns like the Poinsettia FREE Crochet Pattern: Easy Holiday DIY are wonderful for crafting gifts or festive decorations. The beauty of this design lies not only in its simplicity but also in the endless possibilities for customization.
You can adjust the colors to suit your home decor, make it in various sizes, or even incorporate it into wreaths, garlands, or table centerpieces. This project brings the charm of the holiday season right to your fingertips.
In this tutorial, we’ll walk you through each step needed to complete your own crocheted poinsettia flower.
You’ll find all the essential instructions, tips for beginners, and ways to make your project uniquely yours. So gather your supplies, and let’s dive into this easy holiday DIY that will make your festive season even more special.
1. Materials Needed for the Poinsettia Crochet Pattern
Before you start your Poinsettia FREE Crochet Pattern: Easy Holiday DIY, it’s important to gather all the materials you’ll need. Having everything ready will ensure that the process goes smoothly and efficiently. Here’s a list of essential materials:
- Yarn: Choose a red yarn for the petals to give the flower its classic poinsettia look. You can use a worsted-weight yarn for a solid structure. For the center, yellow or gold yarn will work perfectly.
- Crochet Hook: The recommended size is an H-8 (5.0mm) hook, but you can adjust based on the thickness of your yarn. Make sure your crochet hook is comfortable to hold and easy to maneuver.
- Scissors: A good pair of scissors will help you cut the yarn cleanly once you finish the project.
- Yarn Needle: You’ll need a yarn needle for weaving in the loose ends at the end of your project.
- Optional Embellishments: For a bit of extra flair, you can add beads, buttons, or glitter to the center of your poinsettia for a sparkling touch.
Once you have your materials ready, you’re set to start crocheting your poinsettia!
2. How to Crochet the Poinsettia Petals
Creating the poinsettia petals is the most crucial part of this project. The petals are the heart of the flower and give it its vibrant and elegant shape. Here’s how you can crochet each petal:
- Start with a Slip Knot: Begin by making a slip knot on your crochet hook to start the first petal.
- Chain Stitches: Create a chain of four stitches to form the base of your petal. Then, turn your work and make a half double crochet stitch into the second chain from the hook.
- Forming the Petal Shape: Continue to make half double crochets along the chain to shape the petal. As you move along, you will begin to see the petal take form.
- Shaping the Petal Tip: Once you’ve reached the end of the petal, create a few extra stitches to form a pointed tip. This adds a natural look to the petal and mirrors the shape of a real poinsettia.
- Repeat for Additional Petals: Crochet five petals in total to form the full flower. Each petal should have the same shape and size to create a balanced, symmetrical flower.
- Assembling the Petals: After completing all five petals, you’ll need to stitch them together at the base, ensuring they overlap slightly to create the flower’s full, blooming effect.
Now that your poinsettia petals are crocheted, it’s time to move on to the next part: making the flower’s center.
3. Creating the Poinsettia Center
The center of the poinsettia is essential for completing the look of your flower. This part will provide a beautiful contrast to the red petals, adding the final touch of elegance. Here’s how to crochet the center:
- Start with a Magic Ring: Begin by creating a magic ring with your yellow or gold yarn. This ring will form the base of the center.
- Single Crochet Stitches: Into the magic ring, crochet six single crochet stitches. Pull the ring tight to close it, and you’ll form a small circle in the center of your poinsettia.
- Adding Layers: To give your flower center a more textured look, crochet two more rounds of single crochet stitches, increasing the number of stitches in each round. This will make the center fuller and more visually appealing.
- Finishing the Center: Once you’ve created a small, rounded center, fasten off the yarn and leave a long tail for sewing the center to the petals. This is where your yarn needle will come in handy.
- Attaching the Center: Position the center in the middle of your crocheted petals, and sew it securely into place with the tail of your yarn. Make sure the center is centered evenly with all the petals.
- Weaving in the Ends: Finally, use your yarn needle to weave in any loose ends from the yarn to give your poinsettia a neat and finished appearance.
Now, your poinsettia flower is fully formed and ready to use in any holiday project!
4. Creative Ways to Use Your Poinsettia Flower
Once you’ve completed your Poinsettia FREE Crochet Pattern: Easy Holiday DIY, there are many creative ways you can use your beautiful flower to enhance your holiday décor or gift-giving. Here are a few ideas:
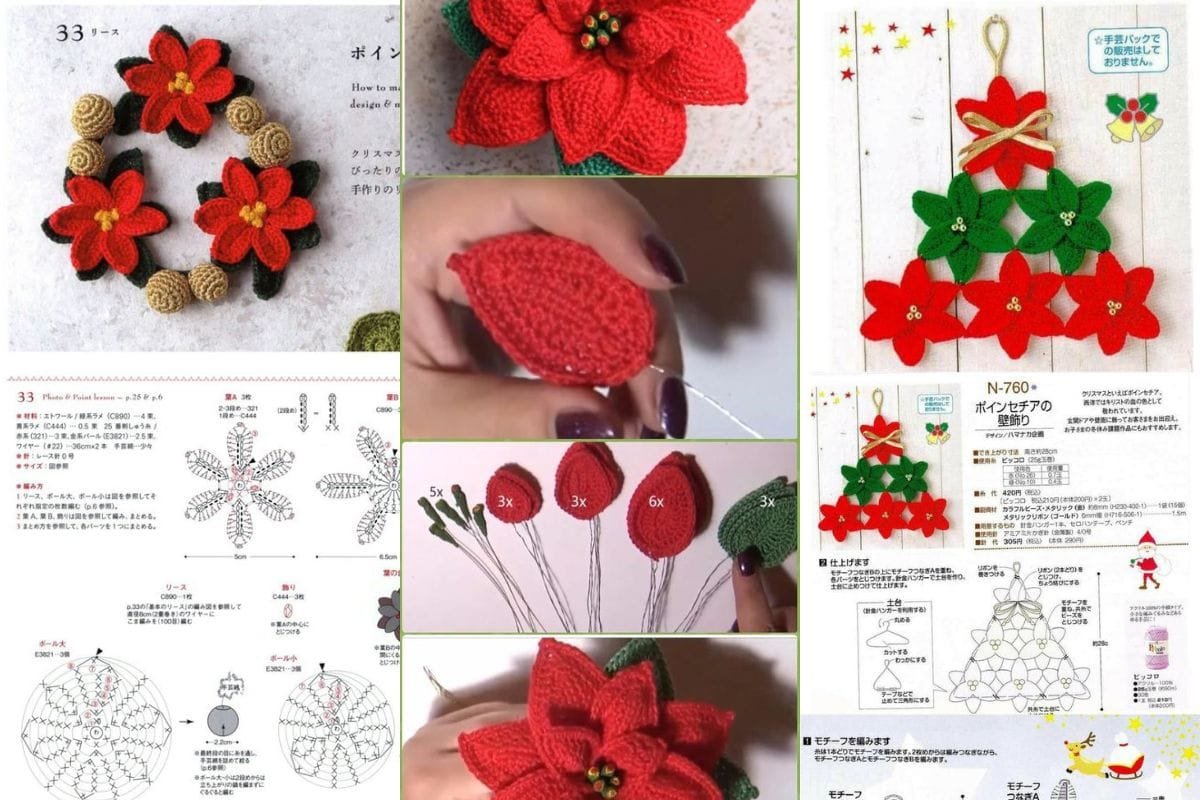
- Holiday Wreaths: Attach several crocheted poinsettia flowers to a wreath base to create a festive and personalized decoration for your front door.
- Christmas Tree Ornaments: Add a string or hook to the back of your poinsettia flower to turn it into a unique Christmas tree ornament. These flowers will add a handmade touch to your tree.
- Gift Embellishments: Use a crocheted poinsettia as a decorative embellishment for gift wrapping. Simply attach it to a gift box or bag for a special touch.
- Table Centerpieces: Create a beautiful table centerpiece by grouping several poinsettia flowers in a vase. The vibrant red petals will add a pop of color to your holiday table setting.
- Headbands or Hair Clips: For a fun holiday accessory, attach a crocheted poinsettia flower to a hair clip or headband. It makes a lovely addition to any festive outfit.
- Coasters or Pot Holders: Add some holiday cheer to your kitchen by turning your poinsettia flowers into coasters or pot holders. Simply crochet a few additional layers of petals to make them thicker and more durable.
These creative uses for your poinsettia crochet flower will make your holiday season extra special!
FAQ
Q1: How long does it take to complete the Poinsettia crochet flower?
It usually takes about 1-2 hours to complete the Poinsettia FREE Crochet Pattern: Easy Holiday DIY, depending on your skill level and experience with crochet.
Q2: Can I use different colors for the petals?
Yes! Feel free to experiment with different colors. You can make a poinsettia flower in any shade you prefer, although red, pink, or white are most commonly used for traditional Christmas designs.
Q3: Is this pattern suitable for beginners?
Yes, this pattern is beginner-friendly. The stitches used are basic, and the instructions are straightforward, making it a perfect project for new crocheters.
Q4: Can I crochet a larger poinsettia?
Absolutely! To create a larger poinsettia, simply increase the size of the yarn and crochet hook. You can also add more petals or make the center larger to suit your needs.
Q5: Can I make the poinsettia using other types of yarn?
While cotton yarn works great, you can use any yarn type you prefer. Keep in mind that the texture and look of the flower may change slightly depending on the yarn you use.
Q6: How do I attach the poinsettia to a project, like a wreath?
You can attach the poinsettia to a wreath or any other project by sewing it securely using the yarn needle or by gluing it in place, depending on the project.
Join our VIP broadcast list and gain access to exclusive patterns, all for free. As a VIP member, you’ll receive the best patterns daily, delivered directly to your device. ✨📱 It’s a unique opportunity to stay up-to-date with the latest trends and designs, curated just for you. Don’t miss out on enhancing your projects and discovering new inspirations with the best patterns every day! 🎨🔝
Conclusion
In this Poinsettia FREE Crochet Pattern: Easy Holiday DIY, you’ve learned how to create a beautiful and festive flower that’s perfect for the holiday season. Whether you use it for decorations, gifts, or accessories, the crocheted poinsettia adds a personal and vibrant touch to any holiday project.
We hope this tutorial has inspired you to create your own poinsettias, and we encourage you to share your thoughts and suggestions in the comments below. Happy crocheting, and may your holiday season be full of warmth and creativity!

