Are you ready to create something truly majestic? With Paksha the Peacock – Crochet Pattern, you can crochet a stunning and intricate peacock that is perfect for display or gifting.
This unique project will test your crochet skills, while also offering a fun and satisfying crafting experience. Whether you’re looking to challenge yourself or create a one-of-a-kind gift, Paksha the Peacock will capture the attention and admiration of anyone who sees it.
Paksha the Peacock – Crochet Pattern is a detailed guide that walks you through every step of creating this intricate design. From the elegant body to the beautifully textured feathers, this pattern allows you to replicate the natural beauty of a peacock with yarn.
The best part? You can choose your own color combinations to make your peacock as vibrant or subtle as you like.
In this blog, we will guide you through the materials needed, the process of crocheting the main body, how to add the signature feathers, and tips for customization. By the end, you’ll have your very own Paksha the Peacock, ready to grace your home or be gifted to someone special.
1. Materials for Paksha the Peacock
Before diving into the creation of Paksha the Peacock, it’s important to gather all the necessary materials. Having everything on hand will make the process smooth and enjoyable. Here’s what you’ll need to complete the Paksha the Peacock – Crochet Pattern.
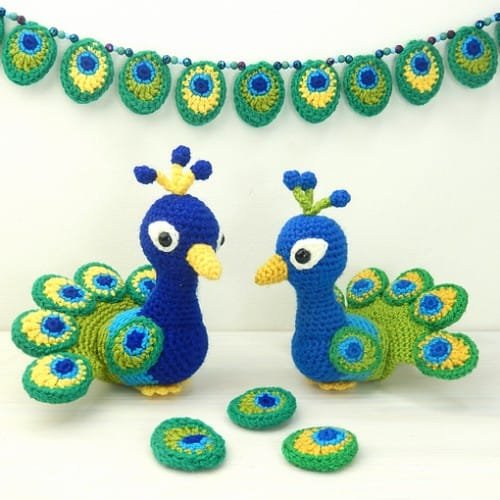
First, you will need a selection of yarn. The recommended yarn for this project is a lightweight cotton or acrylic yarn that holds its shape well. For the peacock body, a dark blue or teal yarn is ideal, while the feathers can be made in a combination of bright greens, blues, and golds to replicate the peacock’s natural iridescent colors. Choosing high-quality yarn will give your Paksha the Peacock a more polished and professional look.
Next, select the appropriate crochet hook. For this project, a 2.5mm to 3.5mm crochet hook works well, depending on the weight of the yarn you choose. It’s important to use a smaller hook than usual to ensure tight stitches that will help the peacock maintain its shape, especially when stuffing the body.
You’ll also need some basic tools like scissors and a yarn needle for sewing parts together and weaving in loose ends. Stitch markers will come in handy to keep track of rounds, especially when working on the body and feathers.
For the finishing touches, you’ll want to have some fiberfill stuffing to give Paksha the Peacock its shape. You’ll also need small safety eyes or black yarn to embroider the eyes for added personality.
Lastly, have some wire or pipe cleaners on hand for the feathers. Using wire can help give the peacock’s feathers more structure, allowing you to position them in a way that mimics real peacock feathers. This adds an extra touch of realism to your Paksha the Peacock.
2. Crocheting the Body of Paksha the Peacock
Once you’ve gathered all your materials, it’s time to start crocheting the body of Paksha the Peacock. The body is the foundation of the project, and creating it requires working in the round.
To begin, create a magic circle. The magic circle is a great technique for starting amigurumi projects, as it allows you to pull the circle tight and eliminate any gaps at the starting point. Once you have your magic circle, you’ll begin crocheting in the round to form the head of the peacock.
As you crochet the head, use single crochet stitches, and increase evenly in each round to create a smooth and rounded shape. After a few rounds, you’ll notice the head taking shape. Once the head is complete, you’ll continue working downwards to form the neck and body.
The body of Paksha the Peacock is slightly larger than the head, so you’ll need to gradually increase the number of stitches in each round. Follow the pattern carefully to maintain the correct proportions. It’s also important to stuff the head and neck as you go, ensuring the peacock stands upright once completed.
Once the body is complete, close off the round and fasten off your yarn. You now have the main structure of your peacock, but there’s still a lot more to bring Paksha the Peacock to life!
3. Creating the Signature Feathers
No Paksha the Peacock would be complete without its stunning feathers. This part of the Paksha the Peacock – Crochet Pattern is where you can get creative with colors and textures, replicating the beauty of a real peacock’s tail.
Start by crocheting the base feathers. These are the larger feathers that fan out from the peacock’s back. You’ll work each feather individually, starting with a magic circle and crocheting outward to form a teardrop shape. Once you have the basic shape, add decorative stitches along the edges to create the eye pattern found on real peacock feathers.
For an added touch of realism, you can use different yarn colors for each section of the feather. Try using a combination of blue, green, and gold to mimic the iridescence of real peacock feathers. Once each feather is complete, attach a wire or pipe cleaner to the back, allowing you to shape and position the feathers as you like.
After the base feathers are done, crochet smaller feathers to place between the larger ones. These will add fullness to the tail and help it stand out. You can also use yarn with metallic threads or sequins for extra sparkle, making the feathers look even more vibrant.
Once you’ve finished all the feathers, sew them onto the back of Paksha the Peacock. Be sure to arrange them evenly to create a fan-like effect. This step may take some time, but it’s worth the effort to make the peacock look regal and lifelike.
4. Final Touches and Customization
Now that the body and feathers are complete, it’s time to add the final touches to Paksha the Peacock. These small details will bring your peacock to life and make it truly unique.
Start by attaching the safety eyes or embroidering the eyes with black yarn. Place the eyes on either side of the head to give your peacock an expressive look. You can also use a small amount of white yarn to add highlights to the eyes, making them appear more lifelike.
Next, create the beak. The beak is a small triangle crocheted in yellow or orange yarn, which is then sewn onto the front of the face. You can make the beak as small or as large as you like, depending on your personal preference.
If you want to add more personality to Paksha the Peacock, consider adding some embellishments. You can crochet a small crown or head crest using gold or metallic yarn to give the peacock a royal touch. You can also add small beads or sequins to the feathers for extra flair.
For an elegant finishing touch, consider creating a base or stand for your peacock. You can crochet a small platform or use a piece of cardboard covered in fabric. This will allow you to display Paksha the Peacock upright, showing off its beautiful feathers.
Lastly, don’t forget to weave in any loose ends and secure all attachments. Take the time to check over your project and make sure everything is securely fastened. Now your Paksha the Peacock is complete and ready to be displayed!
FAQ
1. Is Paksha the Peacock – Crochet Pattern beginner-friendly?
While Paksha the Peacock may require some previous crochet experience, intermediate crocheters will find it manageable. Beginners can also give it a try, but they may need to take their time with the intricate details, like the feathers.
2. How long does it take to complete Paksha the Peacock?
This project can take anywhere from a few days to a week, depending on your crochet speed and the amount of detail you want to include in the feathers and embellishments.
3. Can I customize the colors of Paksha the Peacock?
Absolutely! Feel free to choose any color palette that inspires you. While the traditional peacock colors are blue, green, and gold, you can make your peacock in pastels, neutrals, or even bright rainbow hues.
4. What type of yarn works best for this project?
A lightweight cotton or acrylic yarn works best for Paksha the Peacock. These yarns hold their shape well and are easy to work with, especially for detailed projects like this.
5. How do I make the feathers more realistic?
To make the feathers more realistic, use a combination of wire or pipe cleaners for structure, and try using yarns with metallic threads or sequins to mimic the iridescence of real peacock feathers.
6. Can I sell the finished peacock made from this pattern?
Yes, you can sell the finished product made from this Paksha the Peacock – Crochet Pattern, as long as you credit the pattern designer and follow any licensing terms associated with the pattern.
Join our VIP broadcast list and gain access to exclusive patterns, all for free. As a VIP member, you’ll receive the best patterns daily, delivered directly to your device. ✨📱 It’s a unique opportunity to stay up-to-date with the latest trends and designs, curated just for you. Don’t miss out on enhancing your projects and discovering new inspirations with the best patterns every day! 🎨🔝
Conclusion
Paksha the Peacock – Crochet Pattern is a delightful and intricate project that allows you to create a truly unique piece. From its majestic body to the beautifully detailed feathers, this peacock is sure to impress. With the step-by-step instructions provided, you’ll be able to complete this project and add your own personal touches along the way.
We hope this tutorial has been helpful, and we’d love to hear from you! Share your experience in the comments below and let us know how your Paksha the Peacock turned out. We also welcome any suggestions or feedback you may have for future projects. Happy crocheting!

