Creating a mini crochet tree is one of the most delightful and rewarding crochet projects for both beginners and experienced crafters. In this Mini Crochet Tree Tutorial, you’ll learn how to make a charming decorative piece that can be used for holidays, gifts, or as part of your everyday home décor.
Crocheting a mini tree is not just about crafting; it’s about creativity, patience, and joy. Many crafters find this project relaxing and satisfying, as it combines small details with beautiful results.
The best part about making a mini crochet tree is how customizable it is. You can change the colors, the yarn type, and the decorations to create something that perfectly fits your personal style. Plus, it’s a great way to use leftover yarn from other projects.
Materials and Preparation for the Mini Crochet Tree Tutorial
Before starting this Mini Crochet Tree Tutorial, it’s essential to gather all the necessary materials. Preparation is key to ensuring that your final tree looks neat and professional. You don’t need expensive supplies; just a few basic crochet tools will help you achieve amazing results.
First, choose your yarn wisely. For a realistic mini crochet tree, green yarn is the classic choice, but you can also explore white for a snowy effect, or even metallic yarn for a festive look. Make sure to pick yarn that holds shape well, as your mini tree needs a bit of firmness to stand upright. Cotton or acrylic yarns are great options for this project because they are durable and easy to handle.
Next, select an appropriate crochet hook. The size of your hook will affect the final size and texture of your mini tree. Typically, a 2.5mm to 3.5mm hook works best for this Mini Crochet Tree Tutorial. A smaller hook creates tighter stitches, making your tree more structured and stable.
You will also need stuffing material if you want your mini crochet tree to be three-dimensional. Fiberfill is commonly used, but you can also use yarn scraps or cotton balls. In addition, prepare a yarn needle for sewing and weaving in ends, as well as scissors to trim any excess yarn neatly.
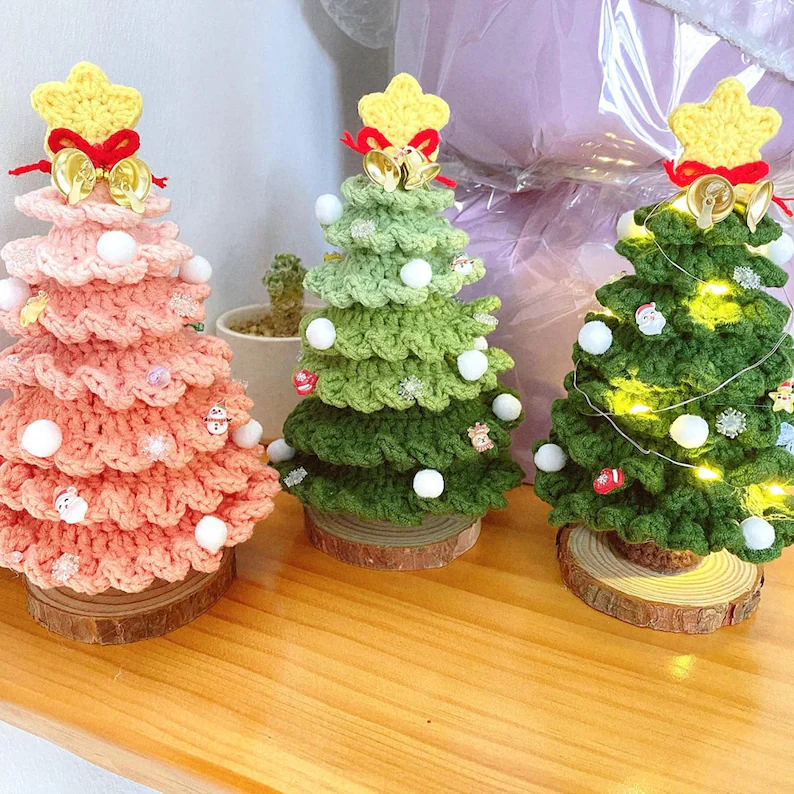
Finally, decide on optional decorations. Small beads, buttons, or tiny stars can add charm to your mini crochet tree. You can even crochet miniature ornaments or attach a golden thread at the top for a more festive touch. Remember, the magic lies in personalization, so feel free to make it uniquely yours.
Step-by-Step Instructions for Making a Mini Crochet Tree
Now that your materials are ready, let’s move into the main part of this Mini Crochet Tree Tutorial. The process is simple and beginner-friendly, yet the result looks wonderfully intricate. Follow these steps carefully, and you’ll have your own handmade mini tree in no time.
Start by making a magic ring. This is the foundation of your mini tree’s base. Crochet six single crochets into the ring, and then pull it tight. This will create the center of your tree. Continue working in rounds, increasing each round until the base reaches your desired width. The key to a stable mini crochet tree is keeping your stitches consistent and even.
Once the base is complete, begin shaping the body of the tree. To create the conical form, you’ll gradually decrease the number of stitches as you go up. Crochet a few rounds without increases, then start making decreases every few stitches. This gradual narrowing forms the iconic triangle shape of your mini tree.
As you reach the top, make sure to stuff the inside before closing it completely. This step helps your mini crochet tree maintain its shape and stand tall. You can lightly stuff it or keep it hollow, depending on your preference. For a firmer structure, stuff it more tightly.
After finishing the tree body, it’s time to crochet the base or trunk. Use brown yarn and make a small cylinder shape that fits perfectly under the tree. Attach it with your yarn needle, securing it neatly with invisible stitches. The contrast between green and brown gives a realistic tree appearance.
Finally, weave in all ends carefully and start decorating. You can sew on tiny beads, add a small crocheted star at the top, or even embroider small details. At this point, your Mini Crochet Tree Tutorial comes to life — the creativity and craftsmanship you put into it truly shine through.
Creative Decoration Ideas for Your Mini Crochet Tree
A mini crochet tree can be decorated in endless ways. The beauty of this Mini Crochet Tree Tutorial is that it gives you a solid base to personalize according to your style or the season. Here are some fun and creative decoration ideas to inspire you.
If you’re making a Christmas-themed tree, try using red, gold, and white yarn to crochet miniature ornaments. You can make small balls, stars, or candy canes to hang on the branches. Tiny ribbons or glitter thread can also make your tree sparkle beautifully under the lights.
For a more natural and rustic style, use earthy tones like beige, brown, and dark green. You could wrap a piece of jute twine around the base or add wooden buttons as decorations. This kind of mini crochet tree works perfectly as home décor all year round.
Another creative idea is to create a snowy version. Use soft white yarn or even yarn with metallic fibers to give it a frosty effect. You can also sprinkle a bit of glitter on the yarn before crocheting to make it shimmer like real snow. This style looks lovely on a winter-themed table display.
If you’re giving it as a gift, personalize it with a small tag or a crocheted heart attached to the top. Handmade gifts like a mini crochet tree carry a personal touch that store-bought items can’t replicate. It’s a heartfelt gesture that shows time, care, and love.
Lastly, consider turning your mini trees into ornaments for the Christmas tree or keychains. Simply attach a loop of yarn or ribbon at the top, and your cute creation becomes a portable piece of art. This Mini Crochet Tree Tutorial is versatile, letting you transform one simple pattern into many creative uses.
Tips and Tricks to Perfect Your Mini Crochet Tree
Even though a Mini Crochet Tree Tutorial is easy to follow, small tips can make a big difference in the final result. These tricks will help your work look neater, more professional, and more durable over time.
Always maintain consistent tension in your stitches. If your tension varies, your mini crochet tree might look uneven or wobbly. Practice controlling your yarn tension so that every stitch looks identical in size and shape.
When sewing pieces together, use the same color yarn as your project. This helps hide seams and gives a clean, polished finish. Invisible stitching techniques are especially useful in crochet projects that need a refined look.
Blocking your mini tree after finishing can improve its shape significantly. Lightly steam or pin it into the correct position and let it dry. This step helps your mini crochet tree stand straight and hold its intended form.
Keep experimenting with different yarns and textures. For example, fuzzy or glittery yarn can add a festive touch, while matte cotton creates a minimalist and modern appearance. Don’t be afraid to mix textures for creative effects.
FAQ – Mini Crochet Tree Tutorial
1. Is this Mini Crochet Tree Tutorial suitable for beginners?
Yes! This project is perfect for beginners. It uses simple stitches like single crochet and slip stitch, making it an excellent starting point for anyone new to crocheting.
2. What kind of yarn should I use?
You can use cotton or acrylic yarn for your mini crochet tree. Both are affordable, easy to work with, and hold shape well. Cotton gives a smoother finish, while acrylic is softer and fluffier.
3. How long does it take to make a mini crochet tree?
Depending on your speed, it can take between one and two hours to complete one mini tree. Once you get the hang of it, you’ll be able to make several in a single afternoon.
4. Can I wash my mini crochet tree?
Yes, but gently. Hand-wash it in cool water and let it air dry to maintain its shape and texture. Avoid machine washing to prevent stretching or unraveling.
Conclusion
This Mini Crochet Tree Tutorial has shown you everything you need to know to create a beautiful and personalized crochet decoration. From preparing materials and mastering basic stitches to adding creative details, each step brings you closer to crafting something truly special. Crocheting your own mini tree is a joyful experience that combines skill, creativity, and heart.

