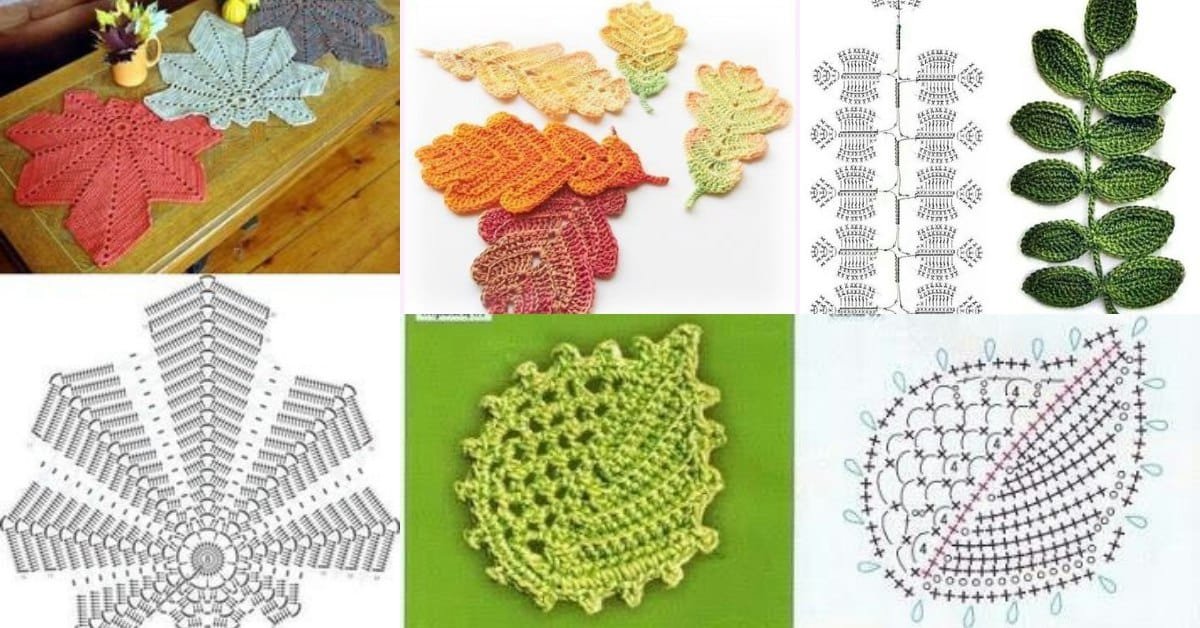
In this guide on how to make crochet leafs – free pattern, you’ll discover the joy of creating beautiful crochet leaves that can enhance your projects, from blankets and garments to home decor.
Crochet leaves are versatile and can be used in various ways, adding a touch of nature to your handmade items. This tutorial will take you through the process step by step, ensuring you feel confident in your crochet skills.
Crocheting leafs is not only a great way to practice your technique, but it’s also a fun and rewarding project for all skill levels.
Whether you’re a beginner looking to expand your repertoire or an experienced crocheter seeking a quick and delightful project, this tutorial will provide you with all the information you need.
You’ll learn about the materials required, the basic stitches involved, and some tips to make your crochet leaves look fantastic.
So, grab your crochet hook and yarn, and let’s dive into the world of crochet! This article is designed to guide you through the process of making beautiful crochet leaves, giving you a free pattern to follow along. You’ll soon find that making crochet leaves is a simple yet satisfying craft that can elevate your crochet projects.
1. Materials Needed for Crochet Leafs
Before we begin our tutorial on how to make crochet leafs – free pattern, it’s essential to gather the necessary materials. Having everything ready will help you work more efficiently and enjoy the process of creating.
- Yarn: Choose a medium-weight yarn (worsted weight) in the color of your choice. Green is the traditional color for leaves, but you can get creative with any shade that fits your project.
- Crochet Hook: A size H (5 mm) crochet hook is typically recommended for medium-weight yarn, but you can adjust the hook size based on your yarn choice and desired leaf size.
- Scissors: A sharp pair of scissors will be necessary for cutting your yarn after finishing your leaves.
- Tapestry Needle: You will need a tapestry needle for weaving in any loose ends after you finish crocheting your leaves.
- Measuring Tape: If you want to create leaves of specific sizes, a measuring tape will help you keep track of dimensions as you work.
- Stitch Markers: These can be helpful for keeping track of rounds or stitches, especially if you’re making multiple leaves at once.
Gathering these materials will ensure you are fully prepared to create beautiful crochet leaves that can be used in various projects.
2. Basic Crochet Stitches for Leaf Making
Before diving into the actual process of crocheting leafs, it’s important to familiarize yourself with the basic crochet stitches that will be used in this pattern. This will help you feel more confident as you follow along with the how to make crochet leafs – free pattern.
- Chain Stitch (ch): This is the foundation of most crochet projects. To create a chain stitch, yarn over and pull through the loop on your hook. Repeat for the desired length.
- Slip Stitch (sl st): Used to join rounds or move to a new stitch without adding height. Insert the hook into the stitch, yarn over, and pull through both the stitch and the loop on your hook.
- Single Crochet (sc): A fundamental stitch that adds texture to your work. Insert the hook into the stitch, yarn over, pull through, yarn over again, and pull through both loops on your hook.
- Half Double Crochet (hdc): This stitch is taller than a single crochet but shorter than a double crochet. Yarn over, insert the hook into the stitch, yarn over again, pull through, yarn over, and pull through all three loops on your hook.
- Double Crochet (dc): A popular stitch for creating height in your projects. Yarn over, insert the hook, yarn over again, pull through, yarn over, pull through the first two loops, yarn over again, and pull through the last two loops.
- Double Crochet Cluster (dc cl): This stitch creates a textured effect. Yarn over, insert the hook into the stitch, yarn over, pull through, yarn over, pull through the first two loops, yarn over again, and pull through the last two loops. Repeat twice in the same stitch, then yarn over and pull through all loops on the hook.
Understanding these stitches will give you the foundation needed to successfully follow the how to make crochet leafs – free pattern.
3. Step-by-Step Instructions for Crocheting Leafs
Now that you have your materials ready and are familiar with the basic crochet stitches, let’s get into the step-by-step instructions for crocheting your leaves. Follow these detailed steps to create your own beautiful crochet leafs.
- Step 1: Start with a Slip Knot: Begin by making a slip knot with your yarn and placing it on your hook. This will be your starting point for crocheting.
- Step 2: Create a Chain: Chain 10 stitches to form the foundation for your leaf. This will give you the length needed for the base of the leaf.
- Step 3: Make the Leaf Shape: In the second chain from the hook, work 1 single crochet. Then, in the next chain, work 1 half double crochet. In the next chain, make 3 double crochets, which will form the top point of your leaf.
- Step 4: Continue to Shape the Leaf: After the 3 double crochets, work 1 half double crochet in the next chain and 1 single crochet in the next chain. Finally, make 1 slip stitch in the last chain. This creates the left side of your leaf.
- Step 5: Work the Other Side: To create the other side of the leaf, chain 1, and work a slip stitch back down the same side of the chain. This helps mirror the left side of your leaf, giving it a symmetrical shape.
- Step 6: Finish Off: After completing the stitches, cut the yarn, leaving a long tail for weaving in. Pull the yarn through the last loop to secure your leaf.
Congratulations! You have successfully created your first crochet leaf. Repeat these steps to make as many leaves as you desire, varying the colors for a more vibrant look.
4. Tips and Tricks for Perfecting Your Crochet Leafs
Creating crochet leaves can be a delightful experience, but it can also come with challenges. Here are some tips and tricks to help you perfect your crochet leaf-making skills as you follow the how to make crochet leafs – free pattern.
- Practice Tension: Keep an eye on your tension as you crochet. Maintaining consistent tension will ensure that your leaves are uniform in size and shape.
- Use a Stitch Marker: If you’re working on multiple leaves or a larger project, using a stitch marker can help keep track of your stitches and rounds, preventing any confusion.
- Experiment with Sizes: Feel free to experiment with the number of chains or stitches to create leaves of different sizes. This adds variety to your projects.
- Mix and Match Colors: Don’t hesitate to combine different yarn colors for your leaves. This can create a more dynamic and visually appealing look, perfect for any project.
- Blocking: After finishing your leaves, consider blocking them to help them maintain their shape. This can be done by gently wetting them, shaping them to the desired form, and allowing them to dry.
- Incorporate Leaves into Projects: Think about how you can incorporate your crochet leaves into other projects. They make excellent embellishments for hats, scarves, blankets, or as decorative accents on home décor items.
By following these tips, you’ll elevate your crochet leaf-making skills and create stunning leaves for all your crochet projects.
FAQ
Q: What type of yarn should I use for crochet leaves?
A: It’s best to use medium-weight yarn (worsted weight) for crochet leaves. Cotton yarn works well, but you can use acrylic or wool depending on your preference and project needs.
Q: Can I crochet leaves in different sizes?
A: Yes! You can create leaves in various sizes by adjusting the number of chains or stitches in your pattern. Experimenting with different sizes can add interest to your projects.
Q: How do I attach the leaves to my project?
A: You can sew the leaves onto your project using a tapestry needle and yarn. Alternatively, you can use hot glue for quicker attachment, especially for decorative items.
Q: How do I keep my crochet leaves from curling?
A: To prevent curling, make sure you’re maintaining consistent tension while crocheting. Additionally, blocking your leaves after finishing can help them lie flat.
Q: Can I use crochet leaves for other projects besides decoration?
A: Absolutely! Crochet leaves can be used in a variety of projects, such as embellishments for clothing, accessories, or even as part of larger crochet patterns like wreaths or garlands.
Q: What is the best way to store my crochet leaves?
A: Store your crochet leaves flat in a dry place, away from direct sunlight. Consider using a plastic bag or box to protect them from dust and damage.
Join our VIP broadcast list and gain access to exclusive patterns, all for free. As a VIP member, you’ll receive the best patterns daily, delivered directly to your device. ✨📱 It’s a unique opportunity to stay up-to-date with the latest trends and designs, curated just for you. Don’t miss out on enhancing your projects and discovering new inspirations with the best patterns every day! 🎨🔝
Conclusion
In this tutorial on how to make crochet leafs – free pattern, you’ve learned the basics of creating beautiful crochet leaves, from gathering materials to the step-by-step process of crocheting. These leaves can be used in a multitude of projects, adding a touch of natural beauty to your work.
We hope you found this guide helpful and inspiring for your crochet journey. Please leave your honest opinions and suggestions in the comments below. Happy crocheting!

