How to make a Crochet Rose Flower 3D Pattern is one of the most searched topics among crochet lovers who want to create realistic and elegant floral designs.
Learning how to make a Crochet Rose Flower 3D Pattern allows you to transform simple yarn into a dimensional flower that looks intricate yet is surprisingly achievable with basic techniques.
Crochet flowers have long been admired for their versatility and charm. A Crochet Rose Flower 3D Pattern stands out because of its layered petals and natural shape.
Unlike flat appliqué flowers, a 3D rose adds depth and texture, making your handmade creations more visually appealing. With careful shaping and thoughtful color selection, you can produce a rose that looks delicate, elegant, and beautifully structured.
Another reason many crafters explore how to make a Crochet Rose Flower 3D Pattern is that it’s a manageable project for both beginners and experienced crocheters. The pattern typically uses basic stitches such as chain, single crochet, and double crochet. By following structured steps and focusing on petal layering, you can create a professional-looking rose in just a few hours. In this complete guide, you will learn about materials, step-by-step instructions, shaping tips, creative variations, and frequently asked questions.
Materials Needed for a Crochet Rose Flower 3D Pattern
Before starting how to make a Crochet Rose Flower 3D Pattern, gathering the right materials ensures a smooth crafting experience and a polished final result.
Choose medium-weight cotton or acrylic yarn. Cotton yarn holds its shape well and creates defined petals, while acrylic yarn offers softness and flexibility. Select your preferred rose color—classic red, soft pink, creamy white, or even bold blue for a modern touch.
A crochet hook that matches your yarn weight is essential. Most medium-weight yarns work well with a 3.5mm to 4.5mm hook. Using the correct hook size helps maintain even stitches and balanced petal structure.
You will also need scissors and a yarn needle for sewing and weaving in ends. Stitch markers are optional but helpful if working in rounds.
If you plan to attach the rose to other projects, keep a small amount of green yarn ready for leaves. Adding leaves enhances realism and dimension in your Crochet Rose Flower 3D Pattern.
Finally, ensure good lighting and a comfortable workspace. Since this pattern involves shaping and layering, visibility is important for neat finishing.
Step-by-Step Instructions on How to Make a Crochet Rose Flower 3D Pattern
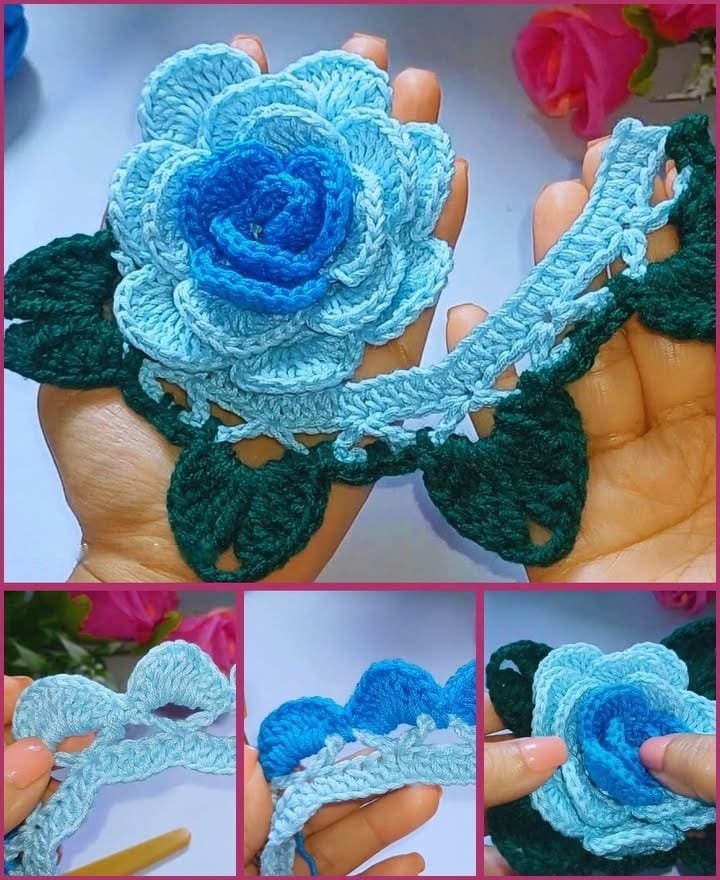
Understanding the construction process is essential when learning how to make a Crochet Rose Flower 3D Pattern. Most 3D roses are created by crocheting a long strip that is later rolled and shaped into petals.
Begin by chaining a foundation row. The length of your chain determines the size of your rose. A longer chain creates a fuller flower.
In the second row, work groups of double crochet stitches into each chain space to form petal-like clusters. These clusters create the curved edges that resemble rose petals.
Continue building additional rows with increasing stitch counts in each cluster. This creates larger outer petals, giving the rose its natural layered effect.
Once the strip is complete, fasten off and leave a long tail for sewing. Carefully roll the strip from one end, forming a spiral shape. The tight center represents the rosebud, while looser outer layers form open petals.
Use the yarn needle to stitch through the base of the rolled rose, securing all layers together. Adjust petal positioning as needed to achieve a balanced, symmetrical look.
Tips for a Realistic and Structured Crochet Rose Flower 3D Pattern
Small details can significantly enhance your results when mastering how to make a Crochet Rose Flower 3D Pattern.
Maintain consistent stitch tension throughout the project. Uneven tension can distort petal shapes and affect the overall symmetry of the flower.
When rolling the strip, start tightly at the center and gradually loosen as you move outward. This mimics the natural opening of real rose petals.
Secure the base firmly with multiple stitches. A well-secured base ensures durability, especially if attaching the rose to wearable items.
Lightly shape petals with your fingers after sewing. Gentle adjustments can enhance the dimensional look of the Crochet Rose Flower 3D Pattern.
If needed, lightly steam block the finished flower to refine petal curves. Avoid excessive heat, especially with acrylic yarn.
Add small green leaves beneath the flower for added realism and contrast.
Creative Variations of a Crochet Rose Flower 3D Pattern
Once you understand how to make a Crochet Rose Flower 3D Pattern, you can explore creative variations to personalize your design.
Experiment with different yarn colors to match specific themes or events. Blue roses offer a unique and modern aesthetic, while soft pastel shades create romantic charm.
Create miniature roses using thinner yarn and smaller hooks. These tiny flowers are perfect for delicate accessories or scrapbooking embellishments.
Combine multiple roses to create a crochet bouquet. Handmade bouquets make meaningful gifts and long-lasting decorative pieces.
Attach the rose to headbands, hats, bags, or pillow covers. This transforms simple items into stylish statement pieces.
Add subtle glitter yarn for special occasions. Metallic threads create elegant highlights without overwhelming the design.
You can also layer two different shades of yarn in one strip for a gradient petal effect.
FAQ About How to Make a Crochet Rose Flower 3D Pattern
Is this pattern suitable for beginners?
Yes, beginners familiar with basic stitches like chain and double crochet can complete this project successfully.
How long does it take to make one rose?
Most crocheters can finish a medium-sized rose in one to two hours.
What yarn works best?
Cotton yarn is ideal for structure, while acrylic yarn offers softness and flexibility.
Can I wash the finished rose?
Yes, gentle hand washing and air drying are recommended.
How do I attach the rose to other projects?
Use a yarn needle to stitch the base securely to your desired surface.
Can I sell finished crochet roses?
Yes, if using your own pattern or one that allows commercial use, you may sell completed flowers responsibly.
Conclusion
Learning how to make a Crochet Rose Flower 3D Pattern is a rewarding and creative journey. From crocheting layered petals to shaping and securing the spiral design, each step builds toward a realistic and elegant flower. With proper tension, thoughtful rolling, and secure stitching, your Crochet Rose Flower 3D Pattern can become a beautiful embellishment or standalone decorative piece.
This versatile design allows endless customization in color, size, and application. With practice, you can confidently create roses that enhance accessories, gifts, and home décor.
If you found this guide helpful, please share your honest opinion and suggestions. Your feedback encourages continued creativity and helps improve future crochet tutorials.
By continuing to practice how to make a Crochet Rose Flower 3D Pattern, you will gradually refine your technique and develop greater confidence in shaping dimensional crochet projects. Each flower you create becomes an opportunity to experiment with texture, layering, and color harmony. Over time, your roses will look even more natural and professionally crafted.
Remember that patience and consistency are key when mastering a Crochet Rose Flower 3D Pattern. Small adjustments in tension, rolling, and stitching can make a noticeable difference in the final appearance.
VIDEO TUTORIAL
Keep exploring new variations, trust your creativity, and enjoy the relaxing process that makes crochet such a rewarding and meaningful craft.

