How to make a Crochet Granny Square Bucket Hat Pattern is a question that has gained popularity among craft lovers who enjoy combining creativity, fashion, and handmade charm. This stylish accessory blends the timeless appeal of the granny square with the modern silhouette of a bucket hat, resulting in a unique and trendy piece.
The beauty of a Crochet Granny Square Bucket Hat Pattern lies in its versatility. You can experiment with colors, textures, and yarn types to create something that truly reflects your personality. From bold and vibrant tones to soft and neutral palettes, each hat becomes a one-of-a-kind creation.
In this guide on how to make a Crochet Granny Square Bucket Hat Pattern, you will learn step-by-step instructions, essential techniques, and helpful tips to ensure your project turns out beautifully. We’ll cover everything from choosing the right materials to assembling the squares and shaping the hat.
Understanding the Basics of a Crochet Granny Square Bucket Hat Pattern
Before diving into the process of how to make a Crochet Granny Square Bucket Hat Pattern, it’s important to understand what makes this design so special. A granny square is one of the most iconic crochet motifs, known for its simple structure and repetitive pattern. It typically consists of clusters of stitches worked in rounds, forming a square shape that can be easily joined with others.
Another key aspect is sizing. Since granny squares can vary depending on yarn weight and hook size, it’s important to measure your squares and adjust accordingly. This ensures that your hat fits comfortably without being too tight or too loose.
Yarn choice also plays a major role in the final result. Cotton yarn is often preferred for bucket hats because it provides structure and breathability, making it ideal for warmer weather. However, acrylic or blended yarns can also be used depending on your preference.
By mastering these basics, you’ll have a solid foundation for learning how to make a Crochet Granny Square Bucket Hat Pattern and customizing it to suit your style.
Materials and Tools You Need for the Pattern
To successfully learn how to make a Crochet Granny Square Bucket Hat Pattern, having the right materials and tools is essential. The good news is that this project doesn’t require anything too complicated, making it accessible for beginners.
First, you’ll need yarn. As mentioned earlier, cotton yarn is a popular choice because it holds its shape well. You can select multiple colors to create a vibrant patchwork design or stick to a monochromatic palette for a more minimalist look. Make sure your yarns are of similar weight to ensure consistency in your squares.
Next, you’ll need a crochet hook. The size of your hook should match the yarn you’ve chosen. Most yarn labels provide recommended hook sizes, which can serve as a helpful guide. Using the correct hook size will ensure that your stitches are even and your squares are uniform.
You’ll also need a yarn needle for weaving in ends and joining squares. This tool is essential for giving your hat a clean and professional finish. A pair of scissors is another must-have for cutting yarn neatly.
A measuring tape is useful for checking the size of your squares and the overall hat. This ensures that your finished product fits properly and looks well-proportioned.
By gathering these materials in advance, you’ll be fully prepared to start your journey in how to make a Crochet Granny Square Bucket Hat Pattern without interruptions.
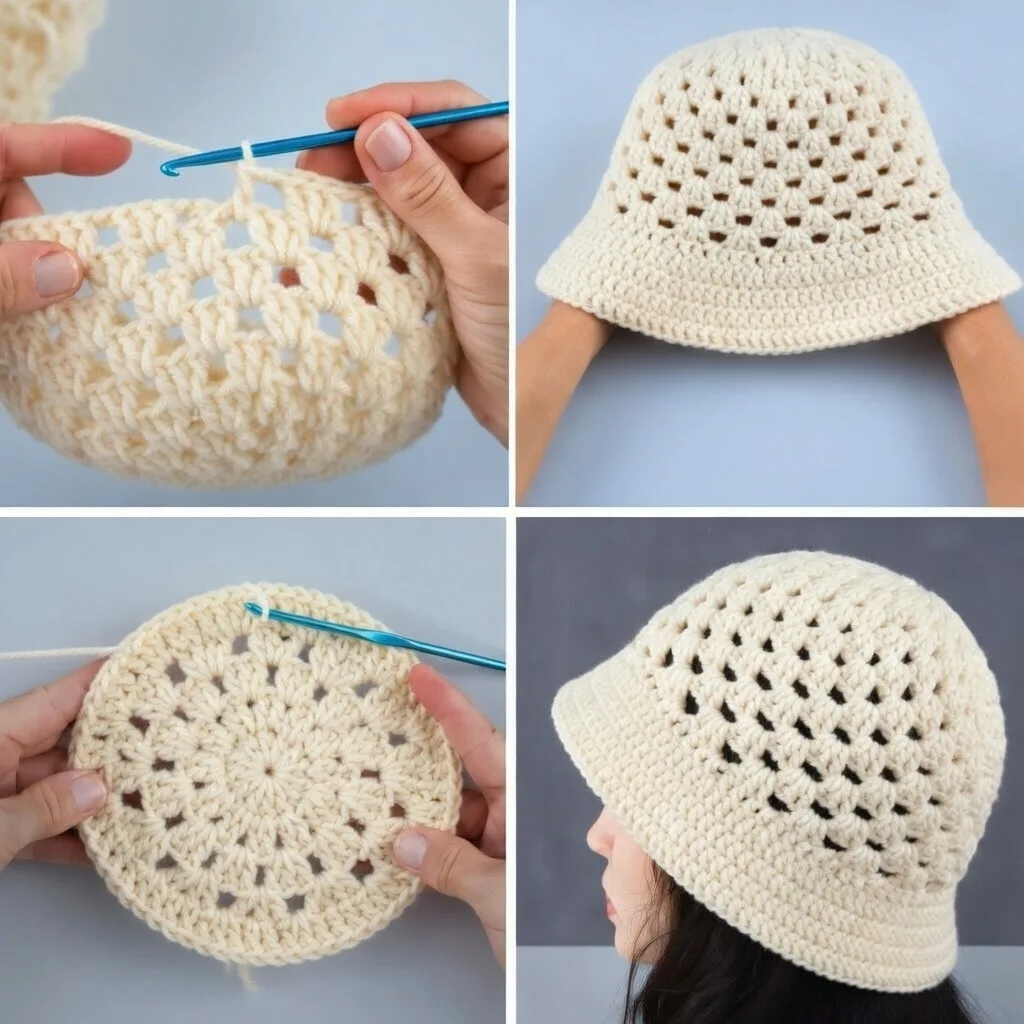
Step-by-Step Guide to Making the Hat
Now that you understand the basics and have your materials ready, let’s walk through how to make a Crochet Granny Square Bucket Hat Pattern step by step. This process is straightforward but requires patience and attention to detail.
Start by creating your granny squares. Typically, you’ll need around 5 to 7 squares depending on the size of your hat and the dimensions of each square. Begin with a magic ring or chain loop, then work clusters of double crochet stitches separated by chain spaces to form the square.
Once your squares are complete, it’s time to join them. Arrange the squares in a circular pattern to form the crown of the hat. Use a slip stitch or whip stitch method to connect them securely. Make sure the seams are neat and consistent.
After assembling the crown, you’ll move on to the sides of the hat. Attach your yarn to one of the edges and begin working in rounds using single or half-double crochet stitches. This will create the body of the bucket hat.
Continue working in rounds until the sides reach your desired length. Try the hat on as you go to ensure a comfortable fit. This step is crucial for achieving the correct depth.
Next, create the brim. Increase stitches gradually in each round to give the brim its characteristic flare. This part allows for creativity, as you can adjust the width and style of the brim to suit your preference.
Finally, finish off your hat by weaving in all loose ends and shaping it gently. At this stage, your Crochet Granny Square Bucket Hat Pattern is complete and ready to wear.
Tips for Customization and Perfect Results
When learning how to make a Crochet Granny Square Bucket Hat Pattern, adding your personal touch can make all the difference. Customization allows you to create a piece that truly reflects your style and stands out.
One of the easiest ways to customize your hat is through color selection. You can use a consistent color scheme for a cohesive look or mix contrasting colors for a bold statement. Gradient yarns can also create a beautiful visual effect without changing yarns frequently.
Experimenting with different stitch patterns can also enhance your design. While traditional granny squares use double crochet clusters, you can try variations such as puff stitches or textured stitches for added depth.
Adjusting the size of your squares is another way to personalize your hat. Larger squares will result in a bigger hat, while smaller squares create a more fitted look. This flexibility makes the pattern adaptable to different head sizes.
Blocking your granny squares before assembly can improve the overall appearance of your hat. This process helps even out stitches and ensures that all squares are the same size, resulting in a more polished finish.
By applying these tips, you’ll not only learn how to make a Crochet Granny Square Bucket Hat Pattern but also elevate your craftsmanship to a professional level.
FAQ – Frequently Asked Questions
1. Is a Crochet Granny Square Bucket Hat Pattern suitable for beginners?
Yes, this pattern is beginner-friendly. If you know basic crochet stitches like chain and double crochet, you can successfully complete this project.
2. How long does it take to make one hat?
The time varies depending on your skill level, but most people can complete a hat within a few hours to a couple of days.
3. What type of yarn is best for this project?
Cotton yarn is highly recommended for its structure and breathability, but acrylic yarn can also be used.
4. How many granny squares do I need?
Typically, you’ll need between 5 and 7 squares, depending on the size and design of your hat.
5. Can I wash my crochet bucket hat?
Yes, but it’s best to follow the care instructions for your yarn. Hand washing is usually recommended to maintain shape.
6. How do I make the hat larger or smaller?
You can adjust the size by changing the number of squares, using a different hook size, or modifying the number of rounds in the sides and brim.
7. Can I sell hats made from this pattern?
In most cases, yes. Handmade items are often sold, but avoid copying proprietary patterns if they are copyrighted.
Conclusion
Learning how to make a Crochet Granny Square Bucket Hat Pattern is a rewarding and enjoyable experience that combines creativity, practicality, and style. Throughout this article, you’ve discovered the fundamentals of granny squares, the materials needed, step-by-step instructions, and valuable tips to enhance your results. This project is perfect for anyone looking to explore crochet while creating a fashionable accessory.
By practicing the techniques outlined here, you can confidently design and customize your own bucket hats, making each piece unique. Whether you’re crafting for yourself, as a gift, or even for sale, this pattern offers endless possibilities.
VIDEO TUTORIAL
If you found this guide helpful, consider sharing your thoughts and experiences. Your honest opinion and suggestions are always welcome and can help improve future content.

