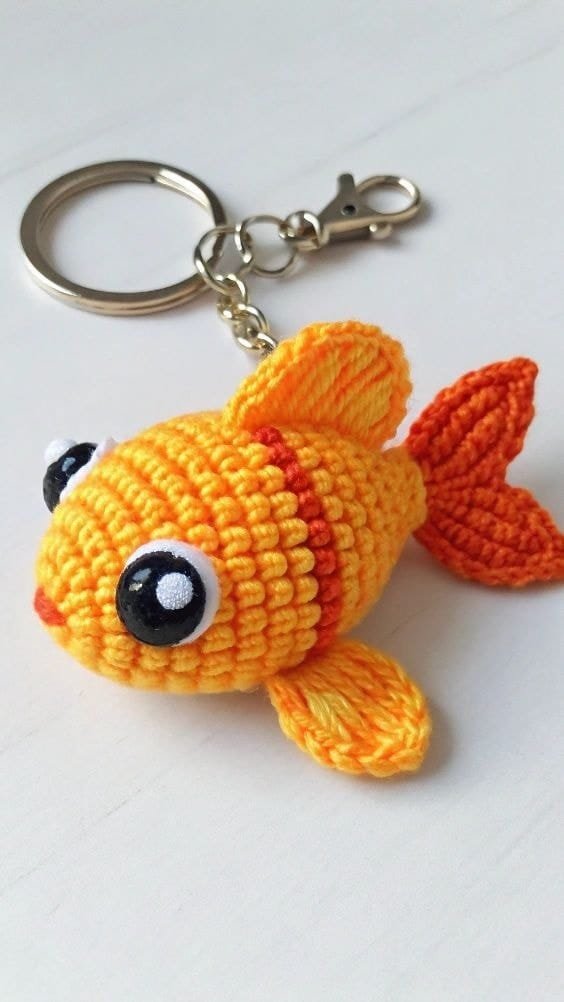
How to Make a Crochet Fish Keychain Pattern is a fun and beginner-friendly project that combines creativity with practicality. Learning how to make a Crochet Fish Keychain Pattern allows you to create a small, lightweight accessory that can be attached to keys, backpacks, purses, or gift packaging.
This charming amigurumi-style project is perfect for using leftover yarn and practicing shaping techniques on a miniature scale. With just a few basic stitches and simple assembly steps, you can craft a colorful fish keychain that is both decorative and durable.
One of the best reasons to explore how to make a Crochet Fish Keychain Pattern is its versatility. You can customize the fish with different colors, stripes, or embroidered details to create unique variations. Whether you prefer a bright tropical design or a soft pastel look, this project adapts easily to your style.
Because the pattern is small, it works up quickly, making it ideal for handmade gifts, craft fairs, or personal accessories. The compact size also makes it a great travel project that fits neatly into your crochet bag.
Another benefit of this project is skill development. Even though the fish keychain is small, it introduces important amigurumi techniques such as working in continuous rounds, shaping with increases and decreases, and secure assembly. By mastering these steps on a small piece, you build confidence for larger crochet toys and decorative projects. Now let’s walk through the materials, construction steps, and finishing touches to complete your crochet fish keychain successfully.
Materials and Yarn Selection
Choosing the right materials is essential when learning how to make a Crochet Fish Keychain Pattern. Since the keychain will be handled frequently, select a durable yarn such as cotton or high-quality acrylic. Lightweight yarn (sport or DK weight) works best for small amigurumi pieces, keeping the keychain compact and firm.
A crochet hook between 2.5 mm and 3.5 mm is typically recommended, depending on your yarn choice. Using a slightly smaller hook than usual helps create tight stitches, preventing stuffing from showing through. You will also need fiberfill stuffing, a yarn needle, scissors, a stitch marker, and a metal keychain ring with a small chain attachment.
Safety eyes or embroidered eyes can be used for facial details. If the keychain is intended for children, embroidered features are a safer option. Preparing all materials in advance ensures a smooth crafting process.
Crocheting the Fish Body
The foundation of how to make a Crochet Fish Keychain Pattern begins with the fish body. Start with a magic ring and work single crochet stitches in continuous rounds. Gradually increase in the first few rounds to create a rounded oval shape. Maintaining even stitch tension ensures a smooth surface.
After reaching the widest part of the body, begin decreasing evenly to taper toward the tail area. Lightly stuff the body as you go, ensuring it feels firm but not overly packed. Tight stitches and balanced shaping help the fish maintain its structure.
Once the body is nearly closed, fasten off securely. Leave a small opening if you plan to attach the tail separately. Proper shaping at this stage defines the overall silhouette of the keychain.
Creating the Tail and Fins
The tail is a defining feature in how to make a Crochet Fish Keychain Pattern. It can be crocheted directly onto the body or made separately and sewn on later. To create a simple tail, attach yarn at the back of the body and work chains followed by slip stitches or half double crochets to form a triangular shape.
Side fins can be crocheted as small oval or teardrop shapes. Keep them minimal to maintain balance and avoid bulk. Sew the fins securely onto the body using tight, even stitches.
Adding subtle color changes or stripes to the body enhances visual interest. Contrasting colors for the tail create a playful effect, especially for tropical-themed designs.
Assembly and Finishing Touches
After completing all parts, securely attach safety eyes or embroider facial details. A small curved stitch can create a smiling expression. Weave in all yarn ends carefully to prevent unraveling.
Attach the keychain ring by threading yarn or strong thread through the top of the fish’s body. Reinforce the attachment by stitching through multiple stitches to ensure durability. The keychain must be secure enough to withstand daily handling.
Inspect your finished piece to ensure even stuffing and firm seams. The completed crochet fish keychain should feel compact, balanced, and ready for use.
Customization and Creative Ideas
Learning how to make a Crochet Fish Keychain Pattern opens the door to endless creative possibilities. You can experiment with bright tropical colors, metallic yarn accents, or soft ombré gradients. Adding embroidered scales or tiny bead accents (securely attached) can enhance texture and personality.
This project is perfect for themed gift sets. Pair multiple fish in complementary colors for a coordinated look. You can even personalize each keychain with initials stitched subtly onto the body.
Because the pattern works up quickly, it is ideal for craft fairs or small handmade business ideas. With consistent quality and creative color combinations, your crochet fish keychains can become charming and memorable accessories.
FAQ
1. Is this pattern suitable for beginners?
Yes, confident beginners who know basic stitches and simple shaping can complete this project.
2. What yarn works best for keychains?
Cotton or durable acrylic yarn is recommended for longevity.
3. How do I prevent stuffing from showing?
Use a smaller hook and maintain tight, even tension.
4. Can I wash the keychain?
Follow the yarn label instructions. Hand washing is usually safest.
5. How long does it take to complete?
Most fish keychains can be finished in under two hours.
6. Can I sell finished keychains?
Yes, handmade keychains are popular at craft fairs and markets.
Conclusion
Understanding how to make a Crochet Fish Keychain Pattern is a rewarding way to combine creativity and functionality in a small, manageable project. By selecting durable materials, maintaining consistent tension, and carefully assembling each component, you can create a charming accessory that is both practical and decorative. This pattern encourages experimentation while strengthening your amigurumi skills. If you found this tutorial helpful, please leave your honest opinion and share suggestions. Your feedback helps improve future crochet guides and inspires more creative ideas.
Beyond its simple construction, mastering how to make a Crochet Fish Keychain Pattern helps refine important crochet fundamentals such as shaping, stitch consistency, and secure finishing. Small projects like this are excellent for practicing precision because every stitch is visible in a compact design. As you repeat the pattern with different color combinations, your speed and confidence naturally improve. Over time, these miniature creations can strengthen your overall technique, making larger amigurumi or accessory projects feel much more manageable and enjoyable to complete.
Additionally, the Crochet Fish Keychain Pattern is a wonderful way to share handmade creativity with friends and family. Because it is lightweight and quick to produce, you can easily create multiple versions for party favors, small gifts, or themed collections.
VIDEO TUTORIAL
Personal touches like embroidered names or customized color palettes make each keychain unique and meaningful. By combining thoughtful design with careful craftsmanship, you transform a small crochet piece into a charming accessory that carries both practicality and heartfelt value.

