If you’ve ever wondered how to knit a useful and pretty slipper, you’re in the right place. Whether you’re a beginner or have a little experience, this tutorial will guide you through creating something both beautiful and practical. Handmade slippers are not just cozy and warm; they’re also a thoughtful gift and a satisfying project.
Knitting slippers might sound complicated at first, but with the right techniques, tools, and mindset, it becomes a relaxing and enjoyable experience. You don’t need expensive materials or advanced skills—just a bit of yarn, the right needles, and a little time. This tutorial will help you create slippers that look lovely and are sturdy enough for daily use.
We’ll walk through the full process of how to knit a useful and pretty slipper, from choosing your yarn and tools to assembling your finished pair. You’ll also learn useful tips on customization and styling. This article is filled with beginner-friendly advice, expert tips, and real-life tricks that make all the difference.
Choosing the Right Materials for Your Slippers
When starting any knitting project, especially one like knitting a useful and pretty slipper, selecting the proper materials is crucial. This includes your yarn, needles, and additional accessories like stitch markers or buttons. Each of these choices will affect the final look and feel of your slippers.
First, choose a yarn that is both durable and soft. Wool blends are an excellent option because they keep your feet warm but also hold their shape well over time. Look for yarn that is labeled as “worsted weight” or “chunky” for extra warmth and easier handling.
Next, consider your knitting needles. Most slipper patterns recommend US size 8 to 10 needles, depending on the yarn thickness. Circular needles are great if you’re working in the round, while straight needles are ideal for simpler flat-knit patterns.
Color also plays a role in your final product. While functionality is key, don’t underestimate the power of choosing a color palette you love. Consider matching the yarn color with the recipient’s personality or the season.
Extra touches like rubber soles, decorative buttons, or even faux fur edging can turn your project into a fashionable piece. These are optional, but they can enhance your slippers’ appearance and comfort dramatically.
Always remember to do a gauge swatch before starting your pattern. It might feel like an extra step, but it ensures your slippers will fit perfectly.
Lastly, gather any additional supplies you may need, like stitch holders, tapestry needles, and scissors. Being well-prepared will make your knitting experience smoother and more enjoyable.
Step-by-Step Knitting Instructions
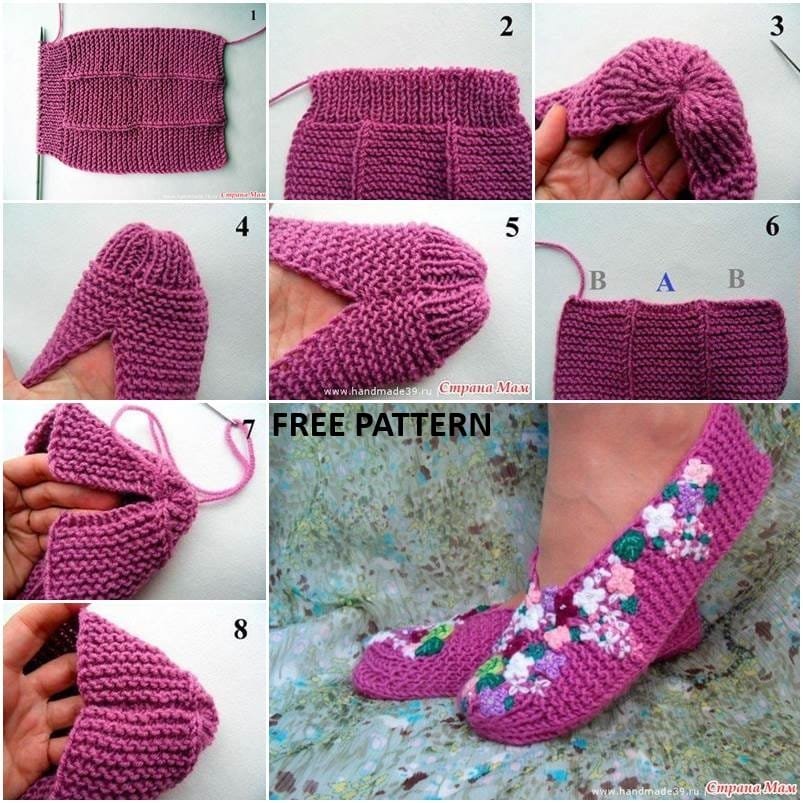
The core of this guide focuses on how to knit a useful and pretty slipper from start to finish. Even if you’ve never followed a knitting pattern before, these step-by-step instructions are easy to follow and require only basic stitches.
Begin by casting on the required number of stitches. Most simple slipper patterns will have you cast on between 28 and 36 stitches, depending on the size you’re making. Use a stretchy cast-on method to ensure flexibility.
The next few rows are usually worked in garter stitch or ribbing, which helps the slipper hug your foot. These stitches are simple: knit every row for garter stitch, or alternate knit and purl stitches for ribbing.
After completing the cuff, you’ll start shaping the top of the foot. This involves decreasing stitches in the middle rows, which gives your slipper a comfortable, snug fit. Don’t worry—it’s easier than it sounds.
Once the foot is shaped, you’ll move on to the sole section. This part is often knitted flat and then folded and sewn together. You can use mattress stitch or whipstitch for a clean seam.
The heel is the final section. It’s typically made by gathering the back stitches and sewing them closed, forming a rounded and secure finish. This step ensures the slipper fits well and doesn’t slip off.
At this point, weave in all loose ends, and give your slippers a gentle block (if necessary) to help them take shape. Congratulations—you’ve completed your first useful and pretty knitted slipper!
Tips for Customizing Your Slippers
One of the best parts of learning how to knit a useful and pretty slipper is the opportunity to personalize your project. With just a few creative changes, you can make your slippers unique and perfectly suited to the wearer.
First, consider adding colorwork or stripes to your pattern. Alternating rows of different colors is a fun way to play with design and use leftover yarn scraps creatively.
You can also change the texture of the slipper by experimenting with different stitches. For example, moss stitch or seed stitch can give a luxurious, chunky look, while maintaining warmth and flexibility.
Another popular customization is adding soles or grip pads. These can be sewn or glued onto the bottom of the slipper to provide extra durability and slip resistance—perfect for wood or tile floors.
For a more feminine look, consider adding crochet flowers, buttons, or bows. These small additions turn a basic slipper into a fashionable accessory, making it an excellent gift.
Kids’ slippers can be even more fun to personalize. Use bright colors, animal faces, or even add ears and tails for a playful touch that children will love.
Lastly, don’t forget about sizing. You can easily adjust the pattern by adding or removing a few stitches, especially if you’re knitting for someone with larger or smaller feet. Always keep measurements handy.
Caring for Your Knitted Slippers
Once you’ve mastered how to knit a useful and pretty slipper, it’s important to know how to take care of them. With proper maintenance, your handmade slippers can last for many seasons without losing shape or softness.
Hand washing is always recommended for knitted items, especially if they are made with natural fibers like wool. Use a mild detergent or wool-specific soap, and let them soak in lukewarm water for about 10 minutes.
After washing, gently squeeze out excess water—never wring or twist your slippers. Lay them flat on a towel and roll them up to absorb even more moisture before reshaping them.
Dry your slippers flat and away from direct sunlight. This preserves the yarn fibers and prevents any fading or distortion. Avoid using a dryer unless your yarn is specifically labeled as machine-safe.
To maintain the slipper’s shape, consider storing them with a small towel or paper inside. This prevents them from flattening or stretching when not in use.
If your slippers start to pill or fuzz, a fabric shaver or sweater stone can restore them to like-new condition. Use gentle strokes to avoid damaging the fabric.
Regular cleaning and thoughtful storage ensure your knitted slippers stay useful and pretty, just like the day you made them.
FAQ – Frequently Asked Questions
1. Can beginners really learn how to knit slippers easily?
Yes! Many slipper patterns are beginner-friendly and use basic stitches like knit and purl. This tutorial simplifies the process step-by-step.
2. How long does it take to knit a pair of slippers?
For most knitters, a single pair can be completed in 4–6 hours, depending on complexity and experience. Simple patterns are faster to finish.
3. What type of yarn is best for knitting slippers?
Wool blends or chunky acrylic yarns are ideal because they provide warmth, durability, and a bit of stretch—perfect for everyday use.
4. Can I knit slippers without using circular needles?
Absolutely. Many patterns are designed for straight needles. You can sew the pieces together afterward to form the slipper shape.
5. How do I make my knitted slippers non-slip?
You can sew or glue fabric soles or silicone dots to the bottom. These additions make them safer on smooth floors.
6. Can slippers be machine washed?
It depends on the yarn. Always check the label. If in doubt, hand washing in cold water with mild soap is safest for preserving quality.
Conclusion
Learning how to knit a useful and pretty slipper is more than just picking up a new hobby—it’s about creating something warm, personal, and satisfying. Throughout this tutorial, we’ve explored the steps involved in crafting the perfect slipper: from material selection to shaping, customization, and care.
With just a bit of yarn and your own hands, you can turn simple stitches into practical comfort. Whether you’re gifting them or enjoying them yourself, handmade slippers carry a charm that store-bought items can’t match.
We hope this guide inspired you to start your own project today! If you followed along, feel free to leave a sincere opinion and suggestions. Your feedback helps improve future tutorials and encourages others to pick up their needles too!

