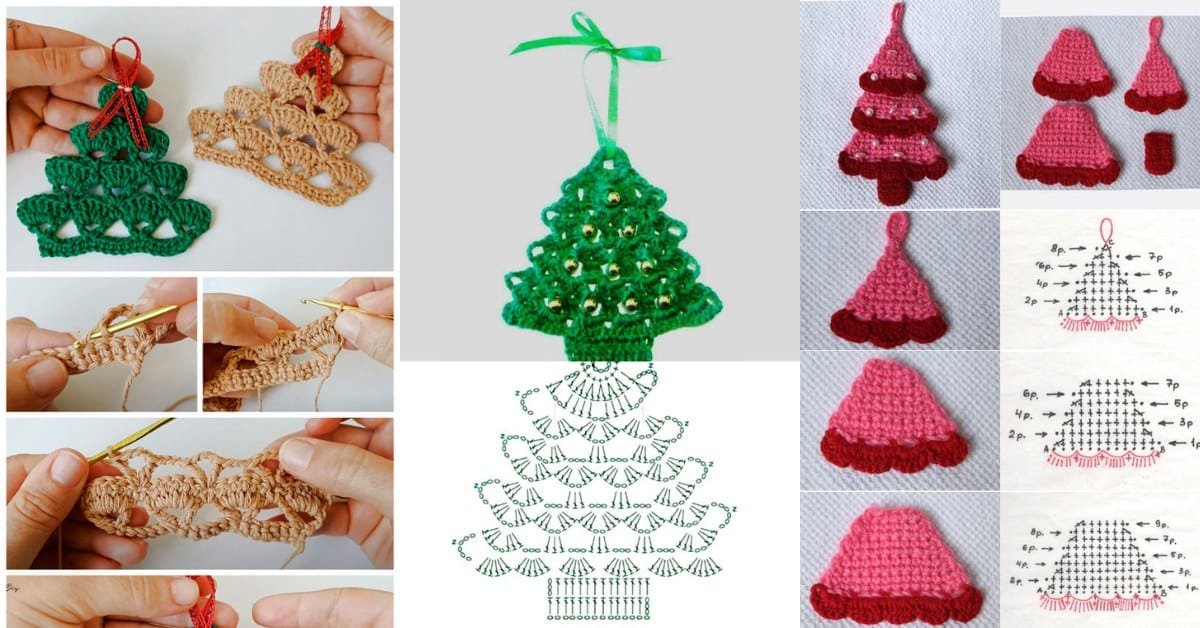
Crocheting a pine tree can be a delightful way to bring some holiday spirit into your home, or simply to create a charming, nature-inspired decoration.
In this how to crochet pine tree – free pattern, we will walk you through the steps to make your very own crochet pine tree, perfect for adding a handcrafted touch to any room. Whether you’re a seasoned crocheter or a complete beginner, this pattern is simple enough to follow and produces stunning results.
The great thing about crocheting a pine tree is its versatility. You can make your tree as small or as large as you’d like, depending on the yarn and hook size you choose.
Additionally, this project allows for plenty of creative expression — feel free to add your own embellishments like beads or sequins for a festive touch. This free pattern is designed to be easy, so you can enjoy the process and experiment with your design.
Before we dive into the steps of how to crochet pine tree, it’s important to gather your materials. For this pattern, you’ll need some green yarn, a matching crochet hook, and a few other basic crochet tools.
Once you have everything ready, you’re just a few stitches away from creating a beautiful crochet pine tree that will impress everyone who sees it.
1. Materials Needed for Your Crochet Pine Tree
The first step in any crochet project is gathering the materials. For this how to crochet pine tree – free pattern, you won’t need anything too fancy, but having the right tools will make the process smoother and ensure a professional finish.
- Yarn: The most important material for your crochet pine tree is the yarn. You’ll want to choose a green yarn that reflects the color of pine trees, but don’t be afraid to experiment with different shades of green. Bulky or worsted-weight yarn is best for giving the tree a sturdy structure.
- Crochet Hook: Your crochet hook size will depend on the thickness of the yarn you choose. Generally, a 4.0mm to 5.0mm hook works well with worsted-weight yarn, but always check the yarn label for recommendations.
- Polyfill or Cotton Stuffing: To give your pine tree a full, dimensional look, you’ll need polyfill stuffing. This will help the tree stand upright and keep its shape over time.
- Tapestry Needle: A tapestry needle is essential for weaving in any loose ends and sewing the different parts of the tree together. This will give your tree a neat, professional appearance.
- Scissors: A good pair of scissors will be needed for cutting your yarn when finishing each piece of the pine tree.
- Optional Embellishments: If you’d like to decorate your crochet pine tree, consider adding some embellishments like tiny beads, buttons, or sequins to give it a festive look.
2. Step-by-Step Instructions for Crocheting the Pine Tree
Now that you have all your materials ready, let’s begin crocheting your pine tree. Follow this step-by-step guide for how to crochet pine tree – free pattern and you’ll have your finished tree in no time!
- Step 1: Crochet the Tree Base: Start by creating the base of your pine tree. Crochet a magic ring and work single crochets into the ring to form a small circle. Increase the number of stitches each round until you have a flat base that will support the rest of the tree.
- Step 2: Shape the Tree Trunk: Once the base is complete, you can begin crocheting the trunk of the pine tree. Use single crochets in a continuous spiral to create a sturdy, straight trunk. Continue until the trunk reaches your desired height.
- Step 3: Crochet the Pine Layers: The key to creating a realistic pine tree effect is to crochet several “layers” of branches. To do this, crochet a series of small triangles or half-circles that will be attached to the trunk. These pieces should gradually increase in size as you move down the tree to create a tapered effect.
- Step 4: Assemble the Tree: After all the layers are crocheted, sew each piece onto the tree trunk, starting from the top and working your way down. Be sure to overlap the pieces slightly to give the tree a full, natural look.
- Step 5: Stuff the Tree: Once your pine tree is fully assembled, use polyfill stuffing to fill the inside of the tree. Be sure to stuff it evenly so that the tree stands upright and holds its shape.
- Step 6: Finish the Tree: To complete your crochet pine tree, weave in any loose ends with a tapestry needle. You can also add any embellishments at this stage to decorate the tree.
3. Creative Ideas for Customizing Your Crochet Pine Tree
While the basic how to crochet pine tree – free pattern is simple, there are plenty of ways you can customize your tree to make it your own. Here are a few ideas to inspire your creativity.
- Add Snow to Your Tree: For a wintery touch, consider adding some white yarn or glitter to the tips of the branches to mimic snow. This is a great way to give your crochet pine tree a festive, seasonal look.
- Decorate with Beads or Buttons: If you want to use your crochet pine tree as a holiday decoration, you can easily transform it into a mini Christmas tree by adding tiny beads, buttons, or sequins as ornaments. This adds a playful and colorful element to your tree.
- Use Different Yarn Textures: For a more rustic or whimsical look, experiment with using yarns of different textures. You could use a fluffy yarn for a soft, snowy effect or a sparkly yarn for a touch of glamour.
- Create Multiple Trees in Different Sizes: Crochet several trees in different sizes to create a forest effect. You can use varying shades of green or even different colors entirely for a fun, creative display.
- Turn It into a Keychain: Make a miniature version of the crochet pine tree and attach it to a keychain ring. This is a great way to carry a bit of nature-inspired art with you wherever you go.
- Personalize with Embroidery: If you enjoy embroidery, you can add some small details to your tree, like tiny stars or initials. This will make your tree even more unique and special.
4. Tips for Perfecting Your Crochet Pine Tree
Crocheting a pine tree may seem simple, but there are a few tips that can help you achieve the best possible result. Here are some expert tips for how to crochet pine tree that will help you perfect your project.
- Take Your Time with the Tree Base: The base of the tree is crucial for stability, so make sure it’s large and flat enough to support the tree’s weight. If your tree wobbles, consider crocheting a slightly larger base.
- Use Stiff Yarn for a Structured Look: If you want your crochet pine tree to have a more structured appearance, choose a stiffer yarn. This will help the tree stand upright without collapsing.
- Stuff the Tree Evenly: When stuffing your tree, be sure to distribute the stuffing evenly throughout the inside. This will help the tree maintain its shape and prevent it from becoming lopsided.
- Experiment with Tree Sizes: Don’t be afraid to play around with the size of your crochet pine tree. A smaller tree might be perfect for a table decoration, while a larger tree could become a focal point in your holiday display.
- Block the Tree for a Professional Finish: Blocking your crochet pine tree can help it hold its shape and give it a polished, professional finish. Simply wet the tree, shape it, and allow it to dry in place.
- Use a Crochet Stitch Marker: Since you’ll be working in the round, it’s helpful to use a stitch marker to keep track of your rounds and ensure that your tree is evenly shaped.
FAQ
Q: How long does it take to crochet a pine tree?
A: The time it takes to crochet a pine tree depends on the size and complexity of your design. A simple tree can be completed in a few hours, while a more detailed version may take longer.
Q: Can I use different colors for my crochet pine tree?
A: Absolutely! While green is the traditional color for a pine tree, you can use any color you like. White or silver yarn can create a wintery look, while bright colors make a fun and whimsical tree.
Q: What type of yarn is best for crocheting a pine tree?
A: Bulky or worsted-weight yarn works well for creating a sturdy and full crochet pine tree. Cotton yarn is also a good choice for a more defined structure.
Q: How do I make my tree stand upright?
A: To help your tree stand upright, make sure the base is wide and flat, and stuff the tree evenly. You can also place a small weight, like a coin, inside the base for extra stability.
Q: Can I add decorations to my crochet pine tree?
A: Yes! You can easily add decorations like beads, buttons, or sequins to your crochet pine tree. This is a great way to make your tree more festive or personalized.
Q: Is this pattern suitable for beginners?
A: Yes, this how to crochet pine tree – free pattern is suitable for beginners. It uses basic stitches like single crochet, and the steps are simple to follow.
Join our VIP broadcast list and gain access to exclusive patterns, all for free. As a VIP member, you’ll receive the best patterns daily, delivered directly to your device. ✨📱 It’s a unique opportunity to stay up-to-date with the latest trends and designs, curated just for you. Don’t miss out on enhancing your projects and discovering new inspirations with the best patterns every day! 🎨🔝
Conclusion
In this How to Crochet Pine Tree – Free Pattern, we’ve covered everything you need to know to create your very own crochet pine tree. From gathering materials to customizing your tree with decorations, this project is both fun and versatile. Whether you’re looking to make a holiday decoration or a year-round piece, this pattern is a great way to add a touch of handmade beauty to your home.
We hope you enjoyed this tutorial and found it helpful! Please feel free to leave your honest feedback and suggestions in the comments below. We’d love to hear from you!

