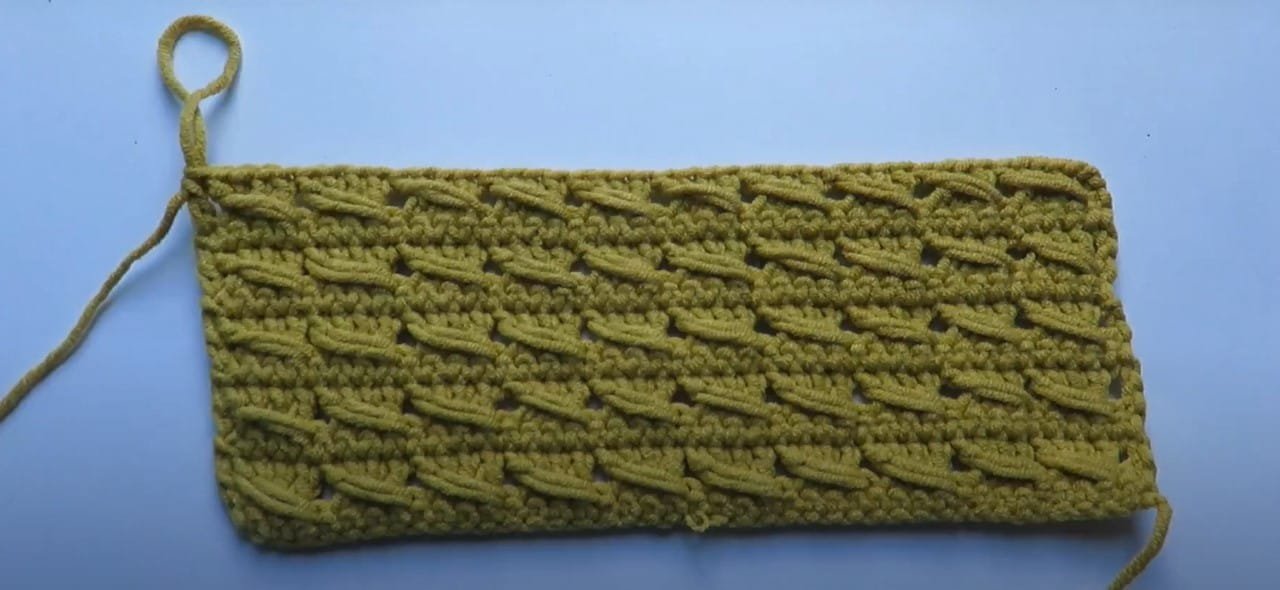
If you’re eager to explore new techniques in your crochet journey, learning how to crochet HUG STITCH is a fantastic choice. This unique stitch creates a beautiful texture and adds a cozy feel to any project.
Whether you are making blankets, scarves, or garments, the HUG STITCH can enhance your designs and give them a distinctive look. Not only is this stitch visually appealing, but it’s also relatively simple to master, making it a great addition to your crochet skill set.
The HUG STITCH is not just a stitch; it’s a creative way to express your style through crochet. With its unique look, this stitch can transform ordinary projects into extraordinary ones.
You can easily incorporate it into your existing patterns or create something entirely new. This tutorial will walk you through the steps needed to successfully create the HUG STITCH, providing clear instructions and helpful tips along the way.
In this article, we will cover everything from the materials you need to detailed instructions on how to execute the stitch. You’ll also find creative ideas for incorporating the HUG STITCH into your projects. So, gather your supplies, get comfy, and let’s dive into how to crochet HUG STITCH together!
1. Materials Needed for HUG STITCH
Before starting your journey into how to crochet HUG STITCH, it’s important to have all your materials ready. Having everything on hand will make your crocheting experience enjoyable and efficient.
- Yarn: Choose a yarn that complements your project. Medium-weight yarn (worsted weight) is ideal for this stitch, as it provides the right thickness for creating the texture without being too bulky. You can opt for cotton, acrylic, or a wool blend, depending on your project’s purpose and your personal preferences.
- Crochet Hook: The size of your crochet hook will depend on the yarn you choose. For medium-weight yarn, a size H/8 (5 mm) hook works well. However, if you find your stitches too tight or too loose, you may want to adjust the hook size accordingly.
- Scissors: A good pair of scissors is essential for cutting your yarn when you finish your project or change colors.
- Yarn Needle: Also known as a tapestry needle, this tool is vital for weaving in loose ends once you complete your crochet work. Choose one with a large eye to accommodate thicker yarns.
- Measuring Tape: Having a measuring tape on hand will help you gauge the size of your projects, ensuring consistency and accuracy, especially if you’re following a specific pattern.
- Stitch Markers: These can be beneficial for keeping track of your rounds, particularly if you are working on larger projects or trying out the HUG STITCH for the first time.
2. Step-by-Step Instructions for HUG STITCH
Now that you have your materials ready, it’s time to dive into the step-by-step instructions on how to crochet HUG STITCH. Follow these guidelines to create your textured stitches with ease.
- Foundation Chain: Start by creating a foundation chain of your desired length. The HUG STITCH works best with an even number of chains. For practice, you might want to start with a foundation chain of 20 stitches, which will give you a good length to work with.
- Row One – Setting the Base: Turn your work after creating the foundation chain. In the second chain from your hook, make a single crochet stitch. Continue to make single crochet stitches across the entire row until you reach the end. This will create a solid base for your HUG STITCH.
- Row Two – Start the HUG STITCH: Chain one to begin the next row. In the first stitch, make a single crochet stitch. Now, to create the HUG STITCH, yarn over and insert your hook into the next stitch. Yarn over again and pull through, leaving three loops on your hook.
- Completing the HUG STITCH: Yarn over once more and pull through the first two loops on your hook. You will now have two loops remaining. Yarn over again and pull through the last two loops. This creates your first HUG STITCH.
- Repeat for the Row: Continue this pattern across the row. For every two stitches, you’ll be creating one HUG STITCH. Remember to insert your hook into the next stitch and repeat the yarn over and pull-through steps to maintain the stitch’s texture.
- Finishing the Row: At the end of the row, finish with a single crochet stitch in the last stitch. This will help maintain a clean edge. Chain one and turn your work to begin the next row.
3. Incorporating HUG STITCH into Projects
Once you’ve mastered how to crochet HUG STITCH, you may want to know how to incorporate it into various projects. This stitch can add a wonderful texture and visual appeal to a wide range of items.
- Blankets: The HUG STITCH is perfect for blankets, as it creates a cozy feel. You can use it as the main stitch throughout the blanket or alternate it with other stitches for a unique design. Consider using multiple colors to create a beautiful ombre effect.
- Scarves: A scarf made with the HUG STITCH can be both warm and stylish. Use a chunky yarn for a thicker scarf that’s perfect for winter, or opt for lighter yarn for a breezy spring accessory.
- Hats: Incorporating the HUG STITCH into hat designs adds a lovely texture. You can use this stitch for the entire hat or combine it with other crochet techniques to create a stylish piece.
- Home Decor: Consider using the HUG STITCH for decorative items like cushions, wall hangings, or table runners. The stitch’s texture can bring a cozy atmosphere to your living space.
- Garments: For those more experienced in crochet, using the HUG STITCH in garments can elevate your wardrobe. Try incorporating it into sweaters or cardigans for a fashionable touch.
- Bags: The sturdy texture of the HUG STITCH makes it suitable for bags as well. You can crochet a handbag, tote, or even a small pouch using this technique to create functional yet stylish accessories.
4. Tips for Success with HUG STITCH
To ensure a smooth experience while learning how to crochet HUG STITCH, consider these helpful tips for success:
- Practice Consistency: Maintain consistent tension while crocheting. This will ensure that your HUG STITCH looks uniform throughout your project. If you find yourself tightening or loosening your grip, take a moment to adjust.
- Take Your Time: Don’t rush through the process. If you’re new to this stitch, it’s essential to take your time to understand the steps. Slow down, especially during the initial learning phase, to grasp the technique fully.
- Use High-Quality Yarn: Choosing good-quality yarn can significantly enhance your results. Higher-quality yarn often has better stitch definition, making the HUG STITCH stand out beautifully.
- Experiment with Colors: Feel free to play around with different yarn colors and textures. Using variegated or self-striping yarn can add extra flair to your HUG STITCH projects.
- Join Online Communities: Engaging with crochet communities can provide motivation and support. Many online groups offer tips, resources, and a space to share your creations and learn from others.
- Stay Inspired: Look for inspiration online, in books, or through social media platforms. Following crochet influencers or joining forums can help you discover new patterns and ideas for incorporating the HUG STITCH into your work.
FAQ
Q: What is HUG STITCH in crochet?
A: The HUG STITCH is a unique crochet technique that creates a textured stitch, adding depth and coziness to various projects.
Q: Can I use any type of yarn for the HUG STITCH?
A: While medium-weight yarn is recommended, you can experiment with different types of yarn to achieve different textures and looks.
Q: Is the HUG STITCH suitable for beginners?
A: Yes! The HUG STITCH is relatively easy to learn, making it an excellent choice for beginners looking to expand their crochet skills.
Q: How can I incorporate the HUG STITCH into existing patterns?
A: You can replace standard stitches in patterns with the HUG STITCH to create a unique look. Just ensure that you maintain the pattern’s tension and gauge.
Q: Can I wash items made with HUG STITCH?
A: Yes! Most crochet items can be washed, but it’s essential to follow the care instructions for the yarn used. Generally, hand washing is recommended for delicate projects.
Q: How can I troubleshoot uneven stitches in my HUG STITCH?
A: If your stitches are uneven, it may be due to inconsistent tension. Practice maintaining a steady grip on your yarn and hook to achieve more uniform stitches.
Join our VIP broadcast list and gain access to exclusive patterns, all for free. As a VIP member, you’ll receive the best patterns daily, delivered directly to your device. ✨📱 It’s a unique opportunity to stay up-to-date with the latest trends and designs, curated just for you. Don’t miss out on enhancing your projects and discovering new inspirations with the best patterns every day! 🎨🔝
Conclusion
In this comprehensive guide, we’ve explored how to crochet HUG STITCH, providing you with step-by-step instructions, materials needed, and creative ways to incorporate this beautiful stitch into your projects.
By mastering the HUG STITCH, you can enhance your crochet skills and add unique textures to your creations. We encourage you to share your thoughts and suggestions in the comments below. Happy crocheting!

