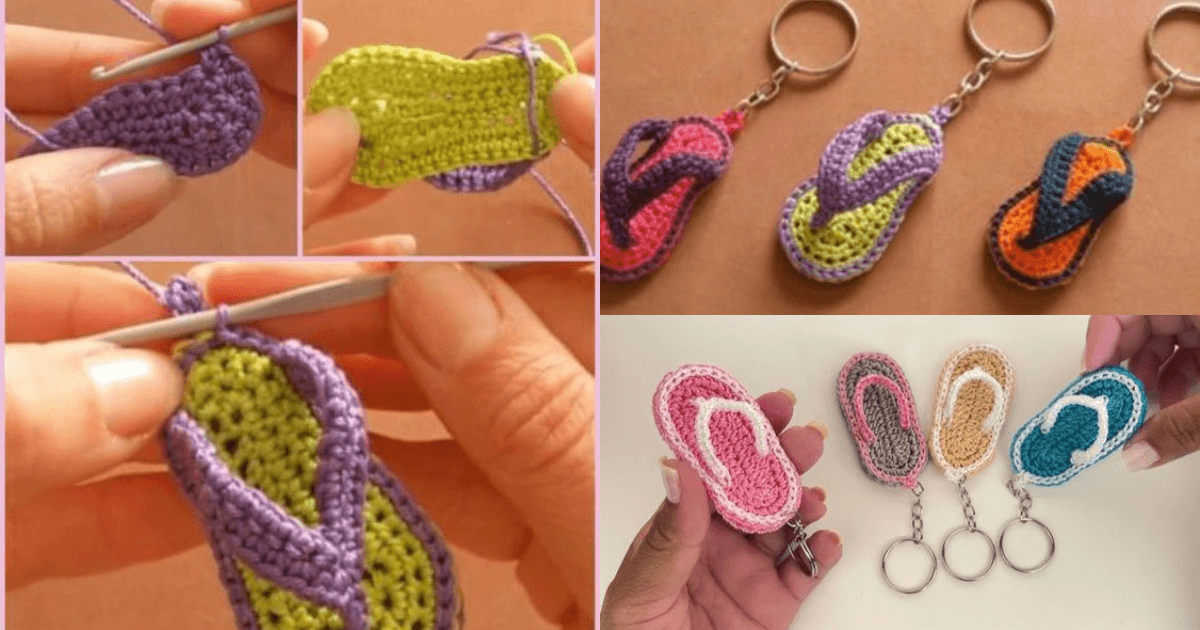
Looking to add a fun and personalized accessory to your collection? This How to Crochet Flip Flop Keychain – Free Pattern is the perfect way to create a unique, handmade keychain that’s both functional and fashionable.
Whether you’re a seasoned crocheter or a beginner, this simple yet adorable project will bring a playful touch to your keyring. By following this free pattern, you can make a crochet flip flop keychain in any color and style you like. It’s also a great idea for gifting!
In this blog post, we’ll guide you through every step of creating a crochet flip flop keychain. The project requires minimal materials and is quick to complete, making it an excellent option for crafting on the go. Plus, who wouldn’t love having a tiny crochet flip flop on their keys, backpack, or purse?
By the end of this tutorial, you will have a beautiful and practical crochet flip flop keychain. You can use this pattern to make multiple keychains for friends, family, or even as a fun summer-themed gift. So grab your crochet hook and let’s get started on this exciting project!
1. Materials Needed for the Crochet Flip Flop Keychain
Before you begin crocheting your flip flop keychain, it’s important to gather the right materials. Here’s a list of what you’ll need to complete the project successfully:
- Yarn: You can use any type of yarn, but cotton yarn is often preferred for keychains because it’s sturdy and holds its shape well. Choose any color that suits your style or matches the season.
- Crochet Hook: A 2.5mm or 3mm hook is recommended for this project, as the small size helps create the tight, compact stitches needed for such a small piece.
- Keyring: You’ll need a keyring or lobster clasp to attach your finished crochet flip flop to your keys or bag. These can be found in craft stores or online.
- Tapestry Needle: This is necessary for sewing the pieces together and weaving in the ends once you’re finished crocheting.
- Scissors: Standard scissors for cutting yarn are essential to this project.
- Optional Embellishments: For added flair, consider using small beads, buttons, or embroidery to decorate your flip flop keychain.
2. How to Crochet the Flip Flop Sole
The base of your crochet flip flop keychain is the sole, which is created using simple stitches. Let’s go through the process step by step:
- Start with a Chain: Begin by chaining 10-12 stitches, depending on how long you want the sole of your flip flop to be. This will be the length of the footbed.
- Single Crochet Around: Once you’ve made your chain, single crochet (sc) into each stitch across. When you reach the end of the chain, turn your work and crochet into the opposite side of the chain. This creates an oval shape, which is the base of the sole.
- Increasing the Sole: In the next round, you’ll need to increase at the curve of the oval to keep the sole flat. To do this, crochet two single crochets into the first and last stitches of the round. Continue crocheting in rounds until the sole is the desired size.
- Adding Structure: To make the sole sturdier, you can switch to a half-double crochet (hdc) for the next couple of rounds. This will give the flip flop more definition and stability.
- Final Touches: Once you’ve reached the desired thickness, fasten off and weave in the ends with your tapestry needle. Now your flip flop sole is complete!
- Optional Customization: You can use different colors of yarn for the sole to give the keychain a more vibrant look. Switching between colors during the rounds can create stripes or patterns on the sole.
3. Creating the Flip Flop Straps
Now that you’ve completed the sole, it’s time to crochet the straps that will give your flip flop keychain its classic look. The straps are easy to make and attach, giving the keychain its unique flip flop appearance.
- Start with a Chain: To make the first strap, chain about 5-7 stitches. This will form one side of the strap that goes over the footbed.
- Attach to Sole: Use your tapestry needle to attach one end of the chain to the side of the flip flop sole and the other end to the opposite side. Secure tightly to ensure the strap stays in place.
- Creating the Second Strap: Chain another 5-7 stitches for the second strap. Attach it similarly, but place it slightly behind the first strap for a more authentic flip flop look.
- Optional Middle Strap: For a more traditional flip flop design, you can add a third strap down the middle. Simply chain a few stitches and attach it at the toe area.
- Sewing the Straps: Once the straps are attached, use your tapestry needle to sew them securely to the sole. Make sure the straps are firm and don’t move when tugged.
- Finishing Touches: After all the straps are in place, fasten off and weave in any loose ends. Your crochet flip flop keychain is almost ready!
4. Attaching the Keyring and Finalizing the Flip Flop Keychain
The last step in this How to Crochet Flip Flop Keychain – Free Pattern tutorial is attaching the keyring and making any final adjustments to your keychain. This step is simple but crucial to ensure your flip flop is functional as a keychain.
- Attach the Keyring: Using your tapestry needle or a small crochet hook, attach the keyring or lobster clasp to the top of your flip flop. You can place it at the back of the sole or thread it through one of the straps.
- Secure the Attachment: Make sure the keyring is securely attached to the flip flop. You don’t want it to fall off while it’s in use. Sew it tightly into place and knot the yarn to hold it firmly.
- Test the Keychain: Before using your keychain, give it a gentle pull to ensure everything is secure. Check that the straps are firmly sewn, and the keyring is attached properly.
- Optional Decorations: If you want to add more detail to your crochet flip flop keychain, now is the time to do it. Sew on small buttons, beads, or embroidery to give your keychain extra personality.
- Final Adjustments: Make any last-minute adjustments, such as trimming any loose threads or tightening stitches.
- Ready to Use: Your crochet flip flop keychain is now complete! Attach it to your keys or bag and enjoy your handmade accessory.
FAQ
How long does it take to crochet a flip flop keychain?
The time varies depending on your crochet skill level, but this crochet flip flop keychain – free pattern can typically be completed in about 30 minutes to an hour.
What type of yarn should I use for a keychain?
It’s best to use a sturdy yarn like cotton, which holds its shape well and is durable for everyday use as a keychain.
Can I make the keychain in different sizes?
Yes, you can adjust the size by using a different hook size or adding more stitches to the sole. This will make the flip flop bigger or smaller, depending on your preference.
Is this pattern suitable for beginners?
Absolutely! This flip flop keychain pattern is easy to follow and perfect for beginners looking for a fun and quick project.
How do I attach the keyring securely?
Make sure to sew the keyring firmly into the flip flop, using a tapestry needle to loop the yarn through the keyring multiple times to ensure it doesn’t come loose.
Can I sell keychains made from this pattern?
Yes, you can sell items made from this free pattern, but it’s always nice to credit the original source of the pattern.
Join our VIP broadcast list and gain access to exclusive patterns, all for free. As a VIP member, you’ll receive the best patterns daily, delivered directly to your device. ✨📱 It’s a unique opportunity to stay up-to-date with the latest trends and designs, curated just for you. Don’t miss out on enhancing your projects and discovering new inspirations with the best patterns every day! 🎨🔝
Conclusion
This How to Crochet Flip Flop Keychain – Free Pattern is a fantastic project for anyone looking to create a cute and functional accessory. Whether you’re making it for yourself or as a gift, the pattern is simple to follow and allows for endless customization. With just a few materials and a little time, you can craft a unique keychain that reflects your personal style.
Have you tried making your own crochet flip flop keychain? We’d love to hear about your experience! Share your thoughts, suggestions, and ideas in the comments below, and let us know if there are other patterns you’d like to see. Happy crocheting!

