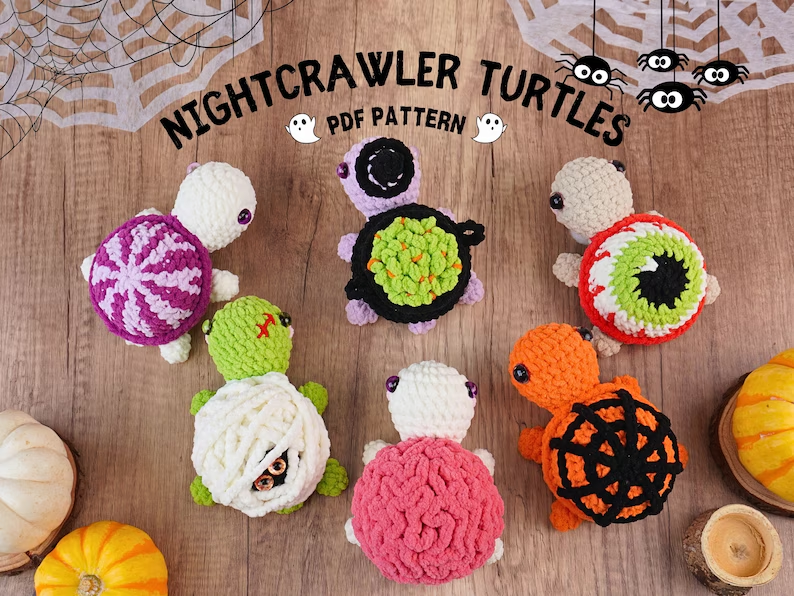
Halloween turtles crochet pattern are a fun and festive way to bring handmade charm to the spooky season. These turtles add a unique touch to Halloween décor and crafts.
Making Halloween turtles crochet pattern is enjoyable for beginners and advanced crafters alike. Each turtle you create will have its own personality and charm.
These turtles are perfect as gifts, seasonal decorations, or collectibles. With Halloween colors and creative touches, they can brighten any room or display.
Materials and Tools Needed for Halloween Turtles, Crochet Pattern
To make your Halloween turtles crochet pattern, you will need yarn in traditional Halloween colors such as black, orange, green, and purple. These colors create a vibrant and festive look.
A variety of crochet hooks is important. Using the correct hook size ensures consistent stitches and a smooth texture, which is crucial for small details like the turtle’s shell and limbs.
Stuffing materials, such as polyester fiberfill, help give your turtles a soft and plump appearance. Proper stuffing ensures the turtles keep their shape and look professional.
Safety eyes or embroidery thread are essential for facial details. Adding expressive eyes, smiles, or small accessories gives your Halloween turtles, crochet pattern personality.
Scissors and yarn needles are required for finishing and assembly. Clean sewing and precise finishing are necessary for a polished final product.
Optional accessories, such as tiny hats, pumpkins, or Halloween-themed capes, allow you to customize each turtle. These additions make your turtles stand out and capture attention in festive displays.
Step-by-Step Guide to Crochet Halloween Turtles
Start by creating a magic ring for the turtle’s body. This technique allows for a tight, secure start and is beginner-friendly.
Crochet the shell in rounds, gradually increasing stitches. Alternate colors like black and orange to reflect Halloween themes vividly. Small variations in patterns can add extra creativity.
Next, crochet the head and limbs separately. Pay attention to stitch counts and shaping, following the pattern instructions carefully. These parts define the turtle’s character.
Once each piece is complete, stuff them lightly with fiberfill. Proper stuffing maintains the turtle’s shape while keeping it soft and huggable.
Assemble the turtle by sewing the head and limbs to the body securely. Ensure all parts are attached firmly to prevent pieces from loosening during handling or display.
Finally, add details like embroidered eyes or attach safety eyes. Small accessories, such as tiny pumpkins or Halloween hats, complete your Halloween turtles crochet pattern with a festive touch.
Tips and Tricks for Perfect Halloween Turtles
Choose yarn carefully. Acrylic yarn is durable and easy to work with, making it ideal for beginners. Cotton yarn is smooth and perfect for intricate detailing.
Maintain consistent tension throughout your project. Uneven stitches can distort the shape of the turtle’s shell and limbs, affecting overall appearance.
Using stitch markers can help track rounds and increases. This is especially useful for beginners working on complex Halloween turtles crochet pattern designs.
Take breaks to avoid hand fatigue. Crocheting in short, focused sessions ensures your stitches remain neat and even.
Experiment with colors and patterns. Adding stripes, spots, or gradients using Halloween colors like purple, black, orange, and green makes each turtle unique.
Be patient during assembly. Carefully sewing each part ensures durability and a polished final look, making your Halloween turtles crochet pattern long-lasting and perfect for display or gifts.
Creative Ideas for Displaying Halloween Turtles
Place your turtles on mantels, shelves, or tables as part of Halloween décor. Their playful design will charm visitors and add a festive touch to any space.
Create a small Halloween scene using pumpkins, candles, and cobwebs. Position your turtles as the focal point to draw attention and create a whimsical setup.
Attach turtles to wreaths or garlands for eye-catching door or wall decorations. This creative use of your Halloween turtles crochet pattern adds a unique twist to traditional décor.
Gift your turtles to friends, family, or coworkers. Handmade gifts carry special meaning, showing thoughtfulness and creativity during the Halloween season.
Use turtles in centerpieces for Halloween parties. Combine them with glowing lights, candy, and miniature tombstones for a festive and interactive display.
Place turtles near Halloween books, movies, or themed crafts for a cohesive seasonal setup. Small touches like this bring charm and continuity to your décor.
Additional Creative Ideas and Variations
Consider making mini and jumbo versions of your Halloween turtles crochet pattern. Adjusting hook size and yarn thickness allows for fun variations in size.
Decorate your turtles with Halloween-themed embroidery. Add spiders, ghosts, or bats on the shell to enhance the festive atmosphere.
Experiment with glow-in-the-dark yarn for eyes or shell patterns. This adds a playful twist and can make your turtles a conversation piece.
Create a family of turtles with different expressions and accessories. This variety can be part of a larger Halloween display or storytelling setup.
Combine turtles with other crochet creatures like pumpkins or black cats to create a full Halloween crochet scene. These themed collections are visually engaging.
Share your creations online or in craft communities. Posting images of your Halloween turtles, crochet pattern inspires others and connects you with fellow enthusiasts.
FAQ About Halloween Turtles Crochet Pattern
Q: Are Halloween turtles suitable for beginners?
A: Yes, many Halloween turtles, crochet pattern designs include simple instructions, making them perfect for beginners.
Q: Can I change the colors of my Halloween turtles?
A: Absolutely! Experiment with orange, black, green, purple, or even metallic yarn for unique effects.
Q: How long does it take to crochet one turtle?
A: Depending on experience and size, it may take one to three hours. Beginners should allow extra time.
Q: Which yarn is best for Halloween turtles?
A: Acrylic is versatile and durable, while cotton is ideal for detailed work and smooth finishes.
Q: Can children help with making turtles?
A: Older children with some crochet knowledge can help. Younger children can assist with stuffing, assembly, or decorating.
Q: Are these turtles washable?
A: Yes, most can be hand-washed gently. Ensure all accessories are secure to avoid damage.
Q: Can I sell my finished turtles?
A: Yes. Handmade crafts are suitable for fairs or online sales, provided your design is an original version of Halloween turtles, crochet pattern.
Q: How can I add extra decorations to turtles?
A: Use small felt shapes, embroidery, or tiny accessories like pumpkins, hats, or tiny capes to enhance your turtle’s festive appearance.
Q: Is it possible to make turtles in different sizes?
A: Yes, adjust yarn weight and hook size to create mini or large versions while keeping the same pattern structure.
Q: Where can I find more inspiration for variations?
A: Look at crochet magazines, books, and crafting communities. Seasonal patterns often inspire creative adaptations of Halloween turtles crochet pattern.
Conclusion
In this article, we explored the world of Halloween turtles crochet pattern. From materials and tools to step-by-step instructions, tips, creative display ideas, and variations, you now have everything needed to create charming Halloween turtles.
These handmade turtles are perfect for decorations, gifts, and festive displays. Experimenting with colors, patterns, and accessories makes each turtle unique and engaging.
We hope this guide inspires you to make your own Halloween turtles crochet pattern. Share your honest opinions, experiences, and suggestions to help improve future projects and inspire the crafting community. Your feedback is invaluable for making more fun and creative crochet tutorials.

