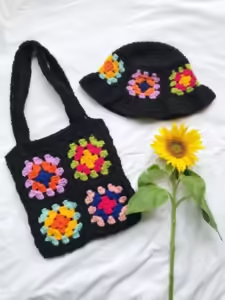
If you’re looking to add a touch of handmade charm to your daily routine, the Granny Squares Tote Bag – Free Pattern is the perfect project for you. This versatile and stylish tote bag combines the classic appeal of granny squares with the functionality of a practical accessory.
In this article, we’ll explore everything you need to know to create your very own granny squares tote bag, from the materials required to step-by-step instructions and helpful tips. Whether you’re a seasoned crocheter or just starting out, this guide will help you create a beautiful bag that’s sure to become a favorite.
Creating a granny squares tote bag is not only a rewarding crafting experience but also a fantastic way to showcase your creativity. The Granny Squares Tote Bag – Free Pattern allows you to experiment with different color combinations and square sizes, making each bag unique.
By following this comprehensive guide, you’ll be able to make a tote bag that is not only stylish but also durable enough to handle your everyday needs.
Before we dive into the specifics, let’s take a moment to appreciate the versatility and charm of granny squares.
These small, square motifs are beloved in the crochet community for their endless possibilities. When combined, they create a stunning and cohesive piece that can be tailored to any taste or need. Now, let’s get started on making your very own granny squares tote bag.
1. Materials Needed
To get started with your Granny Squares Tote Bag – Free Pattern, you’ll need a few essential materials. First and foremost, you’ll need yarn. Choose a yarn that is durable and suitable for bags. Cotton yarn is an excellent choice because of its strength and washability. You’ll also need a crochet hook; typically, a size H (5mm) hook works well for most yarns used in this project.
In addition to yarn and a hook, you’ll need a pair of scissors and a yarn needle. The scissors will help you cut the yarn, while the yarn needle is essential for weaving in ends and sewing the squares together. Some patterns might also require a stitch marker to keep track of your rounds, so having one on hand can be helpful.
Don’t forget to prepare a pattern for your granny squares. While you can follow a pre-made pattern, you can also create your own design if you’re feeling adventurous. If you’re new to granny squares, starting with a simple pattern can be a great way to get familiar with the technique.
2. Creating the Granny Squares
Once you have your materials, it’s time to start crocheting the granny squares for your tote bag. Begin by creating a slipknot and chaining the desired number of stitches for your first square. The most common granny square pattern starts with a small loop, into which you work several rounds of double crochets.
Each round of your granny square will consist of clusters of double crochet stitches separated by chain stitches. This creates the characteristic openwork pattern. Continue working in rounds until your square reaches the desired size. Remember to change colors if you want a multi-colored effect, and make sure to keep track of your color changes.
When all your squares are complete, it’s time to join them together. You can either use a whip stitch or a slip stitch to join the squares. Whip stitch creates a more seamless join, while slip stitch can be quicker and easier. Experiment with both techniques to see which one you prefer.
3. Assembling the Tote Bag
With your granny squares completed, you’ll need to assemble them to form the body of your tote bag. Start by laying out your squares in the desired arrangement. You can choose to arrange them in a grid pattern or mix them up for a more eclectic look. Once you’re satisfied with the arrangement, use a yarn needle to sew the squares together.
After the body of your tote bag is assembled, it’s time to add the straps. You can create straps by crocheting long chains and then attaching them to the top of the bag. Alternatively, you can use a sturdy fabric for the straps if you prefer a more robust handle. Attach the straps securely to ensure they can support the weight of the items you’ll be carrying.
Finally, add a lining if desired. A lining can provide additional durability and prevent small items from falling out of your tote bag. Simply cut a piece of fabric to fit the interior of the bag and sew it in place.
4. Care and Maintenance
To keep your Granny Squares Tote Bag – Free Pattern looking its best, proper care and maintenance are essential. If you’ve used cotton yarn, the bag can usually be machine washed in cold water. Avoid using bleach or fabric softeners, as these can damage the yarn.
After washing, reshape the bag and allow it to air dry. Avoid placing the bag in the dryer, as the heat can cause the yarn to shrink. If your tote bag gets stained or dirty, spot clean it with a mild detergent and a damp cloth.
Regular maintenance will help your tote bag last for years to come. Check for any loose stitches or fraying edges and make repairs as needed. With proper care, your granny squares tote bag will remain a stylish and practical accessory.
FAQ
Q1: Can I use different yarn weights for this pattern?
A1: Yes, you can use different yarn weights for this pattern, but be aware that it will affect the size and drape of your tote bag. Adjust your hook size accordingly to match the yarn weight.
Q2: How many granny squares will I need to complete the tote bag?
A2: The number of granny squares needed depends on the size of the bag and the size of each square. Typically, you will need about 20-30 squares for a medium-sized tote.
Q3: Can I add pockets to the tote bag?
A3: Absolutely! You can add pockets to the interior or exterior of the tote bag by sewing them in after the bag is assembled. Use fabric or crochet additional squares for the pockets.
Q4: What is the best way to join granny squares?
A4: You can join granny squares using various methods, including whip stitch, slip stitch, or even a join-as-you-go technique. Choose the method that works best for you and gives the desired finish.
Q5: Can I use a different stitch pattern for the granny squares?
A5: Yes, you can experiment with different stitch patterns for your granny squares. The classic granny square is just one option; you can try out other designs to create a unique tote bag.
Q6: How do I make the straps of the tote bag?
A6: The straps can be made by crocheting long chains or using fabric. If crocheting, use a sturdy yarn and create a chain of the desired length, then attach it securely to the top of the bag.
Join our VIP broadcast list and gain access to exclusive patterns, all for free. As a VIP member, you’ll receive the best patterns daily, delivered directly to your device. ✨📱 It’s a unique opportunity to stay up-to-date with the latest trends and designs, curated just for you. Don’t miss out on enhancing your projects and discovering new inspirations with the best patterns every day! 🎨🔝
Conclusion
In this article, we’ve explored the Granny Squares Tote Bag – Free Pattern from start to finish. We covered the materials needed, the process of creating and assembling granny squares, and tips for maintaining your finished bag. Whether you’re a beginner or an experienced crocheter, this pattern offers a fun and creative project to enhance your crafting skills.
We’d love to hear your thoughts on this pattern! If you have any questions or suggestions, please leave a comment below. Your feedback helps us improve and provide more helpful content for fellow crafters. Happy crocheting!

