Whether you’re a beginner or an experienced crocheter, this project will help you create a unique and wearable piece that you can wear all year round.
The Granny Square Bucket Hat is a versatile and customizable pattern that allows you to experiment with different colors and textures.
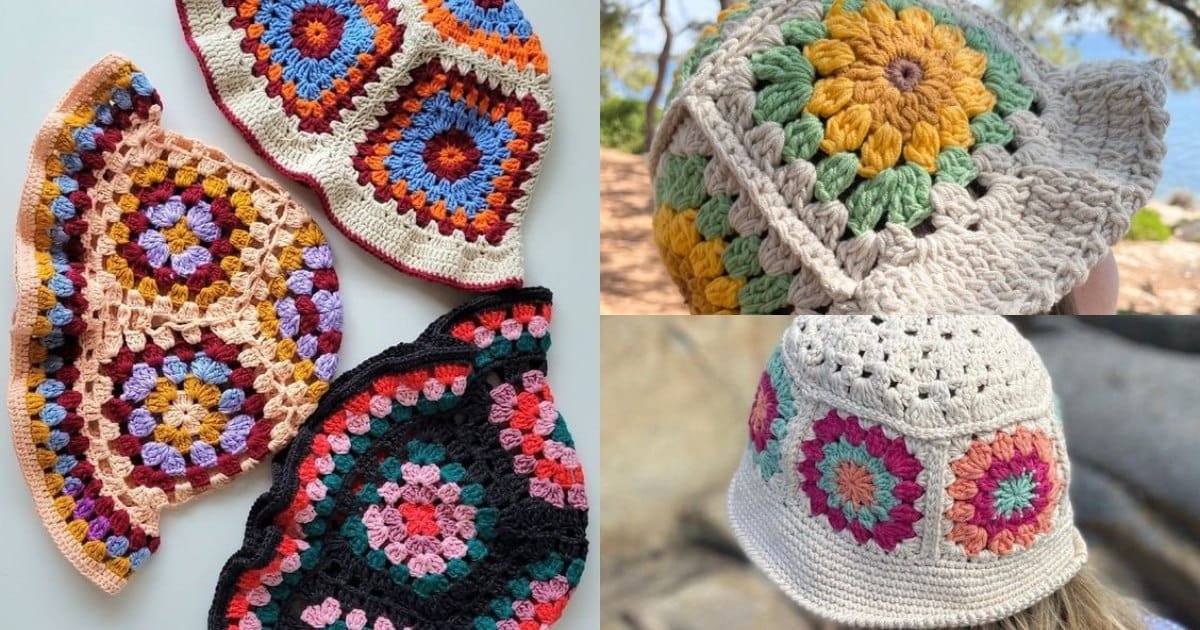
The granny square has long been a beloved crochet technique, and when combined with the bucket hat style, it creates a modern, trendy accessory.
This pattern is simple enough for beginners, but also gives room for more advanced crocheters to add their own personal touch.
With this free pattern, you’ll learn how to crochet the iconic granny square and assemble it into a beautiful bucket hat.
In this article, we will guide you through the steps to create your very own Granny Square Bucket Hat Crochet – FREE PATTERNS, providing all the necessary instructions, materials, and tips for success.
From the basic granny square stitch to the assembly process, we’ve got you covered. So grab your crochet hook, select your favorite yarn colors, and let’s start creating a stunning bucket hat!
1. Materials Needed for the Granny Square Bucket Hat Crochet – Free Patterns
Before you begin working on your Granny Square Bucket Hat Crochet – FREE PATTERNS, it’s essential to gather all the materials you’ll need. Having everything ready will make the crocheting process much smoother and more enjoyable. Here are the key items required for this project.
1.1. Yarn
To create the Granny Square Bucket Hat, you will need yarn in different colors for the granny squares. It’s recommended to use medium-weight yarn (also called worsted weight) as it provides the right thickness and texture for this project. Choose at least three contrasting colors to create a vibrant and eye-catching design, but feel free to add more colors for a personalized touch.
1.2. Crochet Hook
A 5mm (H-8) crochet hook works well for medium-weight yarn, which is perfect for the Granny Square Bucket Hat Crochet – FREE PATTERNS. If you use a thicker yarn, you may need to increase the hook size, or a smaller hook for thinner yarn. Ensure that the hook you use creates even stitches to avoid unevenness in the finished hat.
1.3. Stitch Markers
Stitch markers are helpful for keeping track of your rounds while crocheting. Using them in your Granny Square Bucket Hat Crochet – FREE PATTERNS will ensure that your work stays neat and organized, especially when working in the round.
1.4. Scissors
Once you’ve completed your granny squares and the hat, you’ll need scissors to cut the yarn after finishing each round. Sharp scissors will make it easier to cut yarn and create clean edges.
1.5. Yarn Needle
A yarn needle is essential for weaving in loose ends after you’ve joined the granny squares and completed the hat. It also helps to attach any embellishments or decorative features you may want to add to your Granny Square Bucket Hat Crochet – FREE PATTERNS.
1.6. Measuring Tape
Having a measuring tape handy will help ensure the right fit for the bucket hat. You’ll want to check the circumference of the hat to ensure it will fit comfortably around your head.
2. Basic Granny Square Stitch and How to Crochet It
The Granny Square Bucket Hat Crochet – FREE PATTERNS is built upon the iconic granny square stitch, which is a staple in crochet projects. If you’re new to granny squares, don’t worry! The process is straightforward and easy to follow. Here’s how to crochet a basic granny square.
2.1. Starting the Granny Square
Begin with a magic ring and chain 3 (this counts as your first double crochet stitch). Then, work 2 more double crochet stitches into the magic ring, followed by a chain 2. Repeat this sequence until you have a total of four groups of 3 double crochets separated by chain 2 spaces. Pull the magic ring tight to form the center of the granny square.
2.2. Working the Second Round
For the second round, chain 3 and double crochet into the first chain-2 space. Chain 2 and double crochet into the same space. Continue working around the square, placing 2 double crochets into each chain-2 space. When you reach the end of the round, join with a slip stitch into the top of the beginning chain 3.
2.3. Adding More Rounds
To continue building the granny square, repeat the process for additional rounds. Each new round will consist of double crochet clusters, with chain-2 spaces in between each set of double crochets. The number of clusters per side of the square will increase as you add more rounds.
2.4. Changing Colors
One of the most fun aspects of the Granny Square Bucket Hat Crochet – FREE PATTERNS is the ability to change colors. You can switch yarns in between rounds to create vibrant, multicolored squares. Simply finish your round with a slip stitch, cut the yarn, and attach a new color for the next round.
2.5. Joining the Granny Squares
Once you’ve crocheted a sufficient number of granny squares for the hat, it’s time to join them. You can use a whip stitch, slip stitch, or the join-as-you-go method. The key is to keep the edges aligned to form a smooth and seamless hat.
2.6. Finishing the Square
Once the granny squares are joined, weave in any loose ends and trim any excess yarn. You should now have a solid, colorful piece ready to be shaped into the bucket hat.
3. Assembling the Granny Square Bucket Hat
After you’ve completed your granny squares, the next step is to assemble them into the shape of the bucket hat. This process is simple but requires attention to detail to ensure a perfect fit.
3.1. Creating the Brim of the Hat
Start by joining the granny squares into a circular shape, forming the base of the bucket hat. To create the brim, you’ll need to crochet additional rounds around the base. This will add width to the hat and give it that classic bucket shape. Use double crochet stitches to make the brim sturdy and wide.
3.2. Shaping the Sides
Once the brim is the right size, work upward to form the sides of the hat. Continue to crochet in the round, adding a few increases along the way to ensure the sides of the hat stay upright and keep their shape.
3.3. Adjusting the Fit
If needed, try the hat on during the assembly process to check the fit. You can adjust the number of rounds for the sides or add more increases to make the hat fit snugly around your head. Be sure to measure the circumference before finishing.
3.4. Adding a Lining (Optional)
If you want to add extra comfort and durability to your hat, consider adding a fabric lining to the inside. This is particularly useful for hats made from cotton or other lightweight yarns. Use a needle and thread to attach the lining securely.
3.5. Attaching the Final Round
To finish off the hat, crochet a final round to close the top. This round should be worked tightly to ensure the hat holds its shape and doesn’t lose its structure. Weave in all remaining yarn ends once the top is complete.
3.6. Personalizing the Hat
Add any final touches to your Granny Square Bucket Hat Crochet – FREE PATTERNS. You can embellish it with buttons, flowers, or even a pom-pom on top. Personalizing your hat with your favorite decorations will make it truly one-of-a-kind.
4. Tips for Crocheting a Perfect Granny Square Bucket Hat
Crocheting a Granny Square Bucket Hat Crochet – FREE PATTERNS is an enjoyable and rewarding project. However, there are a few tips and tricks that can help ensure you get the best result possible. Here are some helpful suggestions to keep in mind as you crochet your hat.
4.1. Keep Tension Consistent
To make sure your granny squares are uniform, it’s important to keep your tension consistent throughout the project. Avoid crocheting too tightly or too loosely, as this can affect the size and shape of the hat.
4.2. Choose the Right Yarn
The yarn you choose will have a significant impact on the look and feel of the finished hat. For a lightweight, breathable hat, opt for cotton or bamboo yarn. For a warmer hat, acrylic or wool yarn will provide extra warmth and structure.
4.3. Experiment with Color Combinations
The beauty of the Granny Square Bucket Hat Crochet – FREE PATTERNS lies in its versatility when it comes to color. Don’t be afraid to experiment with different color combinations to create a truly unique design. Bold, contrasting colors or soft pastels can give your hat a different vibe.
4.4. Make Adjustments for Fit
If your hat is too loose or too tight, don’t be afraid to make adjustments. Adding or removing a few rounds or increases can make all the difference in achieving the perfect fit.
4.5. Stay Organized
When working with multiple granny squares, it’s helpful to stay organized. Arrange your squares in the order you plan to join them to ensure that the colors flow nicely and the pattern is even.
4.6. Take Your Time
Crocheting a hat takes time and patience. Don’t rush through the project—enjoy the process of creating something beautiful with your hands. Taking your time will ensure a polished and finished result.
FAQ
1. What yarn is best for the Granny Square Bucket Hat?
Medium-weight yarn, such as worsted weight, works well for this pattern. Cotton yarn is recommended for a lighter hat, while acrylic yarn will make a sturdier and warmer hat.
2. How many granny squares do I need to make for the hat?
Typically, you will need 8-10 granny squares for the crown of the hat and additional squares for the brim, depending on your size and style preferences.
3. Can I make the hat larger or smaller?
Yes, you can adjust the size of the hat by adding or removing granny squares or adjusting the number of rounds in the brim and sides.
4. How do I change yarn colors in the granny square?
To change yarn colors, finish the current round with a slip stitch and attach the new color with a slip stitch or a chain, depending on your pattern. Continue crocheting as usual.
5. Is the Granny Square Bucket Hat pattern suitable for beginners?
Yes, the pattern is beginner-friendly, especially if you’re already familiar with the basic granny square stitch. The step-by-step instructions make it easy to follow.
6. Can I make a matching set of accessories with granny squares?
Absolutely! You can create matching items such as scarves, bags, or even mittens using the same granny square technique.
Conclusion
The Granny Square Bucket Hat Crochet – FREE PATTERNS is a wonderful and versatile project that allows you to showcase your creativity.
By following the steps outlined in this guide, you can create a unique and stylish bucket hat that you can be proud of. From selecting materials to assembling the hat, we’ve covered everything you need to know to make a gorgeous finished piece.
We hope you enjoyed this tutorial and are excited to try your hand at making your own granny square bucket hat.
VIDEO TUTORIAL
If you have any feedback or suggestions for future projects, please leave a comment below. We’d love to hear your thoughts!

