The Granny Square Bag Crochet – Tutorial is a delightful project for crocheters of all skill levels. Granny squares are timeless crochet motifs that have stood the test of time, and they make the perfect foundation for crafting a stylish and functional bag.
Whether you’re looking to create a unique accessory for yourself or as a thoughtful handmade gift, this tutorial will guide you through each step.
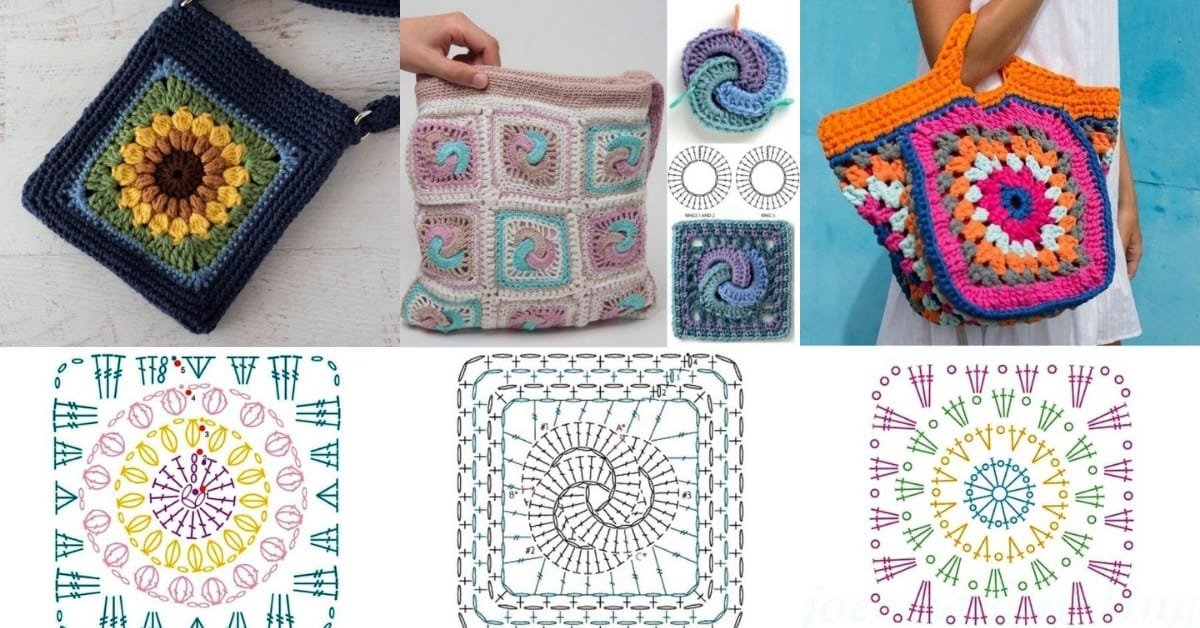
In this Granny Square Bag Crochet – Tutorial, you’ll learn how to crochet classic granny squares, join them together, and assemble a beautiful, sturdy bag.
It’s a versatile project that allows you to play with different yarn colors, textures, and patterns, making each bag uniquely yours. Best of all, granny square bags are not only trendy but also eco-friendly, as they are often made with leftover yarn from previous projects.
Before diving into the steps, it’s essential to have the right materials on hand. Gathering the correct supplies and understanding the basic stitches will ensure your Granny Square Bag Crochet turns out perfectly. Let’s get started!
1. Materials and Tools for Your Granny Square Bag
To begin your Granny Square Bag Crochet – Tutorial, you will need to gather the following materials. Having everything on hand before you start will make the process smoother and more enjoyable.
- Yarn: Choose a medium-weight yarn (like cotton or acrylic) in your desired colors. You can use multiple colors for a more vibrant bag or stick to a single color for a classic look. Scrap yarn also works well for this project.
- Crochet Hook: Use a crochet hook that matches the weight of your yarn. For most medium-weight yarns, a 4mm to 5mm hook will work best. Check the yarn label for recommendations.
- Scissors: A pair of sharp scissors is essential for cutting yarn neatly and efficiently.
- Yarn Needle: You’ll need a yarn needle to weave in the ends and sew the granny squares together. Make sure it has a large enough eye to accommodate your yarn.
- Lining Fabric (Optional): If you want to add extra structure to your bag, consider lining it with fabric. Choose a light, durable fabric that complements your yarn colors.
- Handles or Straps (Optional): For a more polished look, you can add store-bought handles or crochet your own straps to complete the bag.
2. How to Crochet Granny Squares
The foundation of any Granny Square Bag Crochet – Tutorial is, of course, the granny square itself. If you’re new to crochet or need a refresher, don’t worry! Here’s a simple step-by-step guide to crocheting your granny squares.
- Step 1: Start with a Slip Knot: To begin, make a slip knot and chain four stitches. Then, join the chain with a slip stitch to form a ring.
- Step 2: Create the First Round: Chain three (this counts as your first double crochet), and then work two more double crochets into the ring. Chain two, and repeat this pattern (three double crochets, chain two) three more times. You should have four clusters of three double crochets.
- Step 3: Complete the Round: After the last chain two, slip stitch into the top of the starting chain three to close the round. This completes the first round of your granny square.
- Step 4: Add Rounds: For the next round, chain three to start, and work two double crochets into the corner space. Chain two, then work three double crochets into the next chain space. Repeat this pattern around, always placing three double crochets into each chain space, and chaining two in the corners.
- Step 5: Continue Expanding: Repeat the pattern for as many rounds as you like, depending on the size of the square you want. Most granny squares for bags are about four to five rounds.
- Step 6: Finish and Fasten Off: Once your granny square is the desired size, cut the yarn and pull it through the loop to fasten off. Use a yarn needle to weave in the ends.
3. Assembling the Granny Square Bag
Once you’ve completed all your granny squares, it’s time to assemble the pieces and turn them into a bag. In this Granny Square Bag Crochet – Tutorial, we’ll go over how to join your squares and shape them into a functional bag.
- Step 1: Arrange Your Granny Squares: Lay out your granny squares in the desired configuration. For a standard bag, you’ll need about eight to twelve squares, depending on the size. You can arrange them in a rectangle for a tote-style bag or in a different configuration for other shapes.
- Step 2: Joining the Squares: There are several methods for joining granny squares, including slip stitching, whip stitching, or crocheting them together. Choose the method that works best for you. Be sure to align the edges of the squares neatly.
- Step 3: Create the Sides and Base: Once the front and back panels are assembled, crochet additional granny squares or plain double crochet rows to create the sides and base of the bag. This will give your bag more depth and space to hold items.
- Step 4: Sew the Sides Together: After crocheting the sides and base, sew or crochet them to the front and back panels. Make sure all seams are secure and even.
- Step 5: Add Lining (Optional): If you’ve chosen to line your bag, cut the fabric to fit the inside dimensions of the bag and sew it into place. This will add durability and a more finished look.
- Step 6: Attach Handles or Straps: For the final touch, add handles or crochet straps to your bag. If you’re using store-bought handles, sew them securely to the top edge of the bag. For crocheted straps, attach them to the sides of the bag using sturdy stitches.
4. Customizing Your Granny Square Bag
One of the best things about the Granny Square Bag Crochet – Tutorial is that it’s highly customizable. You can make your bag as simple or as elaborate as you like, depending on your preferences and skill level.
- Change Up the Colors: Play with color combinations to make your bag truly one-of-a-kind. You can use a rainbow of colors for a vibrant, eye-catching bag or stick to neutral tones for a more subtle look.
- Add Embellishments: Crochet flowers, buttons, or tassels can be added to your granny squares or bag straps to give it extra flair. These small details can make a big difference in the overall appearance of your bag.
- Experiment with Different Yarn: While medium-weight yarn is the most common choice for granny square bags, you can experiment with different yarn textures and weights for a unique effect. Just be sure that the yarn is sturdy enough to hold the shape of the bag.
- Try Different Granny Square Patterns: There are many variations of the classic granny square pattern. You can mix and match different types of granny squares for a more eclectic look or stick with one pattern for a more cohesive design.
- Crochet a Matching Pouch: If you have leftover yarn, consider crocheting a small matching pouch to go inside your bag. This can be used to hold smaller items like keys, makeup, or coins.
- Personalize the Lining: If you’re adding fabric lining to your bag, choose a pattern or color that reflects your personality. The lining can also provide additional structure and durability to your bag.
FAQ
Q: Is the Granny Square Bag Crochet project suitable for beginners?
A: Yes, the Granny Square Bag Crochet – Tutorial is ideal for beginners. Granny squares are simple to crochet, and the process of joining them to create a bag is straightforward.
Q: How many granny squares do I need to make a bag?
A: The number of granny squares depends on the size of the bag you want to create. Typically, you’ll need about 8 to 12 squares for a standard-sized tote bag, but you can add more or fewer depending on your desired size.
Q: Can I use different yarn weights for the granny square bag?
A: While medium-weight yarn is recommended for most granny square bags, you can experiment with different yarn weights. However, keep in mind that lighter yarn may result in a flimsier bag, while heavier yarn can make the bag bulkier.
Q: How do I make the bag more durable?
A: To add durability, consider lining the bag with fabric or using a tight stitch for joining the squares. Additionally, choosing a strong, durable yarn like cotton or acrylic will help the bag hold up over time.
Q: Can I wash my granny square bag?
A: Yes, most granny square bags made with cotton or acrylic yarn can be washed. Be sure to follow the washing instructions on your yarn label, and handwashing is often the safest option to avoid stretching or damaging the bag.
Q: How long does it take to make a granny square bag?
A: The time it takes to complete a granny square bag will vary depending on your skill level and the complexity of your design. However, most crocheters can finish the project within a few days or a week.
Join our VIP broadcast list and gain access to exclusive patterns, all for free. As a VIP member, you’ll receive the best patterns daily, delivered directly to your device. ✨📱 It’s a unique opportunity to stay up-to-date with the latest trends and designs, curated just for you. Don’t miss out on enhancing your projects and discovering new inspirations with the best patterns every day! 🎨🔝
Conclusion
In this Granny Square Bag Crochet – Tutorial, we’ve walked through the steps of creating a beautiful and functional crochet bag using timeless granny squares. From gathering your materials to customizing your design, this project offers plenty of room for creativity and personalization. The end result is a stylish and eco-friendly accessory that you’ll be proud to carry or gift.
We hope this tutorial has inspired you to try your hand at crocheting a granny square bag. Feel free to share your thoughts, suggestions, or any tips you’ve picked up along the way in the comments below. Happy crocheting!

