Gingerbread House Tissue Box Cover Pattern is a delightful and cozy holiday craft that brings handmade charm to your winter décor.
Creating your own Gingerbread House Tissue Box Cover Pattern allows you to combine creativity, practicality, and the warm spirit of Christmas in a single project.
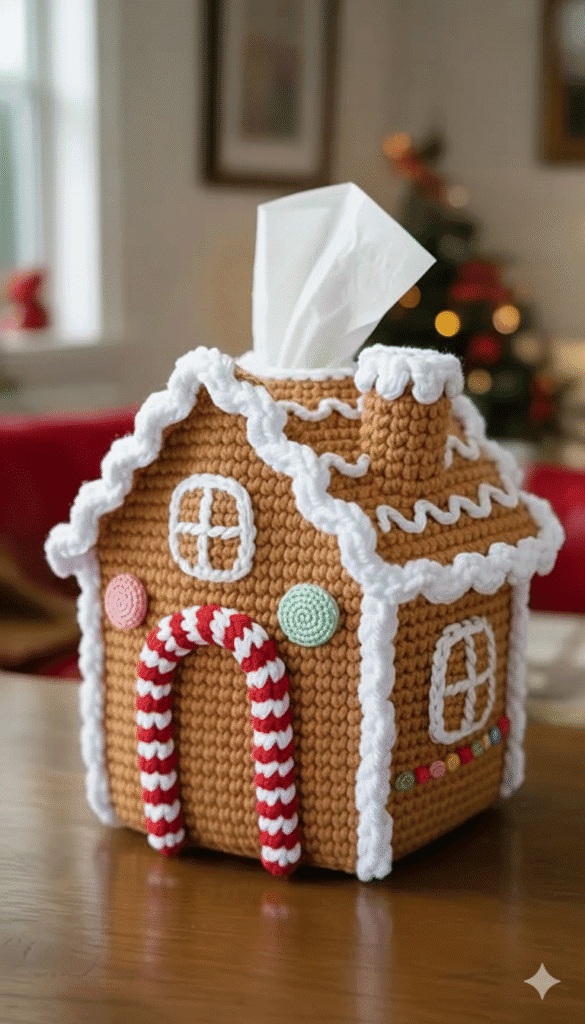
This pattern transforms an ordinary tissue box into a whimsical gingerbread house, complete with stitched details, decorative “icing,” and all the festive touches that make this a show-stopping seasonal piece.
For makers who enjoy sewing, crafting, or decorating for the holidays, this is a project that feels both meaningful and fun, producing something you can proudly display year after year.
Crafting a Gingerbread House Tissue Box Cover Pattern is not only about aesthetics but also about adding functional beauty to your home. Instead of leaving a plain cardboard tissue box sitting on a table, this handmade cover turns it into a centerpiece that enhances your décor. Whether placed in the living room, kitchen, office, or even a child’s bedroom, this cover immediately creates a festive atmosphere. The joy of working with fabric, felt, trims, and embellishments makes the process rewarding, and the finished product feels like a miniature piece of holiday art.
Another wonderful aspect of the Gingerbread House Tissue Box Cover Pattern is how customizable it is. You can adjust the colors, trims, gingerbread details, candy accents, and roof design to match your personal holiday theme. Some makers enjoy traditional gingerbread colors with white icing, while others prefer vibrant candy-inspired palettes filled with reds, greens, blues, and pastels. No matter your style, this charming project offers endless opportunities for creative expression while remaining accessible to beginners and satisfying for experienced crafters.
Understanding the Gingerbread House Tissue Box Cover Pattern
When crafting a Gingerbread House Tissue Box Cover Pattern, the first key concept is recognizing that the cover is built like a soft, fabric-based “box” that slips over a standard square tissue box. The pattern typically includes four side panels and one top panel. Each panel is decorated before assembly, making the stitching process easier and allowing finer details to be added without distortion. This ensures clean lines and a professional, well-structured look.
The design naturally imitates the shape of a gingerbread house. The front panel often features a door and windows, while the side panels may include more windows, stitched candy decorations, stitched snow, or embroidered motifs. The back panel can either match the sides or include its own unique pattern. The top panel usually showcases the tissue opening, framed in a way that resembles a chimney or rooftop opening.
Choosing the right materials is essential for achieving a sturdy and visually appealing finish. Felt is one of the most recommended materials because it holds its shape, doesn’t fray, and is easy to cut and stitch. However, cotton fabric with interfacing is also an excellent option for those who prefer more traditional textile construction. Embellishments such as ribbon, pom-poms, ricrac, beads, or buttons help create the signature “candy” and “icing” details associated with gingerbread houses.
Once the fabric pieces are cut and decorated, they are stitched together using a basic seam method. Reinforcing the seams ensures the cover stays upright when placed over the tissue box. The final result is a sturdy, adorable, and festive gingerbread house ready to brighten your home for the holiday season.
Materials Needed for the Pattern
To create a Gingerbread House Tissue Box Cover Pattern, you will need felt or cotton fabric in gingerbread colors along with white felt or trim for the icing. You will also need embroidery thread or sewing thread for constructing the panels and adding decorative details. Scissors or a rotary cutter will help you achieve clean edges and precise shapes while working on each piece.
You’ll also need interfacing or stabilizer if you prefer a more structured design. These materials help the cover maintain its shape and stand upright over the tissue box. Glue is optional but can help attach embellishments securely when sewing them on is too delicate or time-consuming. A sewing machine is helpful but not required, since felt and small-scale projects are easy to complete by hand.
Decorative elements play a big role in bringing this project to life. Pom-poms, buttons, beads, sequins, ricrac, and ribbon are excellent choices for candy accents and frosting details. You may also include lace or crocheted trim for a textured icing effect. The combination of embellishments creates the magical gingerbread look that makes this tissue box cover feel like a holiday treasure.
You will also need a ruler or measuring tape to ensure that your panels match the dimensions of your tissue box. Not all tissue boxes are identical, so taking accurate measurements ensures a perfect fit. Craft pins, clips, or fabric weights will help hold pieces in place as you stitch and assemble the structure.
Once you gather all your materials, you’re ready to begin the creative part: designing each panel and making your gingerbread house unique. The materials you choose will shape the final look, making the project both flexible and personalized.
Steps to Sew the Gingerbread House Tissue Box Cover
The first step in sewing a Gingerbread House Tissue Box Cover Pattern is cutting out the panels according to your measurements. Generally, you will cut four side panels and one top panel. If you are using felt, you can cut the pieces directly. If you are using fabric, apply interfacing to the wrong side before cutting, helping stabilize the material.
Next, decorate each panel separately. Start with the main features: the door, windows, gumdrops, candy canes, stars, snowflakes, or whatever design you want on your gingerbread house. Use contrasting fabric colors, felt cutouts, embroidery, or applique techniques to create your details. Making the decorations first ensures accuracy and prevents difficulty once the panels are stitched together.
After the decorations are finished, assemble the structure by sewing the panels together. Begin by stitching the front panel to the two side panels, then attach the back. Sew each seam carefully to maintain straight edges. Once the four side panels are attached, sew the top panel onto the assembled “box.”
Next, reinforce the corners and seams. Pressing the seams outward and stitching an additional line can strengthen the cover. This helps the house maintain its shape and prevents the structure from collapsing. At this stage, you can also add additional decorative trim around the rooftop edges for a snowy look.
Finally, test the fit by sliding the cover over your tissue box. If adjustments are needed, make small refinements to the seams. When everything fits perfectly, your gingerbread house is complete and ready for display.
Display Ideas and Custom Variations
One creative idea is to display your Gingerbread House Tissue Box Cover Pattern as part of a winter village scene on a shelf or mantel. Pair it with small Christmas houses, mini trees, or battery-powered lights to create a cozy scene. The tissue opening can resemble a chimney with “smoke” coming out, adding charm to the décor.
Another idea is to make themed versions of the gingerbread house. For example, you can create a pastel candy house, a snowy white peppermint design, or a Santa-themed house with red and gold. Each variation allows you to match your seasonal décor perfectly and personalize the project for gifting.
The tissue box cover also makes a thoughtful handmade Christmas gift. Friends, family members, teachers, coworkers, or neighbors will appreciate a seasonal decoration made with care. Because it’s functional and decorative, it appeals to a wide variety of recipients.
You can also scale the design up or down depending on your tissue box size or your creative vision. Taller boxes, rectangular boxes, or travel-size boxes can all be transformed into gingerbread houses with simple pattern adjustments. This flexibility makes the craft suitable for multiple uses.
Many crafters enjoy adding embroidered messages, such as “Merry Christmas,” “Happy Holidays,” or the year of creation. These small touches add sentiment and make the piece timeless. Your gingerbread house can become an annual tradition that brings joy each holiday season.
FAQ
What materials work best for a Gingerbread House Tissue Box Cover Pattern?
Felt is the easiest and most beginner-friendly material because it holds its shape and doesn’t fray, but cotton with interfacing also works beautifully for a more structured look.
Can beginners make this tissue box cover?
Yes, this project is beginner-friendly. The simple construction and decorative freedom make it accessible for all crafting levels.
How long does it take to complete the project?
Most makers can complete it within a few hours to a full afternoon, depending on the level of decoration and detail.
Can I wash the tissue box cover?
It depends on the materials. Felt pieces should be spot-cleaned, while cotton fabrics with secure stitching may be hand-washed gently.
Can I customize the house to match my holiday décor?
Absolutely! You can choose any color scheme, add embellishments, or change the design to fit your style.
Does the pattern fit all tissue box sizes?
Measurements vary, so you should always measure your tissue box before cutting panels to ensure a perfect fit.
Conclusion
Creating a Gingerbread House Tissue Box Cover Pattern is a heartwarming and creative project that adds charm, personality, and holiday magic to your home. This craft transforms a simple tissue box into a festive decoration while allowing endless customization.
From selecting materials and designing panels to stitching details and adding embellishments, every step offers room for creativity. If you enjoyed this project, feel free to share your honest opinion and let me know what other patterns or tutorials you’d like to see next!

