The Easy Multicolor Crochet Waves Bag Pattern is a delightful project perfect for anyone looking to combine vibrant colors with a fun and useful accessory. Whether you’re a beginner exploring the world of crochet or a seasoned crafter searching for your next creative adventure, this bag will add a splash of color and personality to your handmade collection.
With its eye-catching ripple texture and a cheerful mix of colors, the Easy Multicolor Crochet Waves Bag is more than just a tote—it’s a statement piece. This project allows you to use leftover yarns creatively, resulting in a sustainable, practical, and gorgeous bag that can be used for shopping, beach days, or everyday wear.
What makes this pattern even more appealing is how approachable it is. The wave pattern might look complex at first glance, but it’s built on basic stitches and a simple repeating sequence. Even crochet enthusiasts with minimal experience can bring this bag to life with a bit of patience and joy for colors.
Materials You’ll Need to Crochet a Waves Bag
To get started with your Easy Multicolor Crochet Waves Bag Pattern, you’ll need to gather a few simple materials. One of the biggest advantages of this project is that you don’t need anything fancy. In fact, it’s a great opportunity to use up scraps or leftover yarns from past projects, especially in a variety of hues.
Choose medium weight cotton yarns or blends for durability. The multicolor design works best with 4 to 6 shades, but feel free to experiment. A 4mm to 5mm crochet hook is typically suitable, but you should always match it with the yarn label’s recommendation for a smooth finish and nice drape.
You’ll also need a tapestry needle for weaving in ends, a pair of sharp scissors, and stitch markers if you want to keep your pattern organized. Some crafters like to line their bags with fabric for extra strength, which is optional but adds a professional touch.
Finally, don’t forget to print or write down your Easy Multicolor Crochet Waves Bag Pattern before beginning. Keeping a physical or digital copy of your pattern close by will help you track your rows and color changes easily as you work through the beautiful wave stitches.
How to Crochet the Ripple or Wave Stitch
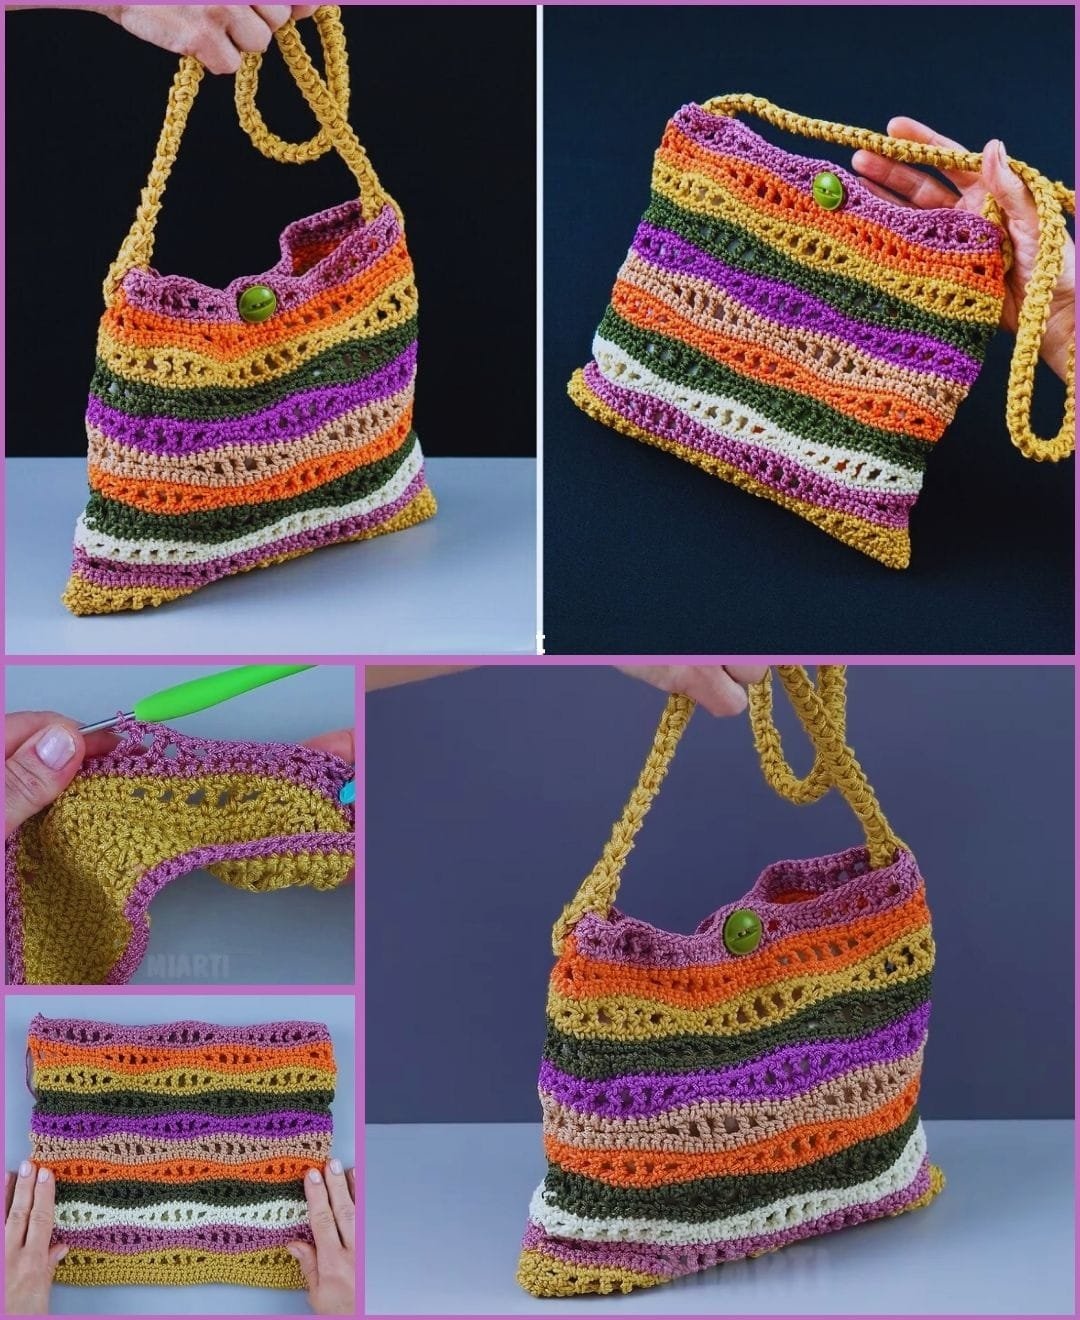
The defining feature of the Easy Multicolor Crochet Waves Bag Pattern is the wave stitch, also called ripple stitch. It gives the bag its stunning zigzag texture, mimicking gentle waves and allowing vibrant colors to truly shine.
The wave stitch is based on basic crochet techniques such as single crochet, half double crochet, and double crochet. These are organized in a repeated sequence that forms peaks and valleys, giving your project that classic ripple effect.
Start with a foundation chain in multiples of 14 plus two extra stitches. This ensures that the stitch pattern repeats properly across the row. Once you have your foundation, begin your first row using double crochet, increasing and decreasing as the pattern indicates to form the curves.
Color changes are best done at the end of each row for clean transitions. Use the last yarn-over of the final stitch to bring in your new color. This technique creates a seamless blend and maintains the integrity of the ripple shape throughout your Easy Multicolor Crochet Waves Bag.
Continue building your bag by working the same ripple rows and changing colors every 2-4 rows for a balanced look. Be consistent with your yarn tension to ensure your waves remain even and your bag retains its shape.
Practice a few rows on a small swatch if you’re new to ripple stitches. This helps you get comfortable with counting stitches and understanding where to place increases and decreases. Once you master this part, the rest of the Easy Multicolor Crochet Waves Bag Pattern flows easily.
Assembling and Shaping the Bag
Once the wave-stitched body of your Easy Multicolor Crochet Waves Bag is complete, it’s time to give it structure. Most designs are worked as a flat rectangle, which is then folded in half and seamed up the sides to form the bag body.
After folding your rectangle, use whip stitch or slip stitch to join the sides. If you’d like to add more dimension, you can create a flat bottom by sewing small triangles at the bottom corners inward, forming a gusset.
The top edge of the bag can be finished with one or two rows of single crochet for a neat appearance. This helps prevent the bag from stretching too much over time, especially if you’ll be carrying heavier items.
Now it’s time to create your handles or strap. The most common choice is to crochet two sturdy straps directly onto the bag with single or half double crochet rows. However, for a more stylish finish, you can attach bamboo or leather handles. Ensure your attachment points are reinforced with extra stitching for durability.
If you’re feeling adventurous, consider lining your bag with cotton fabric. Cut a rectangle the same size as the bag, sew the edges, and attach it inside with fabric glue or a hand-stitched seam. This optional step adds polish and protects the inside.
No matter how you finish your project, the assembly phase is your opportunity to customize the bag to suit your needs. With the Easy Multicolor Crochet Waves Bag Pattern, you have flexibility to adapt dimensions, add closures like zippers or buttons, or decorate with tassels and beads.
Tips for Choosing Colors and Customizing Your Waves Bag
Color choice plays a huge role in how your Easy Multicolor Crochet Waves Bag turns out. It’s where your personality and creativity really get to shine. Whether you prefer soft pastels, earthy neutrals, or bold brights, you can tailor the palette to suit your style.
Try using a gradient color scheme for a more harmonious look, or go bold with high contrast stripes. Using a neutral base color like white, gray, or black between your vibrant rows can also help the other shades pop beautifully.
Another fun idea is to use ombré yarns or self-striping yarns for effortless color transitions. This reduces the number of ends to weave in while still delivering a dynamic, multicolor effect.
You can also play with size and shape. Want a larger tote for beach days? Just increase the number of wave rows. Prefer a compact handbag for casual outings? Reduce the stitch and row count to scale the bag down.
If you plan to sell or gift your bags, consider adding a custom label or a little charm. Small touches make your finished project feel even more special and memorable.
Above all, don’t be afraid to experiment. The beauty of the Easy Multicolor Crochet Waves Bag Pattern lies in its versatility. There’s no “wrong” way to color it—only your way.
FAQ – Frequently Asked Questions About the Easy Multicolor Crochet Waves Bag Pattern
Q: Is this pattern beginner-friendly?
A: Yes! The Easy Multicolor Crochet Waves Bag Pattern uses basic stitches and a repeating pattern that is simple to follow, making it suitable for confident beginners and intermediate crocheters.
Q: How much yarn do I need for this project?
A: On average, you’ll need about 200-300 grams of worsted weight yarn in total, depending on your bag size. You can use multiple colors in smaller amounts, which makes this a great stash-busting project.
Q: Can I machine wash the bag?
A: It depends on the type of yarn used. Cotton and some blends are machine washable, but always check the yarn label. If you’ve added a lining, make sure it’s also washable or remove it before cleaning.
Q: What are the finished dimensions of the bag?
A: A standard size will measure around 12 to 14 inches wide by 10 inches tall, but this can be adjusted easily by increasing or decreasing stitch and row counts.
Q: Do I need to line the bag?
A: Lining is optional. It adds strength and durability but is not required for the Easy Multicolor Crochet Waves Bag to function. Many crafters enjoy the raw crochet texture without lining.
Q: Can I sell bags made from this pattern?
A: Absolutely! Handmade bags using your own materials and labor can be sold. It’s always good practice to mention that the design is based on a crochet wave pattern, especially if adapted.
Conclusion
Creating your own Easy Multicolor Crochet Waves Bag is a rewarding and enjoyable experience that brings together color, texture, and creativity. From selecting your yarn to stitching the final handle, every step offers room for personal expression. This pattern is adaptable, beginner-friendly, and results in a beautiful, functional accessory that you’ll be proud to use or gift.
We hope this guide helped you understand the steps and inspired you to start your own crochet bag today. If you’ve completed your bag, we’d love to hear your thoughts! Feel free to leave a sincere opinion or share suggestions to help us improve and bring more creative ideas to the community.

