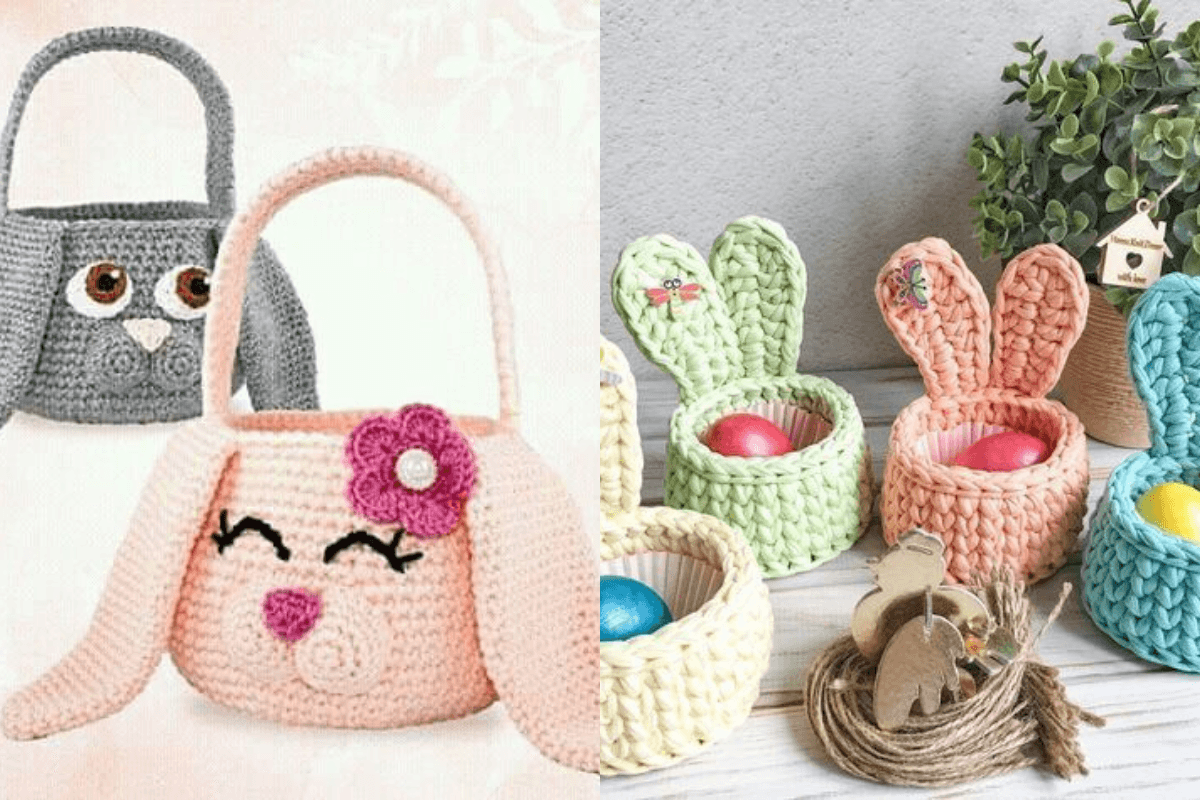
If you’re looking for a fun and festive project, DIY Cute Easter Bunny Basket Crochet Patterns are a great choice! These adorable crochet baskets can be filled with treats or small gifts, making them the perfect addition to your Easter celebrations.
With a few simple materials and crochet stitches, you can create a charming bunny basket that kids and adults alike will love. The best part? These crochet baskets are customizable, allowing you to experiment with colors, patterns, and embellishments to suit your style.
Crocheting an Easter bunny basket is not only a delightful way to express creativity but also a wonderful skill-building opportunity. These baskets can be as simple or as intricate as you like, making them ideal for both beginners and more experienced crafters.
In this guide, we’ll take you through the essentials for creating DIY Cute Easter Bunny Basket Crochet Patterns. You’ll learn about the materials needed, basic crochet stitches, and how to assemble your basket to give it that classic bunny look.
Whether you’re crafting a basket for decoration or as a thoughtful handmade gift, these crochet bunny baskets are sure to bring joy and a touch of springtime magic. Let’s dive into the world of Easter Bunny Basket Crochet Patterns and get ready to create something special!
1. Choosing the Right Materials for Your Bunny Basket
To start creating your DIY Cute Easter Bunny Basket Crochet Patterns, you’ll need to gather the right materials. The type of yarn you choose and the tools you use will affect both the appearance and durability of your basket. Here’s what you’ll need to get started.
A soft, medium-weight yarn works well for crochet baskets. Cotton yarn is a popular choice as it’s both durable and easy to work with, making it ideal for beginners. Cotton also holds its shape well, which is essential for a basket. You can also consider a wool blend or acrylic yarn if you prefer a softer feel or more vibrant colors. Pastel colors, like pink, blue, yellow, and white, are traditional choices for Easter themes, but feel free to experiment.
You’ll also need a crochet hook that matches your yarn’s recommended size. A size H-8 (5.0 mm) or I-9 (5.5 mm) hook is typically suitable for medium-weight yarn. The hook size can influence the tightness of your stitches; a smaller hook creates a denser basket, while a larger hook gives a looser structure.
Lastly, don’t forget the decorative elements! Adding a pair of safety eyes, a pom-pom for the tail, and felt pieces for the ears can give your bunny basket a playful look. You might also want a darning needle for sewing parts together and scissors for trimming any loose ends. These details help bring your bunny to life, making it a cute and functional Easter accessory.
2. Basic Crochet Stitches for an Easter Bunny Basket
To create your DIY Cute Easter Bunny Basket Crochet Patterns, you’ll need to know a few basic crochet stitches. Luckily, the basket primarily requires simple stitches, making it a beginner-friendly project with room for customization as you grow more confident in your skills.
The first stitch you’ll need to master is the single crochet. This is the foundational stitch for many crochet projects and is great for creating a dense, sturdy texture. To make a single crochet, insert your hook into the stitch, yarn over, pull up a loop, then yarn over again and pull through both loops on your hook. This stitch is commonly used in baskets as it creates a tight weave that helps the basket hold its shape.
The chain stitch is another essential stitch for creating your bunny basket. You’ll use it to start your rounds and sometimes for shaping parts of the basket. It’s the simplest crochet stitch and serves as the foundation for more complex patterns. To make a chain, yarn over and pull through the loop on your hook, then repeat.
For a bit of texture, you may also want to use the half double crochet stitch. This stitch is taller than a single crochet but shorter than a double crochet, giving your basket a soft but defined look. To make a half double crochet, yarn over, insert the hook into the stitch, yarn over again, pull through, yarn over one last time, and pull through all three loops on your hook.
Once you’re familiar with these stitches, you’ll be able to create the main body of your basket. Don’t be afraid to mix things up with different stitch patterns or try out color changes as you go.
3. Shaping and Assembling Your Bunny Basket
Now that you’ve practiced the basic stitches, it’s time to shape and assemble your DIY Cute Easter Bunny Basket Crochet Patterns. This part of the project is where your basket will start to take on its bunny-like features, including ears, a cute little face, and a pom-pom tail.
Begin with the base of your basket. You can create a round base by starting with a magic ring and working single crochet stitches in the round, gradually increasing the number of stitches to form a flat circle. Once you reach your desired base size, stop increasing stitches to create the walls of the basket. This technique helps the basket stand upright and hold its shape.
Next, you’ll add the ears. To make the ears, crochet two oval shapes using single crochet stitches. Start with a foundation chain, then work back and forth along the chain, increasing stitches at the ends to create a rounded shape. Once complete, sew the ears to the top edge of the basket, placing them evenly apart.
For the bunny’s face, you can add safety eyes and embroider a small nose and whiskers. Safety eyes add a charming touch but make sure they’re secure, especially if the basket is for young children. You can also create the eyes with yarn if you prefer a fully handmade look.
Finally, add the tail by attaching a small pom-pom to the back of the basket. You can use a store-bought pom-pom or make your own with yarn. This little detail adds an adorable touch and gives the basket a classic bunny look.
4. Customizing and Decorating Your Easter Bunny Basket
One of the best parts of making a DIY Cute Easter Bunny Basket Crochet Patterns is the opportunity to customize it. You can tailor the basket to your style or the recipient’s preferences, making it a unique and thoughtful Easter gift.
Start with colors. While pastels are classic Easter shades, feel free to experiment with other colors that catch your eye. Bright or neutral tones can create a modern, whimsical look, while traditional pastels bring a soft, springtime feel.
Next, consider adding decorative elements to make your bunny basket stand out. Little bows, flower appliques, or even tiny crocheted carrots can be attached to the basket or the ears for a playful twist. Embellishments like ribbons or lace also add charm and can help give your bunny basket a unique character.
You can also personalize the size of the basket. Smaller baskets make great treat holders, while larger ones can hold bigger gifts or be used as home decor. Adjusting the number of rounds in your basket will increase or decrease its size, making it versatile for various uses.
Finally, don’t hesitate to add special finishing touches. A little embroidered monogram or name tag can transform the basket into a keepsake, especially if you’re making it as a gift. These small details add personality and make your crochet project truly one-of-a-kind.
FAQ
Q1: How long does it take to crochet an Easter bunny basket?
A1: The time depends on your skill level and the complexity of the pattern. Generally, a simple bunny basket can take a few hours to complete, while more detailed versions may take longer.
Q2: What size crochet hook should I use for a bunny basket?
A2: A hook size of H-8 (5.0 mm) or I-9 (5.5 mm) is usually recommended for medium-weight yarn. Using a smaller or larger hook can change the basket’s texture and size.
Q3: Can I make a bunny basket without safety eyes?
A3: Yes, you can create the eyes with yarn or felt to make a fully handmade version, which is especially suitable if the basket is for young children.
Q4: Can I wash my bunny basket?
A4: Yes, but be sure to check the yarn label for washing instructions. Many cotton yarns are machine washable, but decorations like safety eyes and embellishments may require gentle hand washing.
Q5: How do I make the bunny ears stand upright?
A5: Using a stiffer yarn or adding a wire frame inside the ears can help them stand up. Alternatively, starching the ears lightly may add some structure.
Q6: Are there other animals I can make with this basket pattern?
A6: Absolutely! By modifying the ears, face, and embellishments, you can create baskets that resemble other animals, such as a cat, bear, or lamb.
Join our VIP broadcast list and gain access to exclusive patterns, all for free. As a VIP member, you’ll receive the best patterns daily, delivered directly to your device. ✨📱 It’s a unique opportunity to stay up-to-date with the latest trends and designs, curated just for you. Don’t miss out on enhancing your projects and discovering new inspirations with the best patterns every day! 🎨🔝
Conclusion
We hope this guide has inspired you to create your own DIY Cute Easter Bunny Basket Crochet Patterns. With a few basic materials, some simple crochet stitches, and a bit of creativity, you can make an adorable Easter accessory that’s both practical and decorative. From choosing yarn and colors to shaping the basket and adding finishing touches, each step brings you closer to a unique handmade piece.
Let us know your thoughts in the comments below, and feel free to share any tips or suggestions for fellow crocheters. We can’t wait to hear how your bunny baskets turn out! Happy crocheting!

