There is something truly magical about creating a crochet snowflake pattern. Whether you are an experienced crocheter or a beginner looking for a cozy winter project, snowflakes offer endless possibilities.
The popularity of crochet snowflake patterns has grown because of their versatility. You can use them to decorate your Christmas tree, make holiday garlands, embellish gifts, or even hang them as window ornaments. Each snowflake can be as simple or as intricate as you desire, giving you the freedom to express your creativity.
Crocheting snowflakes is also a wonderful way to relax and embrace mindfulness. The repetitive rhythm of stitches, the gentle texture of the yarn, and the satisfaction of seeing your project take shape can bring a sense of calm.
Choosing the Right Materials for Your Crochet Snowflake Pattern
Before starting your crochet snowflake pattern, choosing the right materials is essential for achieving the best results. The quality of your thread, the size of your hook, and even your choice of color can significantly affect the final look of your snowflake.
First, most crocheters prefer to use cotton thread rather than yarn for snowflakes. Cotton thread creates a more delicate and defined stitch, perfect for intricate lace-like designs. Sizes 10 or 20 crochet thread are excellent options because they are thin but strong, ensuring your snowflake maintains its shape. For those who prefer a slightly chunkier look, a light fingering or lace-weight yarn can also work beautifully.
Second, selecting the correct crochet hook size is vital. Using a smaller hook (like a 1.5 mm or 2 mm) will give your snowflakes a tighter, more detailed appearance. If you use thicker yarn, you might need a larger hook, but remember that finer details may be lost with bulkier fibers. Always check your pattern’s recommendation for the ideal hook size.
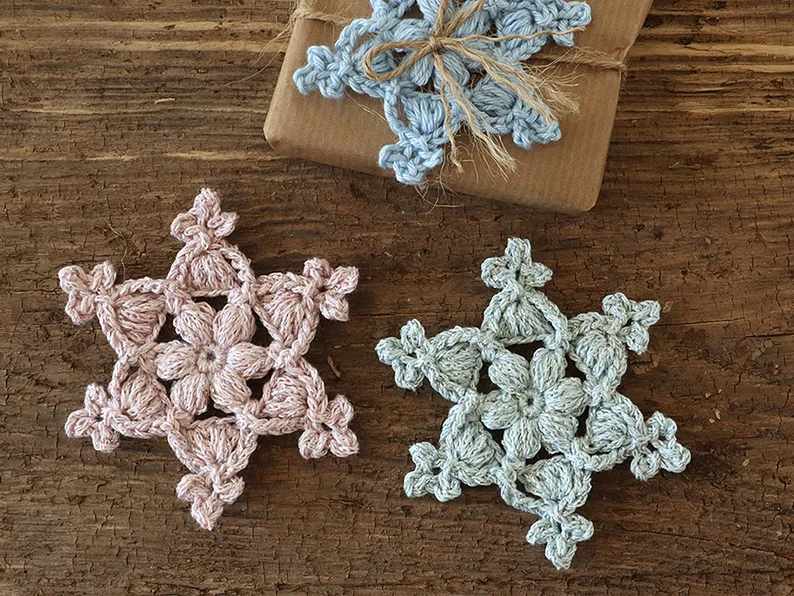
Next, consider your color palette. Traditional white and silver are timeless choices for crochet snowflake patterns, reflecting the beauty of real snow. However, don’t hesitate to explore creative colors—light blue, icy lavender, or even gold thread can make your snowflakes stand out.
Once your snowflakes are complete, you may want to stiffen them for better definition. A simple mixture of white glue and water, or commercial fabric stiffener, works perfectly. Dip your finished snowflake, shape it carefully, and let it dry flat on wax paper. This step ensures your delicate design remains crisp and lasts for many seasons.
Finally, keep your tools handy—sharp scissors, a tapestry needle for weaving in ends, and blocking pins to help shape your finished work. Having everything organized before you begin your crochet snowflake pattern makes the process smooth and enjoyable.
Step-by-Step Tips for Crocheting Snowflakes
Once you have your materials ready, it’s time to begin your crochet snowflake pattern. Whether you are following a diagram or a written guide, these general steps and tips can help you create stunning results every time.
Start with a magic ring or chain loop, which forms the snowflake’s center. This base allows you to build outward in symmetrical rounds. Most crochet snowflake patterns use basic stitches like chains, single crochet, double crochet, and slip stitches. Even though these stitches are simple, combining them strategically creates complex and beautiful designs.
The key to making perfect snowflakes is symmetry. Count your stitches carefully to ensure all sides are even. If you notice any unevenness, unravel a few stitches and redo them—precision makes a huge difference in how professional your finished snowflake looks.
Blocking your snowflake is another crucial step. After finishing your last round, gently wash or steam your piece and pin it on a foam board. This will help it keep its shape and showcase every beautiful point and loop of your design.
Experimentation can also be part of the fun. Try modifying a crochet snowflake pattern by adding extra picots for a spikier design or changing the stitch type in certain sections. No two snowflakes in nature are identical, so why should yours be? Customizing patterns is a great way to develop your own unique creations.
Lastly, remember that practice makes perfect. The more snowflakes you crochet, the easier it becomes to read patterns, maintain consistent tension, and achieve symmetrical results. Before long, you’ll be able to design your own crochet snowflake pattern from scratch.
Creative Ways to Use Crochet Snowflake Patterns
Crocheted snowflakes are not just pretty—they are incredibly versatile. There are countless ways to incorporate your crochet snowflake pattern into your home decor or gift projects.
One of the most popular uses is creating Christmas ornaments. Add a small loop of thread to the top of your finished snowflake and hang it on your Christmas tree. The delicate lace and intricate details shimmer beautifully against twinkling lights, creating a magical holiday atmosphere.
Another creative idea is making snowflake garlands. Connect several snowflakes with a long chain or ribbon and hang them along a fireplace, window, or wall. A crochet snowflake pattern garland adds a cozy handmade touch to your festive decor.
You can also use snowflakes to decorate gifts. Instead of using disposable bows, attach a crocheted snowflake to a wrapped present. It’s an elegant and eco-friendly way to personalize your packaging while giving an extra keepsake to the recipient.
For table decorations, try using stiffened snowflakes as coasters or as part of a winter-themed centerpiece. You can even frame your best designs in shadow boxes or use them in greeting cards.
If you enjoy wearing your creations, consider turning smaller snowflakes into jewelry—delicate earrings, brooches, or pendants. Using metallic or glitter thread can give your accessories a festive sparkle.
Lastly, remember that handmade snowflakes make thoughtful gifts. Giving someone a handcrafted crochet snowflake pattern piece shows care, creativity, and love—a perfect gesture during the holiday season.
Tips for Perfecting and Preserving Your Crochet Snowflakes
Once your snowflakes are finished, it’s important to care for them properly so they remain beautiful year after year. Proper finishing and storage techniques can make a big difference in how your crochet snowflake pattern projects age over time.
First, blocking and stiffening are essential. After stiffening your snowflakes, make sure they dry completely before handling. This will help them stay flat and firm. Avoid over-saturating the thread with glue, as it may make the snowflake look dull or stiff like cardboard. Aim for a light coating that maintains flexibility.
Second, store your snowflakes flat between sheets of tissue paper to prevent wrinkles. If possible, keep them in a sealed plastic container to protect them from dust and moisture. For snowflakes with beads or metallic threads, wrap them individually to prevent tangling or scratching.
If your snowflakes lose shape over time, simply re-dampen them and re-pin for a quick refresh. Cotton and thread respond well to reshaping, so your crochet snowflake pattern pieces can always look brand new with minimal effort.
FAQ About Crochet Snowflake Patterns
1. What materials do I need to make a crochet snowflake pattern?
You will need cotton thread (usually size 10 or 20), a small crochet hook (1.5–2 mm), scissors, a tapestry needle, and optional stiffener for shaping.
2. Can beginners make crochet snowflakes?
Absolutely! Many crochet snowflake patterns are beginner-friendly. Start with simple designs using basic stitches before moving to more complex ones.
3. How do I stiffen crochet snowflakes?
Mix white glue with water (1:1 ratio), dip your snowflake, shape it on wax paper, and let it dry. Commercial stiffeners also work well.
4. What can I do with my finished snowflakes?
Use them as ornaments, garlands, coasters, or decorations for gifts and tables. You can even make jewelry or framed art from them.
5. Can I wash crochet snowflakes?
Yes, but do so gently. Hand wash in cool water with mild soap, then reshape and let them dry flat to maintain their form.
6. How long does it take to make one snowflake?
Depending on the complexity, a single crochet snowflake pattern can take anywhere from 20 minutes to two hours to complete.
Conclusion
Creating a crochet snowflake pattern is a wonderful way to celebrate the beauty of winter through art and craftsmanship. From selecting your materials to perfecting your stitches and shaping your design, every step adds joy and creativity to the process. These delicate decorations bring warmth to any space and serve as thoughtful handmade gifts.

