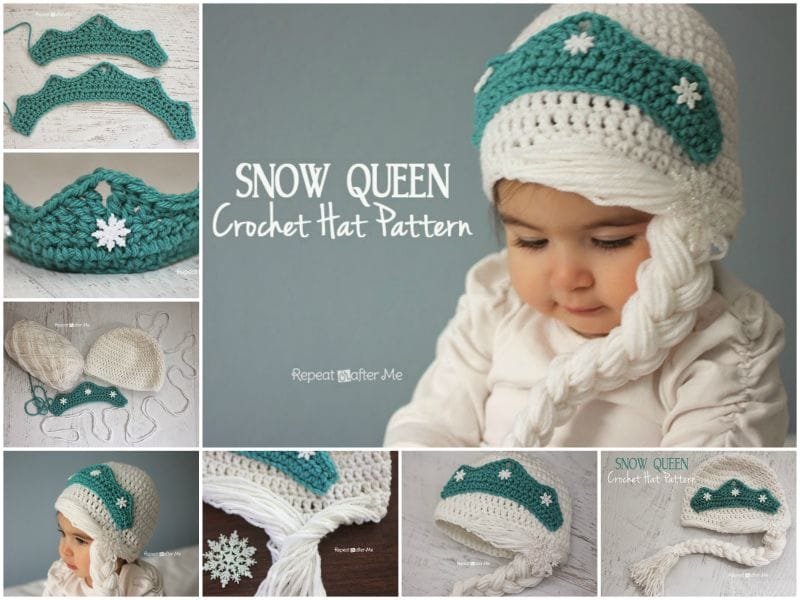
If you’ve been looking for a beautiful winter accessory that’s fun to make and delightful to wear, the Crochet Snow Queen Hat Pattern is your perfect match. This elegant and cozy hat blends a regal aesthetic with the charm of handmade crochet, making it a standout piece for your winter wardrobe or a thoughtful gift during the colder months. Whether you’re an experienced crocheter or just starting, this pattern offers a rewarding challenge that results in a wearable work of art.
Using the Crochet Snow Queen Hat Pattern, crafters can explore intricate stitches while learning how to shape and structure a hat that’s both stylish and warm. Inspired by icy fairytales and frosted landscapes, this hat carries a whimsical and elegant vibe. Its textures, layers, and optional embellishments like pearls or snowflake appliqués give it a magical flair fit for any winter queen — young or old.
In this article, we’ll walk through everything you need to know about creating your own Crochet Snow Queen Hat Pattern, from choosing materials to customizing the final look. Whether you’re making it for a child’s costume, a photo shoot, or just to feel extra special in the snow, this guide will help you crochet confidently and creatively.
Choosing the Right Yarn and Tools
Selecting the perfect materials is key to bringing your Crochet Snow Queen Hat Pattern to life. The right yarn can add softness, structure, and sparkle.
Start with a yarn that has a soft yet firm texture. Worsted-weight or DK yarns work wonderfully for this pattern. Look for yarns that include a touch of shimmer, such as those with metallic threads, to enhance the “snow queen” aesthetic.
Choose a crochet hook that complements your yarn choice. Most commonly, a 4.5mm to 5.5mm hook is ideal for worsted yarns. The hook should glide easily without snagging.
When it comes to color, traditional choices include icy blues, snowy whites, and silvery grays. These shades reinforce the winter magic of the design and allow embellishments to stand out.
Consider using faux fur or textured yarn for the brim to add a luxurious finish. It not only elevates the look but also adds extra warmth.
Don’t forget your tools: stitch markers, yarn needles, and scissors are essential. A row counter can also help keep track of your progress.
Gather all your materials before starting to ensure a smooth, uninterrupted crafting session.
Understanding the Stitch Work
The Crochet Snow Queen Hat Pattern uses a combination of classic and decorative stitches to create a unique texture.
The base of the hat typically starts with a magic ring and increases worked in double crochet or half-double crochet stitches. These form a sturdy foundation and allow the hat to expand smoothly.
Shell stitches are often used for decorative sections. These resemble miniature fans and give a snowflake-like feel to the design, adding elegance and dimension.
Front post and back post double crochets are used to create ribbing or raised effects. This technique adds structure to the brim and can frame the hat beautifully.
Picot edging is another popular feature in the pattern. It adds a dainty finish and mimics the delicate points of ice crystals.
If you’re new to any of these stitches, practicing on a swatch is a good idea before integrating them into the final piece.
Remember that tension matters. Keep your stitches consistent, especially if you’re switching between yarn types or stitch styles.
Adding Decorative Elements
What makes the Crochet Snow Queen Hat Pattern stand out is the opportunity for stunning embellishments.
Start with snowflake appliqués. These can be crocheted separately and sewn onto the finished hat. Use white or silver thread for a frosty effect.
Consider adding pearls, rhinestones, or small gems to the crown section. These accents reflect light and give a regal appearance, enhancing the winter theme.
Faux fur trims or pom-poms bring a cozy, glamorous look. Choose white or pale gray for a classic touch, or add a hint of sparkle with glitter thread.
You can also crochet a matching motif such as a small snow wand, especially if the hat is part of a costume set.
For a more whimsical approach, create icicle-like fringe hanging from the brim using chain stitches and lightweight yarn.
Personalize your hat further with initials, symbols, or additional motifs depending on the intended recipient and use.
Tips for Sizing and Fit
Proper sizing ensures that your Crochet Snow Queen Hat Pattern fits comfortably and looks professional.
Start by measuring the head circumference of the wearer. This will guide you in determining how many increase rounds are needed at the top of the hat.
For children’s sizes, fewer increases and a shorter height will suffice. For adult sizes, you’ll need to add both width and length to cover the ears fully.
Use adjustable sizing techniques, such as a stretchy ribbed brim, to make the hat more versatile for different head shapes.
Trying on the hat (or placing it over a balloon or mannequin head) as you go helps catch fit issues early.
Avoid over-tightening your stitches, which can reduce elasticity and cause the hat to feel too snug.
Remember that yarns with a higher wool content may shrink slightly after washing, so size accordingly if you plan to block or launder the hat.
FAQ — Frequently Asked Questions
What level of experience is needed for the Crochet Snow Queen Hat Pattern?
This pattern is best suited for intermediate crocheters due to its decorative stitches and shaping techniques. However, determined beginners can succeed with patience and some practice.
Can I use different yarn weights for this pattern?
Yes, but you’ll need to adjust the hook size and stitch counts. Using bulkier yarn will create a larger, warmer hat, while finer yarns give a more delicate look.
How long does it take to make the Snow Queen Hat?
Most crafters can complete the hat in 5 to 8 hours, depending on embellishments and experience level. It’s a weekend project for most.
Is this pattern suitable for kids?
Absolutely! The pattern can be resized easily for toddlers, children, and teens. Just adjust the starting circumference and number of rounds accordingly.
Can I wash the hat after adding embellishments?
Yes, but always use gentle hand washing, especially if your hat includes pearls or faux fur. Lay flat to dry and avoid wringing or heat.
What type of stitch creates the “crown” effect on the hat?
Shell or fan stitches combined with post stitches create the raised, crown-like effect that gives the Snow Queen Hat its regal shape.
Conclusion
Creating your own Crochet Snow Queen Hat Pattern is a magical journey into winter elegance and creativity. From selecting shimmering yarn to shaping delicate snowflake-like motifs, each step allows you to bring a unique accessory to life. This pattern is not just about staying warm — it’s about expressing personality, skill, and imagination through crochet.
We hope this guide helped you understand how to make the most of this enchanting project. If you tried the pattern or plan to, we’d love to hear from you! Share your experience, leave a sincere opinion, and let us know what other magical crochet patterns you’d love to see.

