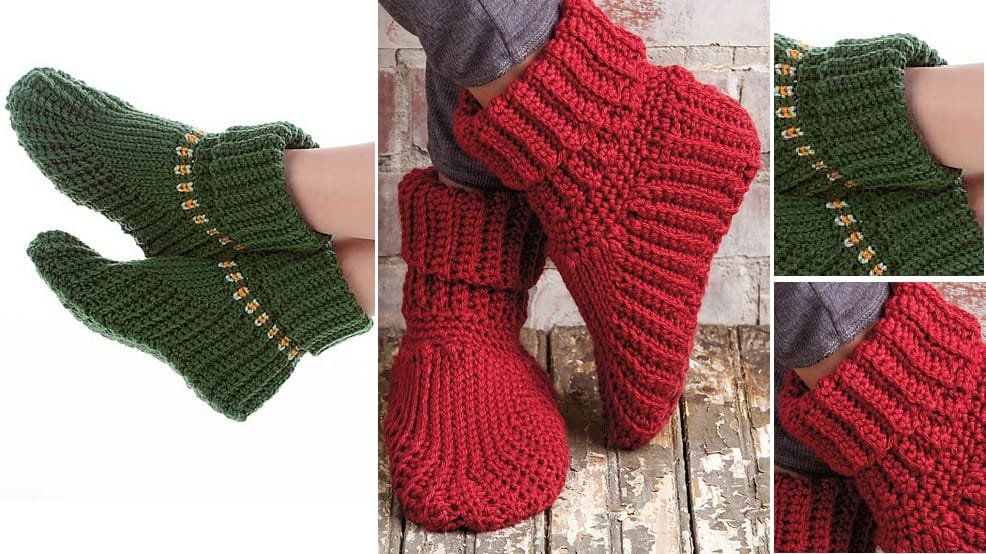
Crochet Slipper Boots are a fantastic way to combine comfort and style. If you’re looking for a cozy and fashionable way to keep your feet warm, this guide is perfect for you.
Whether you’re an experienced crocheter or a beginner, creating your own pair of Crochet Slipper Boots is a rewarding project that allows you to customize them according to your preferences.
In this Ultimate DIY Guide, we’ll cover everything you need to know, from choosing the right yarn to step-by-step instructions to create your very own cozy boots.
When it comes to winter accessories, crochet projects are among the most popular choices. Not only do they provide warmth, but they also allow you to express your creativity and personal style.
Crochet Slipper Boots are especially beloved because they combine the practicality of slippers with the trendy design of boots. You can make them in any color or design you prefer, and they can easily be personalized to match your home décor or wardrobe.
Before we dive into the process, let’s first look at the essential tools and materials you’ll need to get started with your Crochet Slipper Boots.
By preparing the right supplies, you’ll ensure a smooth crafting experience from beginning to end. Don’t worry if you’re new to crochet, as we will walk you through the steps, from basic stitches to completing the entire project.
1. Choosing the Right Yarn and Tools for Your Crochet Slipper Boots
The first step in making your Crochet Slipper Boots is selecting the right yarn. Choosing the correct material is essential to ensure that your boots are both soft and durable. Wool is a great option because it’s naturally insulating and breathable, keeping your feet warm and comfortable. If you’re looking for a vegan alternative, consider using acrylic or cotton yarn.
In addition to the yarn, you’ll need a crochet hook. The size of the hook depends on the thickness of your yarn. Typically, a medium weight yarn will require a hook size between G-6 (4.0mm) and I-9 (5.5mm). Be sure to check the yarn label for recommendations on the appropriate hook size for your chosen yarn.
Don’t forget about other essential tools like scissors, a yarn needle for weaving in loose ends, and stitch markers to help keep track of your rows. If you’re working with a pattern, it can also be helpful to have a row counter to stay on track. These basic tools will make your crocheting experience much smoother and more enjoyable.
When choosing your yarn, also consider the texture and feel. Some yarns can be scratchy, while others are softer. Always test a small section of yarn before committing to the entire project. You want your Crochet Slipper Boots to feel comfortable and soft against your skin.
Finally, remember that the color of your yarn is crucial to your final design. Pick a color that complements your style or home decor. If you’re not sure, neutral colors like gray, beige, or navy blue are always safe options. However, don’t hesitate to experiment with vibrant hues if you’re feeling adventurous!
2. Basic Crochet Stitches for Your Slipper Boots
Now that you have your materials ready, it’s time to learn the essential crochet stitches needed for making Crochet Slipper Boots. These basic stitches will form the foundation of your project, so it’s important to understand each one.
Start with the chain stitch, which is the building block of most crochet projects. To create a chain, make a slip knot, and then yarn over and pull through the loop. This will create a chain of stitches that will be the starting point for your boot’s foundation.
Next, learn how to create a single crochet stitch. This stitch is simple and tight, making it perfect for constructing the body of your slippers. To make a single crochet, insert your hook into the stitch, yarn over, and pull through. Then, yarn over again and pull through both loops on your hook. This creates a tight, dense stitch that will keep your boots snug.
The half double crochet stitch is another important stitch for your project. It’s slightly taller than a single crochet but still provides a solid, cozy feel for your Crochet Slipper Boots. To create a half double crochet, yarn over, insert your hook into the stitch, yarn over again, and pull through all three loops on your hook.
Once you’re comfortable with these basic stitches, you can use them in combination to create different textures and patterns. As you progress, you can experiment with more advanced stitches like the double crochet stitch or slip stitch to add variety to your boots.
Remember to practice these stitches on a swatch before beginning your actual project. This will help you get comfortable with the motions and ensure your tension is consistent throughout your Crochet Slipper Boots.
3. Step-by-Step Instructions to Make Crochet Slipper Boots
With your yarn and tools in hand and basic stitches mastered, it’s time to start creating your Crochet Slipper Boots! Follow these simple steps to make your own cozy pair.
1. Start with the Sole
To begin, create a foundation chain that’s the length of the bottom of your foot. This will form the sole of your boot. Once you have your chain, work in rows of single crochet to create a sturdy base. Continue crocheting until your piece is wide enough to fit your foot comfortably.
2. Build Up the Sides
After completing the sole, you’ll begin building the sides of the boot. Switch to half double crochet stitches to make the sides taller. Work in a continuous round, turning your work at the end of each row. Keep increasing the number of stitches to match the curvature of your foot as you go up.
3. Shape the Heel and Toe
As you work your way up, you’ll need to shape the heel and toe of the boot. To do this, you’ll decrease stitches at the appropriate spots. This will create a snug fit for both areas. Make sure to check the fit frequently, as you don’t want your Crochet Slipper Boots to be too tight or loose.
4. Add the Top Edge
Once you’ve completed the main part of your boot, it’s time to work on the top edge. This will give your Crochet Slipper Boots a finished look and prevent them from unraveling. You can use a decorative stitch, such as a shell stitch or picot edge, to add a touch of elegance.
5. Weave in the Ends
After finishing your boots, use a yarn needle to weave in any loose ends. This will give your Crochet Slipper Boots a clean, polished appearance and prevent any fraying.
6. Try Them On!
Finally, try on your new Crochet Slipper Boots! Adjust any areas if necessary and enjoy the cozy fit of your handmade creation. Don’t forget to snap a picture and show off your work to friends and family!
4. Personalizing Your Crochet Slipper Boots
One of the best things about making your own Crochet Slipper Boots is the ability to personalize them to match your style. Here are some creative ideas to make your boots truly unique.
Add Embellishments
You can sew on buttons, beads, or even small crochet flowers to make your boots stand out. These small touches will add a personal flair that will make your Crochet Slipper Boots truly one-of-a-kind.
Experiment with Patterns
Incorporate different stitch patterns into your design. For example, try adding a ribbed cuff at the top of the boot or a textured design down the sides. You can also use color-blocking or stripes to create a more dynamic look.
Create Custom Sizes
Don’t forget that Crochet Slipper Boots can be made for anyone! Use different yarn weights and adjust the size accordingly. Whether you’re making a pair for a child, adult, or even a pet, you can customize the fit easily by adjusting your starting chain and stitch count.
Play with Color
The color of your boots can completely transform their look. Choose a color that complements your home décor, wardrobe, or the season. Bold colors like red or purple can make a statement, while neutral shades like gray or beige will match any outfit.
Experiment with Different Yarn Types
If you’re feeling adventurous, try different types of yarn to change the texture and look of your boots. For instance, you could use a fluffy yarn for a more cozy, soft look, or a shiny yarn for a more elegant finish.
Try Different Boot Heights
If you prefer ankle-length boots, simply stop when the boot reaches your desired height. For taller, knee-high Crochet Slipper Boots, just keep crocheting higher! The choice is yours.
FAQ – Frequently Asked Questions About Crochet Slipper Boots
1. Can I make crochet slipper boots for beginners?
Yes! If you’re a beginner, start with basic stitches like single crochet and half double crochet. Follow a simple pattern and practice before you begin your actual boots.
2. How do I make my crochet slipper boots non-slip?
To make your boots non-slip, you can add a rubber sole or use a slip-resistant yarn. You can also crochet a textured sole using bobble stitches for extra grip.
3. How long will it take to make a pair of crochet slipper boots?
The time it takes to make a pair of Crochet Slipper Boots varies depending on your experience level and the complexity of the design. On average, it can take anywhere from 3 to 5 hours.
4. Can I wash my crochet slipper boots?
Most Crochet Slipper Boots can be hand-washed or machine-washed on a gentle cycle. However, be sure to check the yarn label for specific care instructions.
5. What size crochet hook should I use for slipper boots?
The size of the crochet hook depends on the thickness of the yarn. Typically, a medium weight yarn will require a hook size between G-6 (4.0mm) and I-9 (5.5mm).
6. How do I know if the size of my crochet slipper boots is right?
Try on the boots as you crochet to make sure they fit comfortably. If they are too tight, add more stitches; if they are too loose, reduce the stitch count.
Join our VIP broadcast list and gain access to exclusive patterns, all for free. As a VIP member, you’ll receive the best patterns daily, delivered directly to your device. ✨📱 It’s a unique opportunity to stay up-to-date with the latest trends and designs, curated just for you. Don’t miss out on enhancing your projects and discovering new inspirations with the best patterns every day! 🎨🔝
Conclusion
In this Ultimate DIY Guide, we’ve covered everything you need to know about creating your own Crochet Slipper Boots, from choosing the right yarn and tools to making the boots fit perfectly. Whether you’re a beginner or an experienced crocheter, making these cozy slippers is an enjoyable and rewarding project.
We hope this guide has inspired you to try making your own pair of Crochet Slipper Boots. Please leave a sincere comment below sharing your thoughts, suggestions, or any questions you may have. We’d love to hear from you and learn about your experiences with this cozy crochet project!

