Crochet Santa Tissue Box Cover Pattern is a festive and adorable holiday project that brings charm, color, and personality to any room in your home.
Using classic crochet techniques, this pattern transforms an ordinary tissue box into a cheerful Santa Claus decoration that instantly lifts the Christmas spirit.
Creating a Crochet Santa Tissue Box Cover Pattern is not only easy but also enjoyable, making it a wonderful handmade gift or a delightful addition to your seasonal décor.
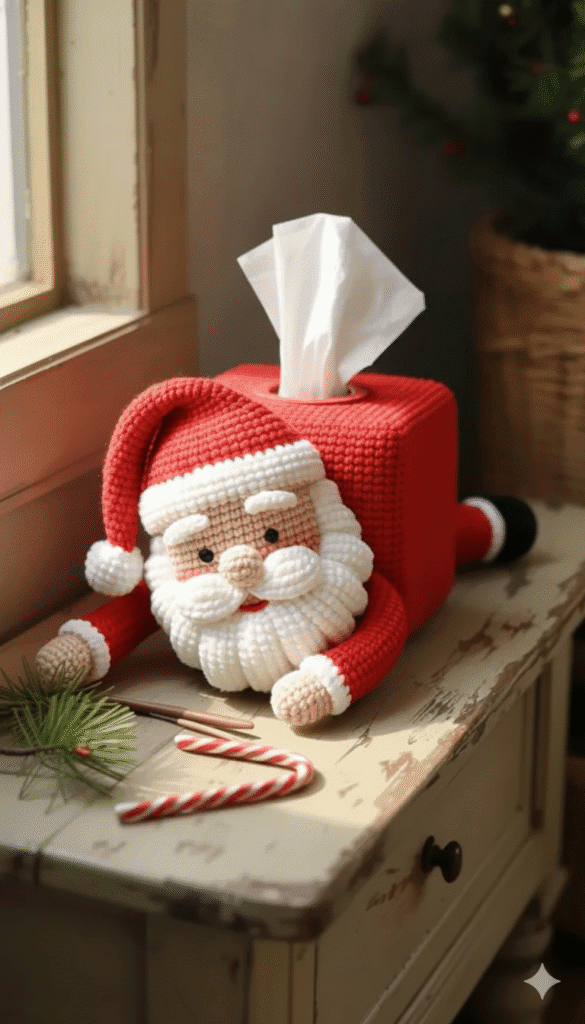
This project blends creativity and practicality, allowing crocheters of all skill levels to express their holiday enthusiasm through crafts. The combination of Santa’s iconic red suit, fluffy trim, black belt, and jolly appearance makes this piece a joyful detail in any home.
Working with a Crochet Santa Tissue Box Cover Pattern allows you to personalize colors, textures, and details while practicing familiar stitches like single crochet, half-double crochet, and double crochet. Whether you prefer a simple and minimalist Santa design or a more detailed version with accessories like a belt buckle, rosy cheeks, and tiny buttons, this project has plenty of room for creative expression. The finished cover slips easily over standard square tissue boxes, making it both functional and decorative. As you crochet, you’ll enjoy the repetition of stitches that create Santa’s rounded shape, ensuring the final result is festive and beautifully crafted. With thoughtful assembly and attention to detail, your project will turn into a charming holiday centerpiece.
This Crochet Santa Tissue Box Cover Pattern is great for beginners who want to practice working in the round, changing colors, and shaping a design with recognizable features. Intermediate and advanced crocheters will enjoy adding embellishments that bring Santa to life, such as embroidered eyes, mustaches, bows, or even small appliqué pieces. You can display your finished piece in the living room, bedroom, bathroom, office, or anywhere people appreciate a warm holiday touch. The best part is that this pattern does not require large amounts of yarn or materials, making it an affordable and fun seasonal crochet project.
Understanding the Crochet Santa Tissue Box Cover Pattern
The Crochet Santa Tissue Box Cover Pattern starts with creating the base that fits around the tissue box. This base is typically made in a square or circular form, depending on the box shape you prefer to cover. Most crocheters choose a square base that easily adapts to standard tissue boxes, providing a snug and clean fit. Working with red yarn defines Santa’s suit, and using white yarn creates the fluffy details associated with Christmas attire.
One of the most recognizable elements of the Santa tissue box cover is the white trim. This is usually crocheted using textured stitches to mimic the softness of fur. You may use puff stitches, bobble stitches, or even loop stitches to add an extra layer of depth. The transition between red and white yarn is essential, giving the project its familiar festive contrast. A correctly executed edge makes the final design look polished and professional.
Another key element in the Crochet Santa Tissue Box Cover Pattern is Santa’s belt. This part is typically made using black yarn and then attached securely around the center of the cover. Many crocheters choose to add a yellow or gold buckle using either a contrasting yarn color or a small crocheted square. The belt brings the design together visually and serves as a focal point that emphasizes Santa’s classic outfit.
Some crocheters like to add facial features, while others prefer to keep the motif simple and elegant. If you choose to make a face, you can crochet small circles for the cheeks, tiny black stitches or beads for the eyes, and a small white mustache for extra character. These details create a charming, whimsical appearance and turn the cover into an expressive holiday decoration.
Finally, the top opening for the tissues should be shaped neatly so the tissues can be pulled through easily. Some patterns include a decorative trim around this opening, which can be made using picots, scallops, or a contrast color that enhances the design. A well-finished top makes the entire project look cohesive and helps maintain durability over time.
Materials and Tools Needed for the Pattern
To create the Crochet Santa Tissue Box Cover Pattern, you only need a few basic materials. Red yarn is essential for Santa’s suit, and white yarn is needed for the trim. Black yarn is used for the belt, while gold or yellow yarn helps you craft a decorative buckle. Medium-weight yarn is the most common choice, but you may also use cotton yarn for a stiffer texture or acrylic yarn for a softer feel.
The crochet hook size may vary depending on the yarn used, but a 4 mm or 5 mm hook usually works best for this project. Having a yarn needle nearby helps with sewing in loose ends and attaching small embellishments. Scissors are also necessary for cutting yarn at various stages of the project.
Optional materials include beads, buttons, small pom-poms, or embroidery thread for adding detailed features. These embellishments allow you to personalize the pattern and give Santa a unique expression or style. For example, adding a small pom-pom to Santa’s hat or a pair of gold buttons can make your project more festive and eye-catching.
Working with stitch markers is helpful if you are crocheting in the round or working on symmetrical shapes. They ensure accuracy and prevent mistakes, especially when changing colors or adding textured stitches. Choosing high-quality yarn ensures that your cover remains durable, soft, and beautiful throughout many holiday seasons.
If you enjoy experimenting, you may also try novelty yarns for the white trim, such as textured yarns that give a fluffy or sparkling effect. These yarns add visual interest and enhance the Christmas charm of the piece. Beginners may prefer smooth yarns at first, as novelty yarns can be more challenging to see and count stitches with.
Finally, having a standard square tissue box nearby while crocheting is recommended. This helps you check the fit regularly, ensuring that the cover remains snug and well-shaped from start to finish. Adjusting the dimensions early helps avoid problems once the piece is complete.
How to Crochet the Body of the Santa Cover
To begin the Crochet Santa Tissue Box Cover Pattern, start by creating the base. Many patterns begin with a magic ring, which forms the center of the base. Working in the round, you increase stitches gradually to create a flat circle that reaches the size of the tissue box bottom. If you are making a square base, you can begin with chain stitches and a foundation row.
Once the base is complete, the next step is building the walls. This is done by crocheting upward without increasing, creating a tube-like shape that fits snugly around the box. Switching to red yarn during this stage helps you establish Santa’s iconic suit. The walls should be tall enough to cover the entire tissue box, with room for a top edge.
The white trim can be added at the bottom or top depending on your preferred design. Puff stitches or bobble stitches create wonderful texture, but single crochet stitches can also be used for a more subtle look. These decorative edges contribute to the festive feel of the project and enhance its visual appeal.
Next, you will create the top part of the cover with an opening for the tissues. Many crocheters make a square with a centered hole, attaching it to the wall portion of the cover. This opening needs to be large enough for tissues to pull through smoothly but not so large that it disrupts the design. A small decorative trim around this opening can make the piece look even more polished.
Once the basic shape is completed, add the belt by crocheting a long strip of black yarn and sewing it around the center of the cover. The buckle can be a small square or rectangle made from yellow yarn. Some crocheters like to embroider a small line inside the buckle to mimic a realistic belt design.
Finally, you may add embellishments such as buttons, facial features, or small appliqué pieces. These additions make your Crochet Santa Tissue Box Cover Pattern come to life and reflect your personal crafting style.
Creative Ways to Customize the Pattern
One way to customize your Crochet Santa Tissue Box Cover Pattern is by altering the color palette while keeping the Santa theme. For example, you may create a vintage-style Santa using muted colors like burgundy, cream, and charcoal. This gives your project a charming, nostalgic appearance that fits well with rustic holiday décor.
Another creative idea is to add textural elements such as embroidery. You can sew small lines on Santa’s suit to mimic seams or use a contrasting yarn to create snowflakes or stars. Embroidery adds a handmade touch and makes the project look more detailed and festive.
If you enjoy embellishments, consider adding small crochet buttons, mini holly leaves, or a tiny candy cane. These items enhance the Christmas theme and add personality to your cover. You may even create a little pocket on Santa’s belly to hold small treats or surprises.
For a humorous twist, some crocheters add googly eyes or oversized facial features. This transforms the Santa cover into a playful decoration that brings laughter and joy. Adding a small yarn nose or a fluffy mustache is another delightful customization option.
You can also make themed variations. For example, you could crochet a Mrs. Claus version using a red dress with white trim, or create an elf tissue box cover in green and red. These variations expand your holiday collection and make great gift sets for friends and family.
Finally, customizing the size of the cover allows you to adapt the pattern for different types of tissue boxes. Whether rectangular, square, or travel-sized, adjusting the stitch count and dimensions ensures a perfect fit for any space in your home.
FAQ
What level of crochet skill is needed for this pattern?
The Crochet Santa Tissue Box Cover Pattern is suitable for beginners with basic stitch knowledge and for intermediate crocheters seeking a festive project.
How long does it take to complete the cover?
Depending on your speed, the project takes anywhere from a few hours to a couple of days.
What yarn works best?
Medium-weight acrylic yarn is the most popular choice because it is soft, affordable, and easy to work with.
Can I make the tissue box cover washable?
Yes, using washable yarn like acrylic or cotton will allow you to wash the cover when necessary.
Do I have to add a face to Santa?
No, the face is optional. Many crocheters prefer a simple version focusing only on Santa’s suit and belt.
Can I adjust the size for different boxes?
Absolutely. Adjusting the number of rows and stitches allows you to customize the fit for any tissue box.
Conclusion
The Crochet Santa Tissue Box Cover Pattern is a delightful and festive project that brings holiday charm into your home. With its bright colors, cute details, and customizable design, this pattern offers endless creative possibilities while remaining accessible to beginners. Whether you make it for yourself or as a gift, this project adds warmth and joy to any Christmas setting.
I hope this article helped you understand how to create and personalize your cover. Please leave your sincere opinion and any suggestions you may have—I’d love to hear them!

