CIf you are looking for a festive and creative project to brighten up your holiday decorations, this Crochet Santa Pillow Tutorial is the perfect place to start. This handmade piece not only brings the warm charm of Christmas into your home but also offers a rewarding experience for any crochet lover.
Making a Crochet Santa Pillow is more than just a crafting project — it’s a beautiful way to add a touch of personality and warmth to your Christmas décor. You can place it on your sofa, bed, or even as a decorative accent under the Christmas tree.
Before we dive into the Crochet Santa Pillow Tutorial, it’s important to gather your materials and prepare your mindset for a calm and enjoyable experience. Crocheting takes patience and practice, but the end result is always worth it.
Materials and Tools You Will Need
To start your Crochet Santa Pillow Tutorial, you’ll first need to prepare the basic materials. These are simple and affordable items that you can easily find at any craft store or online. Having everything ready before you begin will help you work smoothly without interruptions.
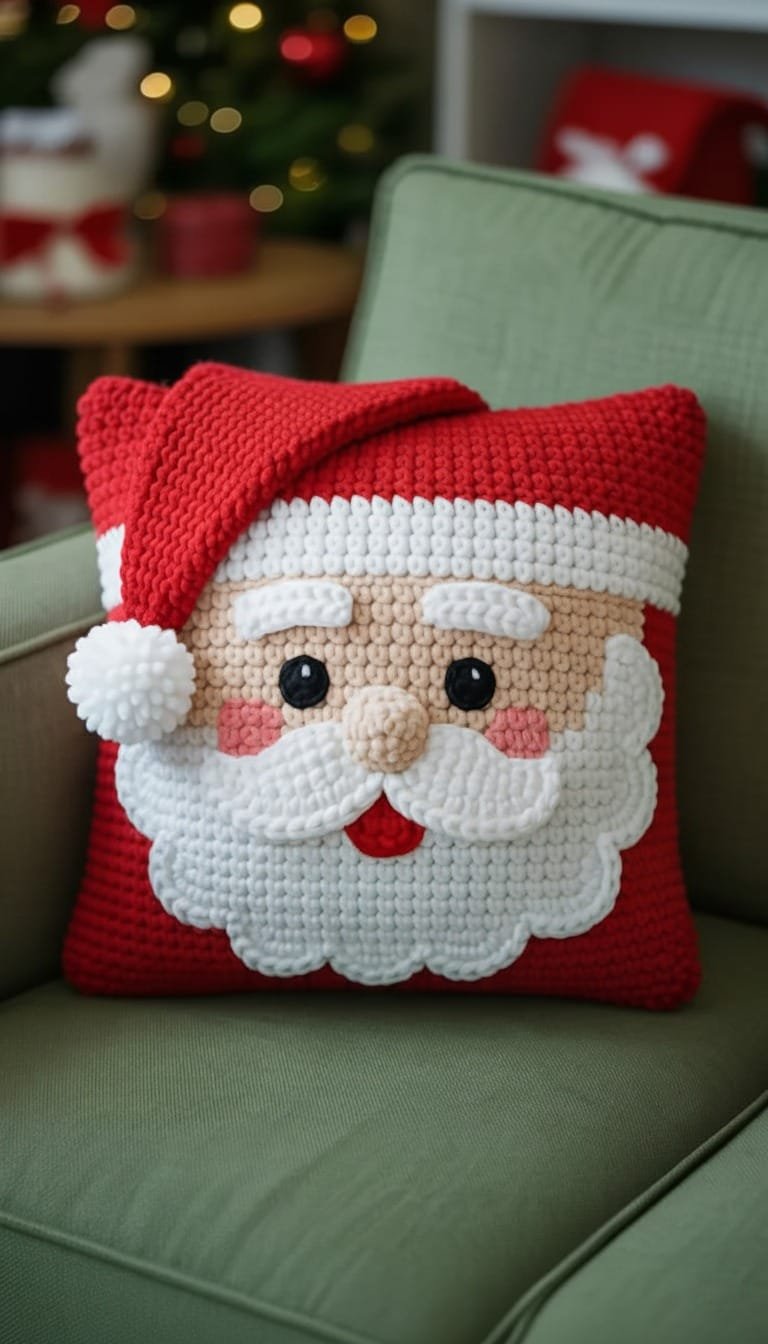
You will need red, white, and black worsted-weight yarn. These colors are essential to create the iconic Santa look. You may also use a bit of beige or pink yarn for the face area if you decide to make a pillow that includes Santa’s face. Soft acrylic yarn is recommended because it is easy to work with and comfortable to touch.
Next, select the right crochet hook. A 4.0mm or 4.5mm hook usually works perfectly for this project, depending on the thickness of your yarn. The hook size can affect the final size and tightness of your stitches, so always check your gauge before starting the main body.
You will also need a yarn needle for sewing parts together, scissors to cut yarn, and some stuffing material or a pillow insert that fits the size of your project. For a more festive look, consider adding decorative buttons or felt pieces for Santa’s belt buckle or hat details.
Having a stitch marker is also useful to keep track of your rounds, especially if you are crocheting in continuous rounds. It helps you avoid mistakes and keeps your pattern even. Organization is key to ensuring a stress-free crafting experience.
Once your materials are gathered, you can begin your project comfortably. Take a moment to relax, perhaps with some Christmas music in the background, and get ready to bring your Crochet Santa Pillow to life.
Step-by-Step Instructions to Crochet Your Santa Pillow
Now it’s time to start working on your Crochet Santa Pillow Tutorial. We’ll go step by step so you can follow along at your own pace.
First, start by creating a magic ring or chain two and work six single crochets into the second chain from the hook. This forms the center of your pillow. Gradually increase each round by six stitches until the circle reaches your desired pillow width. This will be the base for both sides of your Santa Pillow.
Once you have your two circles, one for the front and one for the back, it’s time to focus on the decorative details. For Santa’s belt area, use black yarn to crochet a wide horizontal band across the middle section. You can crochet it directly into the pattern or sew it later, depending on your preference.
Next, add Santa’s belt buckle using yellow or gold yarn. A small square or rectangle will do the trick. You can make it as simple or as detailed as you wish. This little touch brings the whole look together and adds a classic Christmas vibe.
If you want to crochet Santa’s face instead of just his suit, use beige or pink yarn for the skin area and white yarn to make the fluffy beard. For the hat, switch to red yarn with a white brim and a pom-pom at the tip. These details make your pillow even more charming and unique.
After completing the front panel, attach the back piece using single crochet stitches all around the edge. Before you close it completely, add the stuffing or pillow insert inside. Be sure to distribute it evenly so your pillow keeps a nice, plump shape. Finish sewing, cut the yarn, and weave in the ends neatly.
Tips for Beginners and Common Mistakes to Avoid
Even though this Crochet Santa Pillow Tutorial is suitable for beginners, there are a few tips that can make your experience smoother and more enjoyable. The first thing to remember is to keep your tension consistent throughout your project. Uneven tension can make one side of the pillow look different from the other.
Always check your stitch count at the end of each round or row. Missing or adding stitches can distort the shape of your pillow, especially since it needs to be symmetrical. Using a stitch marker helps keep your progress in check.
When working with multiple colors, make sure to switch yarns cleanly and weave in your ends carefully. Messy color changes can make your final project look untidy. You can carry the yarn behind your work or fasten it off each time for a neater look.
If you find your pillow turning out too small or too stiff, consider using a larger crochet hook or a softer yarn. The texture and flexibility of the yarn greatly influence how plush and comfortable the pillow feels.
Take breaks often to relax your hands. Crocheting for long periods can strain your wrists and fingers, especially if you are new to the craft. Stretching your hands every few rounds helps you stay comfortable and avoid fatigue.
Lastly, don’t be afraid to make mistakes. Each crochet project teaches you something new. If something doesn’t look right, simply unravel that part and try again. That’s part of the fun and creativity of crocheting.
Decorating Ideas and Personalization Options
Once your Crochet Santa Pillow is complete, the real fun begins — decorating and personalizing it. This is where you can let your imagination shine and make your pillow one of a kind.
For a classic Christmas style, stick to the traditional Santa suit colors: red, white, black, and gold. However, you can also experiment with different shades, such as burgundy or glittery yarn, to give your project a unique twist.
Adding embellishments like tiny bells, buttons, or ribbons can enhance the festive appeal of your pillow. You might also crochet small snowflakes or stars to sew onto the corners for extra decoration.
Personalization is another great way to make your Crochet Santa Pillow special. You can stitch the year or initials on the back, making it a memorable keepsake for yourself or a loved one. Handmade items with personal touches always make heartfelt gifts.
If you enjoy working with textures, consider adding faux fur yarn for Santa’s hat brim or beard. This adds a soft and fluffy feel that makes the pillow even cozier and more realistic.
Finally, think about how to display your finished pillow. It can be placed on your couch, favorite chair, or even as part of a Christmas photo backdrop. Each placement gives it a new way to spread holiday joy.
FAQ – Crochet Santa Pillow Tutorial
1. Can beginners make this Crochet Santa Pillow?
Yes! This project is beginner-friendly as long as you know basic stitches like single crochet and double crochet. The tutorial guides you step by step.
2. How long does it take to make a Santa Pillow?
Depending on your speed and skill level, it usually takes between 6 to 10 hours to complete the pillow.
3. What size should the pillow be?
A common size is about 14×14 inches, but you can easily adjust it by adding more rounds to make it larger.
4. Can I wash my crochet Santa Pillow?
Yes, you can hand wash it gently in cold water and air dry it to maintain its shape and color.
5. What type of yarn works best for this project?
Soft acrylic yarn is recommended because it’s durable, affordable, and comfortable to touch.
6. Can I make this pillow as a gift?
Absolutely! A handmade Crochet Santa Pillow makes a thoughtful and charming Christmas present.
Conclusion
Creating your own Crochet Santa Pillow is a wonderful way to celebrate the holiday season with creativity and warmth. This project combines fun, color, and comfort — everything that represents the magic of Christmas. With the steps, tips, and ideas shared in this Crochet Santa Pillow Tutorial, you now have all the guidance needed to craft something truly special.

