The Crochet Overlay Coaster Free Pattern is a delightful project for beginners and experienced crafters alike. This beautiful and textured technique allows you to create colorful, intricate designs that look far more complex than they actually are. With the right guidance, yarn, and hook, you’ll be amazed at what your hands can produce.
In this guide, you’ll learn how to create your own crochet overlay coaster, explore the technique behind overlay crochet, and get inspired to experiment with color and shape. Best of all, the free pattern offered here gives you a structured place to begin, making it easy to follow while leaving room for creativity.
Whether you’re making these coasters for your own table, as gifts, or to sell at a market, mastering the crochet overlay coaster technique opens up a world of artistic possibilities. Let’s begin your journey into this textured, color-rich form of crochet.
What Is a Crochet Overlay Coaster?
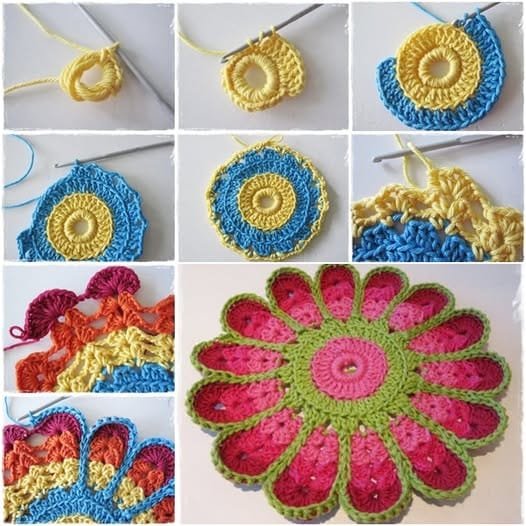
A crochet overlay coaster is a decorative circular or square piece created using the overlay crochet technique. This style of crochet involves layering stitches on top of others to create raised textures and intricate colorwork without sewing or appliqué.
The beauty of a crochet overlay coaster free pattern lies in its ability to blend different colors and stitches, giving the illusion of advanced techniques with simple, repetitive rows. The result is a vibrant coaster that looks hand-painted or mosaic-like.
Overlay crochet is popular for its structural integrity and detailed appearance. Coasters made with this method are not only eye-catching but also durable and functional. The thickness adds insulation for hot and cold drinks, protecting your surfaces in style.
Each crochet overlay coaster starts with a center motif, expanding outward through various layers of stitches. These layers are strategically placed to form colorful petals, diamonds, or other geometric designs. The stitches sit on top of one another without becoming bulky or messy.
One of the greatest advantages is the ability to play with color. Overlay crochet invites experimentation with hues and gradients. With just a few rounds of yarn changes, your crochet overlay coaster can look entirely different each time.
This pattern is a fantastic way to practice advanced-looking crochet with basic skills. If you can manage single crochet, double crochet, and front post stitches, you’re ready to tackle this project.
Materials and Tools You’ll Need
Before diving into your crochet overlay coaster free pattern, gather the right supplies. The right yarn, hook, and accessories will make the process smoother and more enjoyable. Thankfully, this project requires minimal materials and is perfect for using up scraps.
You’ll need a variety of yarn colors to get that classic overlay look. Cotton yarn is ideal due to its durability and ability to hold shape. Choose smooth, high-contrast shades to make the layered stitches pop.
A crochet hook that matches your yarn weight is essential. For most coaster patterns, a 3.5mm to 4mm hook works best with DK or worsted cotton yarn. Make sure your tension is firm to avoid floppy edges.
A tapestry needle will come in handy for weaving in ends, especially since color changes are frequent in overlay crochet. You may also want stitch markers to keep your rounds even.
Scissors and a flat surface to block your finished coaster are also helpful. While blocking isn’t strictly necessary, it can enhance the final appearance by making the stitches lay flat and even.
Optional extras include a row counter or a printable version of the pattern to follow along easily. Some crafters also enjoy using a stitch guide to quickly reference unfamiliar stitches while working.
Keep all your supplies in a small project bag so you can take your crochet overlay coaster on the go. This portable craft is perfect for relaxing evenings, road trips, or cozy weekends at home.
How to Follow the Overlay Technique
Understanding how overlay crochet works is key to succeeding with your crochet overlay coaster free pattern. Though it may look complicated, overlay crochet is surprisingly beginner-friendly once you learn the basics.
Overlay crochet builds dimension by using front post stitches that “float” over previous rows. This allows you to create designs that appear layered without actually adding thickness or sewing on top.
Start your crochet overlay coaster with a simple magic ring or chain loop. The center often begins with a circle or square, worked in the round with basic stitches like single and double crochet.
In the following rows, you’ll start to add new colors and front post stitches. These stitches reach down over earlier rows, forming outlines, petals, or other patterns. This is where the overlay magic begins.
It’s important to pay attention to the pattern instructions, especially where to place your stitches. Most overlay patterns use charted diagrams or highly detailed written directions to avoid confusion.
Color changes usually occur at the start of a new round. Finish off one yarn and join a new color with a slip stitch. Always carry your ends to the back and weave them in securely to maintain a clean look.
With practice, you’ll learn to “read” the design as it forms. This makes future projects faster and more intuitive. Keep practicing, and soon your crochet overlay coaster will look like it came from a boutique store.
Tips for Customizing Your Crochet Overlay Coaster
Once you’ve mastered the basic crochet overlay coaster free pattern, it’s time to make it your own. Customizing your project allows you to experiment with style, shape, and color in exciting ways.
Start by changing the color palette. Try cool tones like blues and purples for a calming feel, or use bright primaries for a cheerful set of coasters. Neutral tones like beige and white create a modern, minimalist vibe.
Consider altering the size. You can add extra rounds or reduce the number of rows to make your crochet overlay coaster larger or smaller. Just remember to maintain the pattern’s symmetry for a balanced look.
Try using metallic or textured yarns as accent rounds. These can create a stunning contrast against matte cotton, adding a professional finish and a bit of sparkle.
Another fun idea is to modify the stitch type. While most overlay patterns use front post double crochet, you can experiment with front post treble or puff stitches to vary the texture even more.
Personal touches such as embroidery, beads, or surface slip stitches can add extra flair after the coaster is complete. These details make your piece uniquely yours and add charm for gifting.
If you’re selling your work, offer customers a choice of color themes or bundles. A well-packaged set of crochet overlay coasters makes a wonderful handmade gift and adds a handmade touch to any home.
FAQ: Frequently Asked Questions
What is a crochet overlay coaster?
A crochet overlay coaster is a decorative coaster made using overlay crochet techniques, where layers of stitches create raised, colorful designs. It’s a textured, vibrant craft project great for both decor and function.
Is overlay crochet hard to learn?
Not at all! If you’re comfortable with basic stitches like single and double crochet, you can learn overlay crochet. It may look intricate, but with a good pattern and some practice, it becomes intuitive.
How long does it take to make one coaster?
Depending on your skill level and the complexity of the pattern, a single crochet overlay coaster can take between 1 to 3 hours. Faster crocheters might finish it even quicker.
What yarn is best for overlay coasters?
Cotton yarn is ideal because it’s durable, easy to wash, and holds its shape well. Choose contrasting colors to highlight the layered effect of the overlay design.
Can I sell coasters made from free patterns?
Usually, yes! Most designers allow you to sell items made from their free patterns, as long as you credit the pattern and don’t redistribute it. Always check the specific designer’s terms.
Do I need to block my crochet overlay coaster?
Blocking is optional but recommended. It helps the stitches lay flat and enhances the coaster’s shape and texture, giving it a polished look.
Conclusion
Creating your own crochet overlay coaster using a free pattern is a rewarding experience that combines artistic creativity with practical function. From understanding the technique to exploring color choices and finishing details, each step helps you grow as a crafter.
This tutorial has covered everything you need to start your journey—from the basics of overlay crochet to the tools required and helpful customization tips. Whether you’re making one coaster or an entire set, this pattern is a great addition to your crochet library.
We’d love to hear your thoughts! Share your experience, leave a comment with your honest opinion, or suggest what you’d like to learn next. Happy crocheting!

