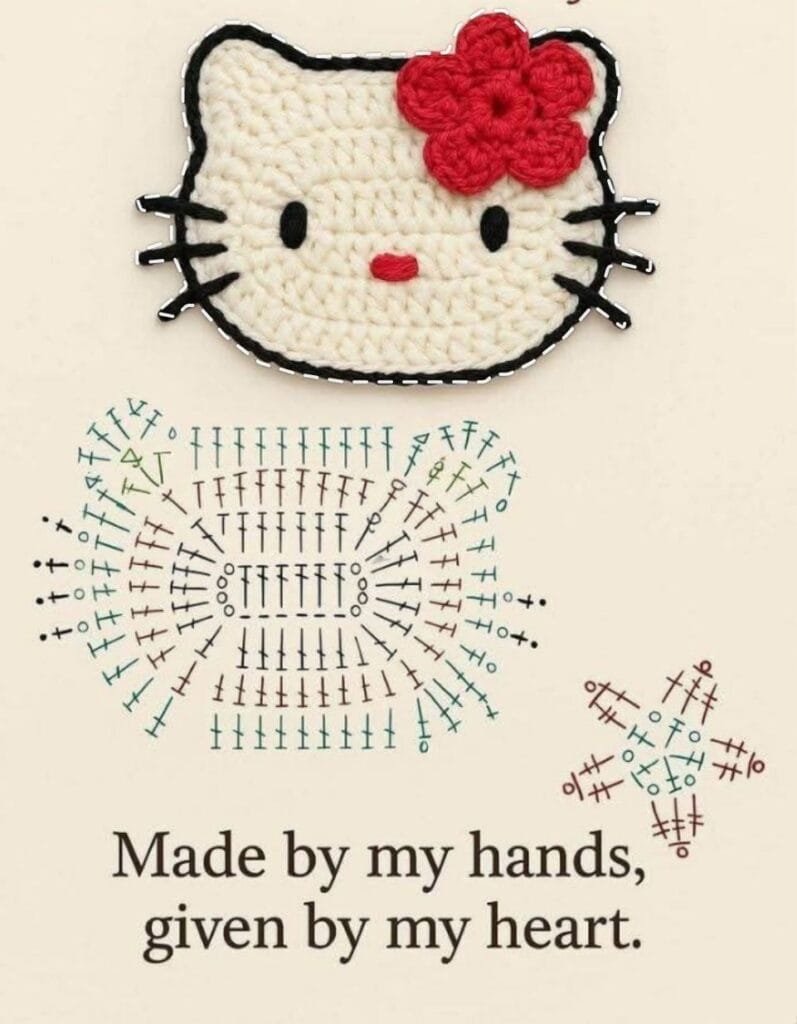
If you’re looking for an adorable and easy crochet project, the Crochet Hello Kitty Applique and Star Motif Free Pattern is the perfect choice.
This project combines the charm of the classic Hello Kitty design with a simple star motif that adds a whimsical touch.
It’s great for decorating blankets, children’s clothes, tote bags, or even greeting cards. With just a few basic stitches, you can create a piece that’s instantly recognizable and filled with personality.
Crochet appliques are wonderful projects for beginners because they are quick, small, and require minimal materials.
The Crochet Hello Kitty Applique and Star Motif Free Pattern is especially appealing because it allows crafters to play with colors and textures while learning the art of shaping. You’ll practice techniques like increasing, decreasing, and assembling small pieces to form an adorable character design.
Whether you’re a lifelong Hello Kitty fan or just love cute crochet patterns, this step-by-step tutorial will guide you through every detail. By the end, you’ll have a soft, flat applique perfect for attaching to larger projects or gifting as a handmade keepsake.
Materials Needed
To make your Crochet Hello Kitty Applique and Star Motif Free Pattern, you’ll need a few simple supplies that you might already have in your crochet basket.
-
Yarn – Use lightweight cotton yarn or DK weight acrylic yarn. You’ll need:
-
White for Hello Kitty’s head and body
-
Pink or red for the bow
-
Yellow for the nose
-
Black for eyes, whiskers, and outlines
-
Any color of your choice for the star motif
-
-
Hook Size – Use a 3.0 mm or 3.5 mm crochet hook for a tighter and neater look.
-
Needle and Scissors – For weaving in ends and attaching details.
-
Optional – Small beads or embroidery thread if you prefer extra texture for the face.
When choosing yarn, remember that cotton yarn gives your applique structure and crisp definition, while acrylic yarn offers softness and flexibility. Both work beautifully depending on your project’s purpose.
Step-by-Step Instructions
Follow these steps carefully to crochet your Hello Kitty applique and star motif. Don’t worry — every step is explained for beginners, and you’ll quickly find the rhythm!
Step 1 – Crochet the Head
-
With white yarn, make a magic ring.
-
Chain 1 and work 6 sc into the ring. Tighten the ring.
-
Round 2: Work 2 sc in each stitch (12 sc).
-
Round 3: (1 sc in next st, 2 sc in next st) repeat around (18 sc).
-
Round 4: (1 sc in next 2 sts, 2 sc in next st) repeat (24 sc).
-
Continue increasing until your circle measures about 2.5 inches across.
This will form the main shape of Hello Kitty’s head. You can adjust the size by adding or skipping rounds.
Step 2 – Form the Ears
-
Attach white yarn at the top of the head.
-
Chain 1, and make 2 sc, 1 hdc, 1 dc, 1 hdc, 2 sc, then slip stitch to secure.
-
Repeat for the other ear on the opposite side.
These small triangular ears instantly give Hello Kitty her recognizable look.
Step 3 – Create the Bow
-
With red or pink yarn, chain 6.
-
Work 1 dc in the 3rd chain from hook, then 2 dc in next two chains, ch 2, and sl st to the first chain.
-
Fasten off and leave a long tail for sewing.
-
Wrap the tail around the center several times to form the bow’s knot.
Sew the bow onto the head, slightly tilted for that cute and playful Hello Kitty charm.
Step 4 – Add Facial Features
-
With black yarn, embroider two small oval eyes using satin stitch or surface crochet.
-
Use yellow yarn to embroider a small oval nose.
-
Add three short whiskers on each side using backstitch or chain stitch.
The details bring the character to life, so take your time to position them symmetrically.
Step 5 – Make the Star Motif
Now it’s time to crochet your little star that complements the Hello Kitty applique.
-
With any bright color, make a magic ring.
-
Chain 2, then (1 dc, ch 2, sl st) five times into the ring to form five star points.
-
Tighten the ring and fasten off.
-
Weave in the ends.
Attach your star near Hello Kitty’s bow, or use it separately as a cute embellishment.
Step 6 – Finishing Touches
Once all parts are crocheted and assembled, gently steam block your applique to flatten it. Use a low-temperature iron and a damp cloth to protect the yarn.
Your Crochet Hello Kitty Applique and Star Motif Free Pattern is now complete and ready to use!
Creative Ideas for Using Your Applique
-
Decorate Children’s Items – Sew it onto hats, scarves, or sweaters for a playful detail.
-
Personalize Bags or Totes – Add a pop of cuteness to your accessories.
-
Home Décor – Use the appliques to decorate pillow covers or wall hangings.
-
Gift Tags or Greeting Cards – Glue them onto handmade cards for a personal touch.
-
Baby Blankets – Add multiple appliques to create a themed blanket design.
-
Hair Accessories – Attach to clips or headbands for an adorable look.
The versatility of this pattern is what makes it so enjoyable. Each piece can be customized with different colors or slight variations for endless creative results.
Tips for Beginners
-
Keep Tension Even: If your applique curls, loosen your tension slightly.
-
Count Stitches: Always check your stitch count each round to maintain symmetry.
-
Use Stitch Markers: Especially when increasing in the round, this keeps your shape even.
-
Weave in Ends Securely: A neat finish makes your project last longer.
-
Experiment with Yarn Types: Metallic or glitter yarn adds sparkle to the star motif.
-
Practice Small Pieces: Each small component helps improve control and technique.
These simple tips will help you create professional-looking appliques even if you’re new to crochet.
FAQ – Crochet Hello Kitty Applique and Star Motif Free Pattern
Q1: Can beginners make this pattern easily?
Absolutely! This pattern uses only basic stitches like single crochet, double crochet, and slip stitch. It’s perfect for beginners who want to learn shaping.
Q2: How long does it take to complete one applique?
Usually, around 30 to 45 minutes, depending on your speed and experience.
Q3: Can I use thicker yarn?
Yes, but remember that thicker yarn will make the applique larger. Adjust your hook size accordingly.
Q4: What if my circle curls up while crocheting?
That’s a sign of tight tension or too few increases. Loosen your grip slightly or add one more increase round.
Q5: Can I attach the star separately?
Yes! The star motif can be used as a separate decoration for other crochet projects or even as a keychain.
Q6: How do I make the face symmetrical?
Lay the applique flat and lightly mark the positions for eyes and nose with pins before embroidering.
Q7: Can I sell finished appliques made from this pattern?
Yes! You’re free to sell finished items, but please do not sell or repost the written pattern itself.
Conclusion
The Crochet Hello Kitty Applique and Star Motif Free Pattern is the perfect blend of creativity, simplicity, and charm. You’ve learned how to crochet the head, ears, bow, and star motif step-by-step, creating an adorable handmade decoration that works for any occasion. It’s a fun project for both kids and adults, offering a relaxing and rewarding crochet experience.
We hope this tutorial inspired you to explore more crochet appliques and create your own colorful versions. Try different yarns, add embellishments, and make each piece uniquely yours!
If you enjoyed this pattern, please leave your honest opinion and suggestions — your feedback helps us keep sharing more cute and creative free patterns with the crochet community. 💖

