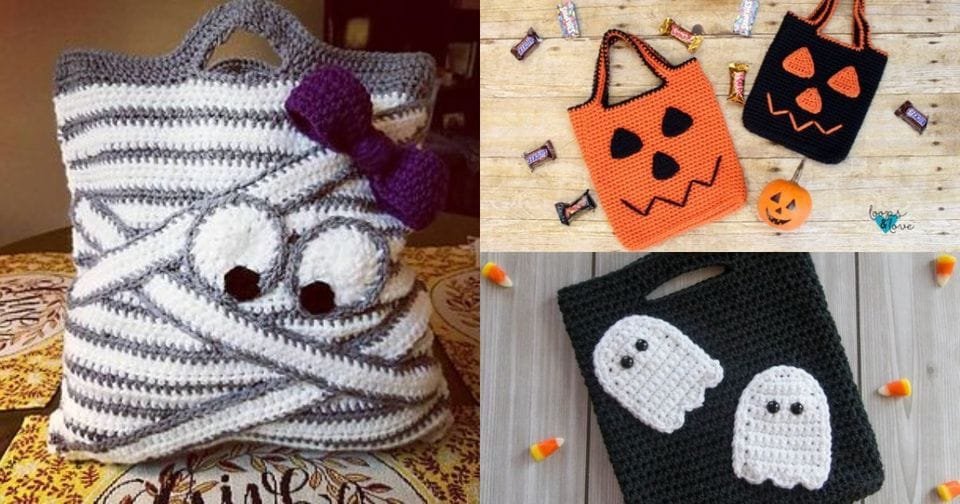
When Halloween approaches, nothing adds more charm to your costume than a handmade bag to collect your goodies.
In this Crochet Halloween Trick or Treat Bags – Tutorial, you’ll learn how to create personalized and festive crochet bags that are perfect for trick-or-treating.
Whether you want a spooky or cute design, these bags are the ideal DIY project to get into the Halloween spirit while honing your crochet skills.
Crocheting your own Crochet Halloween Trick or Treat Bags not only gives you the freedom to customize the colors and designs, but it also makes for a reusable, eco-friendly option.
Instead of buying plastic bags or standard store-bought options, you can create a unique accessory that will make your Halloween celebration even more special.
In this tutorial, we’ll guide you through the materials, stitches, and pattern to create your very own Crochet Halloween Trick or Treat Bags. Let’s get started and bring your spooky crochet creations to life!
1. Gathering Materials for Your Crochet Halloween Trick or Treat Bags
Before you start crocheting, it’s important to gather all the materials you’ll need for this Crochet Halloween Trick or Treat Bags – Tutorial. Having everything ready at hand will ensure you don’t interrupt your creative flow once you start the project.
First, you will need yarn in Halloween colors like black, orange, purple, and green. Opt for a sturdy worsted-weight yarn so your bag can hold plenty of candy. Also, consider using yarn with some sparkle or shimmer for an extra festive touch.
Next, you’ll need a crochet hook that matches the weight of your yarn, usually a size 4.5 mm (US size 7) or 5 mm (US H-8) works well with worsted weight. Having the right hook size ensures the stitches are tight enough to make the bag durable but not too stiff.
Stitch markers are helpful to keep track of rounds when crocheting in circles, which is common for Crochet Halloween Trick or Treat Bags. You’ll also need a yarn needle for weaving in loose ends once your project is complete. Lastly, grab a pair of scissors to cut your yarn at the end of each round.
2. Basic Stitches and Techniques for Crochet Halloween Trick or Treat Bags
Now that your materials are ready, it’s time to familiarize yourself with the essential stitches and techniques used in this Crochet Halloween Trick or Treat Bags – Tutorial. If you are a beginner, don’t worry! These bags require only a few basic stitches that are easy to learn and execute.
The magic circle or magic loop is a key technique for starting crochet projects in the round. This allows you to crochet a tight, adjustable center, which is perfect for creating the base of the bag. If you’re not familiar with this technique, there are plenty of tutorials online to help you get started.
The single crochet (sc) is the main stitch you’ll use throughout this pattern. It creates a dense, sturdy fabric that is ideal for the bag’s structure. If you’re looking for a tighter stitch, you can also try the half double crochet (hdc), which adds a bit more height than the single crochet.
For the edges and details of your Crochet Halloween Trick or Treat Bags, you might use the slip stitch (sl st), which provides a clean and flat finish. The chain stitch (ch) is another essential stitch used for starting rounds and creating the handles.
Finally, increasing and decreasing are important techniques to shape the bag. These techniques help in making the bottom wider or the top narrower, which gives the bag its characteristic structure.
3. Step-by-Step Instructions for Crochet Halloween Trick or Treat Bags
Let’s dive into the actual construction of the Crochet Halloween Trick or Treat Bags. This section will guide you step-by-step, so follow along closely to ensure a successful and spooky bag!
Step 1: Create the Base
Start with a magic circle and work 6-8 single crochets into the loop. Pull the loop tight to close the center. Then, work in the round, increasing the stitch count by adding 2 single crochets into each stitch from the previous round until you have a flat base. The base should be around 6-8 inches in diameter.
Step 2: Build the Body
Once the base is complete, stop increasing and start crocheting one single crochet into each stitch. Continue working in the round, forming the body of the bag. You can choose to crochet the entire bag in one solid color or alternate between Halloween colors for a striped effect.
Step 3: Add Handles
After the body of the bag reaches your desired height (approximately 8-10 inches), you can add the handles. To create the handles, chain 20-30 stitches, skip 10-12 stitches on the bag, and join with a single crochet on the opposite side. Repeat for the second handle.
Step 4: Finishing Touches
Finish the top edge of the bag by using a slip stitch all the way around. This gives the bag a clean, polished look and strengthens the edge. Weave in any loose ends using your yarn needle to ensure a neat finish.
Step 5: Customize with Details
For added fun, you can embellish your Crochet Halloween Trick or Treat Bags with crochet appliqués like pumpkins, ghosts, or bats. Use different yarn colors and shapes to bring your Halloween theme to life.
4. Customizing Your Crochet Halloween Trick or Treat Bags
Personalizing your Crochet Halloween Trick or Treat Bags allows you to add a creative touch and make them truly unique. Here are a few customization ideas to consider when making your bags.
You can incorporate glow-in-the-dark yarn for a spooky effect, making your bag stand out during nighttime trick-or-treating. Alternatively, adding reflective yarn ensures that your little ones are visible and safe while collecting their treats.
If you’re feeling extra creative, try crocheting different Halloween-themed shapes to sew onto the front of your bag. Pumpkins, ghosts, and black cats are popular choices, and you can easily find free patterns for these small appliqués online.
Another great way to customize your bag is by using different stitch patterns. Instead of sticking to single crochet, try alternating between shell stitches, bobble stitches, or granny stripes for added texture and visual interest.
Consider the size of your bag as well. If you need a smaller version for younger children or a larger one for collecting lots of candy, you can easily adjust the pattern by increasing or decreasing the number of rounds.
Lastly, don’t forget to choose a fun lining for your bag! Adding a fabric lining not only adds strength but also gives the Crochet Halloween Trick or Treat Bags a finished, professional look.
FAQ
Q: What type of yarn should I use for the Crochet Halloween Trick or Treat Bags?
A: It’s best to use sturdy worsted-weight yarn in Halloween colors. Cotton or acrylic yarn works well for this project, offering durability and ease of use.
Q: How large should the bag be?
A: The size of your Crochet Halloween Trick or Treat Bags can vary. For most children, a bag around 8-10 inches tall with a base of 6-8 inches in diameter is ideal. You can always adjust the size based on your needs.
Q: How long does it take to make a Crochet Halloween Trick or Treat Bag?
A: On average, it can take anywhere from a few hours to a couple of days, depending on your crochet speed and the complexity of the design.
Q: Can I wash the Crochet Halloween Trick or Treat Bags?
A: Yes, most crochet bags made with cotton or acrylic yarn can be machine washed on a gentle cycle. Be sure to check your yarn label for specific care instructions.
Q: Can beginners make this project?
A: Absolutely! This Crochet Halloween Trick or Treat Bags – Tutorial is beginner-friendly and uses basic crochet stitches, making it a perfect project for those new to crochet.
Q: How can I make the bags more durable?
A: To increase durability, use tight stitches and consider adding a fabric lining. This will help the bag hold its shape and carry more weight without stretching.
Join our VIP broadcast list and gain access to exclusive patterns, all for free. As a VIP member, you’ll receive the best patterns daily, delivered directly to your device. ✨📱 It’s a unique opportunity to stay up-to-date with the latest trends and designs, curated just for you. Don’t miss out on enhancing your projects and discovering new inspirations with the best patterns every day! 🎨🔝
Conclusion
Creating your own Crochet Halloween Trick or Treat Bags is a fun and creative way to get into the Halloween spirit. This tutorial has walked you through the materials, stitches, and steps needed to make your personalized bag. Whether you opt for a simple design or go all out with spooky decorations, these bags are sure to be a hit during trick-or-treating.
We’d love to hear how your Crochet Halloween Trick or Treat Bags turned out! Share your thoughts, tips, or any questions in the comments below. And don’t forget to let us know if you have any suggestions for future crochet tutorials. Happy crocheting and Happy Halloween!

