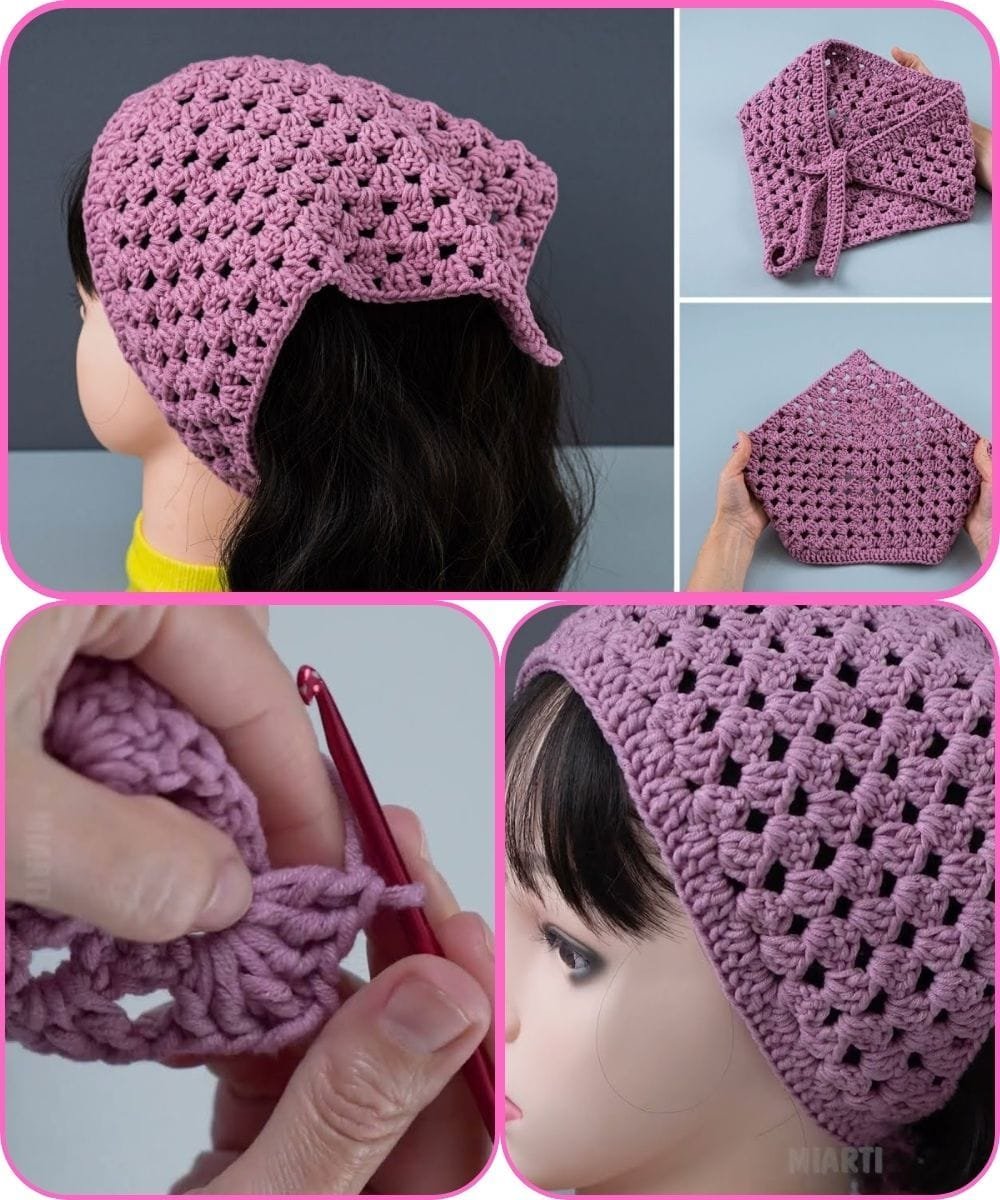
If you love handmade accessories that blend vintage charm with modern fashion, the Crochet Granny Square Triangle Bandana Pattern is the perfect project for you.
This crochet design combines the timeless look of granny squares with a trendy triangular shape, making it both nostalgic and stylish. Perfect for all seasons, this lightweight bandana can be worn as a hair accessory, a scarf, or even a statement neckpiece.
The Crochet Granny Square Triangle Bandana Pattern is not only beautiful but also beginner-friendly. It’s made from simple stitches, colorful motifs, and a relaxing repetitive structure that lets you enjoy every stitch without stress.
You can customize the colors to match your wardrobe or create themed pieces for festivals and gifts. Once you finish your first one, you’ll probably want to make several in different shades.
Whether you’re new to crochet or an experienced crafter looking for an easy, satisfying pattern, this step-by-step tutorial will walk you through the entire process — from creating the first granny square to joining them into a stunning triangle bandana.
Materials Needed
To make your Crochet Granny Square Triangle Bandana Pattern, you’ll only need a few materials. This project is perfect for using up leftover yarn from previous works, which makes it both economical and eco-friendly.
-
Yarn: Choose a lightweight cotton or acrylic yarn (category 3 – DK weight). Cotton gives a crisp, breathable texture that’s great for summer, while acrylic offers a softer feel.
-
Crochet Hook: Use a 3.5 mm or 4.0 mm hook, depending on your yarn thickness.
-
Scissors for trimming ends.
-
Yarn Needle for weaving in tails and joining motifs.
-
Stitch Markers (optional) to keep your rows neat.
You’ll be surprised how little yarn is needed — even half skeins are enough for a complete bandana.
Choosing the Perfect Colors
One of the best parts about the Crochet Granny Square Triangle Bandana Pattern is experimenting with color combinations. Granny squares have always been a symbol of creativity in crochet, and this design lets you mix and match freely.
-
Classic Look: Use soft neutrals like cream, beige, and brown for a timeless, wearable piece.
-
Bohemian Style: Combine bright, saturated colors like teal, coral, mustard, and magenta.
-
Minimalist Touch: Use monochrome shades or gradient yarn for a subtle yet elegant look.
-
Retro Vibes: Go for bold contrasts — think pink, turquoise, orange, and white — for a vintage 70s aesthetic.
Experiment with your stash! The small motifs make this pattern ideal for testing new color palettes without committing to large projects.
Step-by-Step: Crochet Granny Square Triangle Bandana Pattern
Below you’ll find detailed, beginner-friendly steps to create your Crochet Granny Square Triangle Bandana Pattern. Each step builds on basic crochet techniques — chain, double crochet, and slip stitch.
Step 1 – Make Your Granny Squares
-
Start with a magic ring.
-
Round 1: Chain 3 (counts as 1 dc), work 2 dc, ch 2, 3 dc three times, ch 2, sl st to top of chain-3.
-
Round 2: Sl st to corner, ch 3, 2 dc, ch 2, 3 dc in the same corner, (ch 1, 3 dc, ch 2, 3 dc) in next corners, repeat around, join with sl st.
-
Round 3: Repeat pattern, adding a ch 1 space between side clusters.
You can make your granny squares as large or as small as you prefer. For a standard adult bandana, use nine small squares (3×3).
Step 2 – Join the Squares
Lay your squares in a triangle layout:
-
Row 1: 1 square
-
Row 2: 2 squares
-
Row 3: 3 squares
-
Row 4: 3 squares
You can join them using slip stitch join, whip stitch, or the join-as-you-go method. For a clean and flexible finish, the join-as-you-go technique is ideal.
Step 3 – Add the Bandana Edging
Once your triangle is formed, it’s time to crochet the edging to give your piece structure.
-
Attach yarn to one side corner.
-
Chain 1, work 1 sc evenly along the sides and across the base.
-
At the bottom tip, make 3 sc in the same stitch to create a sharp point.
-
Slip stitch to the first sc and fasten off.
For a decorative touch, add a picot edge or shell border using simple patterns like (5 dc in one stitch, skip 1 st, sl st next) repeated along the border.
Step 4 – Create Ties
To tie your Crochet Granny Square Triangle Bandana, you’ll need two cords or crochet ties.
-
Chain 70–90 (depending on how long you want the ties).
-
Slip stitch back along the chain to make a sturdy cord.
-
Attach one cord to each side of the top edge of your triangle.
Now your bandana is ready to wear!
Styling and Use Ideas
Your finished Crochet Granny Square Triangle Bandana Pattern is more than just a cute accessory — it’s a fashion statement. Here are a few creative ways to use it:
-
Headband or Hair Scarf: Tie it behind your head for a vintage summer look.
-
Neck Scarf: Fold the triangle and tie loosely around your neck for casual charm.
-
Festival Wear: Combine with boho outfits for concerts and outdoor events.
-
Pet Bandana: Make a smaller version for your cat or dog — they’ll look adorable!
-
Gift Idea: Perfect for birthdays or handmade holiday presents.
-
Table Décor: Use as a small triangular doily or centerpiece decoration.
This project is not just practical — it’s a reflection of creativity and self-expression.
Tips for Beginners
If this is your first Crochet Granny Square Triangle Bandana Pattern, don’t worry. Here are a few helpful tips to make the process smooth and enjoyable:
-
Block your squares before joining — it helps align the edges neatly.
-
Use stitch markers to track your corners during assembly.
-
Secure loose ends as you go to avoid extra finishing later.
-
Adjust hook size if your tension feels too tight or too loose.
-
Experiment — try lacy yarn for summer, or soft wool for a cozy fall version.
-
Wash gently in cold water to maintain color vibrancy.
Each time you make a new one, you’ll find ways to personalize it even more.
FAQ – Crochet Granny Square Triangle Bandana Pattern
Q1: Is this pattern beginner-friendly?
Yes! It uses only basic stitches — chain, slip stitch, and double crochet. Perfect for beginners learning motif assembly.
Q2: How long does it take to make?
On average, 2–3 hours for beginners and about 1.5 hours for experienced crocheters.
Q3: Can I use different yarn weights?
Yes, but adjust your hook size. Using bulky yarn will make the bandana larger and thicker.
Q4: Can I make it without joining multiple squares?
Absolutely! You can create a single large triangle using the granny stitch pattern instead of joining squares.
Q5: How do I keep the edges straight?
Make sure you’re chaining correctly at corners and sides. Blocking after completion helps too.
Q6: What size should it be for adults?
A triangle measuring about 20–22 inches wide fits most adult heads comfortably.
Q7: Can I add beads or tassels?
Yes! Decorative tassels or wooden beads at the tips make it even cuter.
Conclusion
The Crochet Granny Square Triangle Bandana Pattern is a delightful blend of tradition and modern style. With simple stitches and creative possibilities, it’s the kind of project that never goes out of fashion. You’ve learned how to make granny squares, join them into a triangle, add edging, and create ties — all while developing your crochet skills.
This bandana is not just an accessory; it’s a piece of art that expresses your personal style and love for handmade crafts. Whether you make it for yourself, a friend, or a pet, every stitch carries warmth and care.
VIDEO TUTORIAL
If you enjoyed this tutorial, please leave your honest opinion and suggestions — they help inspire more free, creative crochet patterns for the community!

