If you’re searching for a unique and rewarding crochet project, the Crochet Granny Square Slippers Pattern is a perfect choice. These handmade slippers combine the timeless charm of granny squares with the practicality of cozy footwear. Not only are they fun to make, but they also make excellent gifts and are great for using up leftover yarn. In this guide, you’ll learn everything you need to know about crafting your own crochet slippers using the classic granny square technique.
The Crochet Granny Square Slippers Pattern has become a beloved favorite among both beginners and experienced crocheters. Its versatility, simplicity, and nostalgic beauty make it stand out as more than just a pattern—it’s a creative experience. Whether you’re making them for yourself, for friends, or to sell at craft fairs, these slippers offer a satisfying and enjoyable project.
In the following sections, we’ll walk you through how to choose the right yarn, understand granny square construction, assemble your slippers, and add finishing touches. With this Crochet Granny Square Slippers Pattern, you’ll be stepping into comfort and style in no time.
Choosing the Right Materials for Your Crochet Granny Square Slippers Pattern
When starting your Crochet Granny Square Slippers Pattern, the first step is selecting the right materials. The right yarn and hook size will not only make your slippers more comfortable but will also ensure durability.
Soft acrylic or cotton yarns are popular choices for this project. Acrylic yarn offers warmth and elasticity, while cotton is breathable and ideal for warmer climates. Whichever yarn you choose, aim for a medium-weight option to balance comfort and structure.
The crochet hook size should correspond to your chosen yarn. A size H/8 (5mm) is commonly used for worsted weight yarn, but always check the yarn label for recommendations. Using the right hook ensures consistent tension and stitch quality.
You’ll also need scissors, a yarn needle for sewing squares together, and optional buttons or embellishments for extra flair. Having all materials ready before you start helps you stay focused and organized.
Picking complementary colors or working with a single tone can define the aesthetic of your slippers. Classic granny squares are known for their colorful charm, but modern versions look stunning in neutrals and pastels.
Finally, don’t forget comfort. If you’re making slippers for children or elderly individuals, consider adding a soft insole or a non-slip sole for safety.
How to Make the Granny Squares for Your Slippers
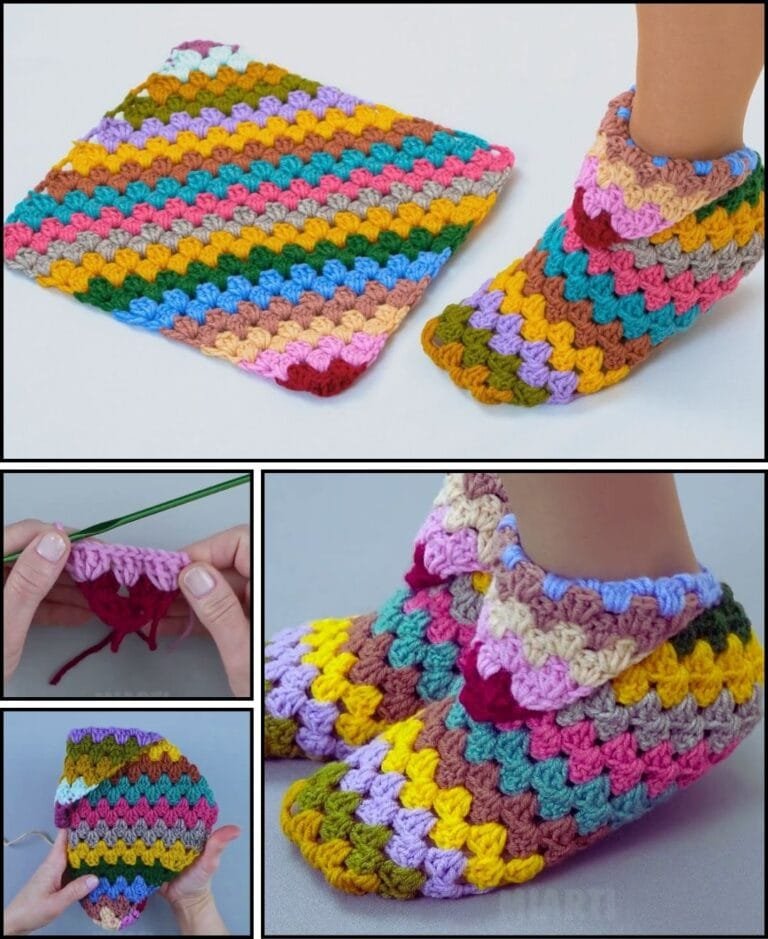
To begin crafting your Crochet Granny Square Slippers Pattern, start by creating your granny squares. These squares form the foundation of the slippers, so it’s important to get them right from the start.
A classic granny square begins with a magic ring or a chain-4 loop, which forms the center. From there, clusters of double crochet stitches are worked in groups of three, separated by chain stitches.
Each round expands outward, creating a square shape. The corners are typically formed by placing two clusters of stitches separated by chains in the same space, creating a right angle.
For slippers, you’ll want to make several squares—usually 6 to 7 per pair, depending on the desired size. Adjust the number of rounds in each square to match your foot size.
Use consistent tension to ensure all squares are uniform in size. This consistency makes assembling your slippers much easier later on.
Feel free to experiment with colors! Each round can be a different color, or you can use a single shade for a more minimalist design. The Crochet Granny Square Slippers Pattern allows for full creative expression.
Weaving in ends as you go can save time and keep your work tidy. Try to finish off each square cleanly before starting the next to avoid a pile of yarn ends later.
Assembling the Slippers from Granny Squares
Once your granny squares are complete, the next step in the Crochet Granny Square Slippers Pattern is assembling them into slipper form. This part transforms your flat squares into functional footwear.
Start by arranging the squares on a flat surface. Typically, you’ll need one square for the toe, two for the sides, one for the heel, and one for the sole. Larger sizes may need an extra square on the top or bottom.
Join the squares using a whip stitch or single crochet stitch. Whip stitching offers a flatter seam, while single crochet creates a decorative raised edge.
Work from the inside out. Begin at the toe, then attach the side squares, heel, and finally the sole. This method provides better alignment and control.
Try the slipper on as you go, especially before closing the heel seam. This helps you adjust sizing or tension if needed. Remember, crochet has some stretch, so a snug fit is ideal.
Once the squares are fully joined, you can add an edging around the ankle opening. A few rounds of single or half-double crochet give a clean and comfortable finish.
Secure all loose ends with a yarn needle, and trim excess yarn. The end result should be neat, firm, and ready to wear.
Personalizing and Caring for Your Crochet Granny Square Slippers
One of the best parts of the Crochet Granny Square Slippers Pattern is the ability to personalize your creation. These slippers can be adapted to suit any style, taste, or occasion.
Add buttons, bows, or decorative patches for a playful look. You can even crochet small flowers or hearts to sew onto the top of the slipper.
Experiment with different color themes. Holiday colors, favorite sports team palettes, or even rainbow gradients can make your slippers one-of-a-kind.
If you want extra comfort, consider sewing a fleece or felt lining inside. This is especially helpful for winter slippers and makes them feel extra plush.
To make your slippers slip-resistant, apply a few dots of hot glue or puffy paint to the bottom. This is a great solution for wooden or tile floors.
Wash your slippers with care. Hand washing in cold water is the safest option. If using a washing machine, place them in a mesh laundry bag and use the gentle cycle.
Store them flat and dry to maintain shape. Avoid stretching or hanging them, as that can distort the form of the granny squares.
FAQ – Frequently Asked Questions about Crochet Granny Square Slippers Pattern
How many granny squares do I need for one pair of slippers?
Most adult-sized Crochet Granny Square Slippers Patterns use 6 to 7 squares per pair. You may need more for larger sizes or different designs.
Can I use leftover yarn for this project?
Yes! This is a great pattern for using up yarn scraps. Just be sure the yarns are of similar weight and fiber type for a consistent look and feel.
Are these slippers good for beginners?
Absolutely. The Crochet Granny Square Slippers Pattern is beginner-friendly, especially for those who have already learned the basic granny square technique.
How do I adjust the slipper size?
You can adjust the size by adding rounds to your granny squares or by changing the number of squares used. Testing the fit as you go is recommended.
Can I make these slippers for children?
Yes. Simply use smaller squares or finer yarn to scale down the pattern. Always ensure a snug but comfortable fit for younger wearers.
Do I need to block the granny squares before assembling?
Blocking is optional but helpful. It ensures uniform size and shape, making assembly easier and resulting in a cleaner finish.
Conclusion
The Crochet Granny Square Slippers Pattern is more than just a cozy DIY project—it’s a way to connect with tradition while creating something stylish and personal. You’ve learned how to choose materials, crochet the squares, assemble the slippers, and add personal touches.
Whether you’re making these for yourself, as heartfelt gifts, or even to sell at local craft fairs, the journey of crafting these slippers is as rewarding as the final product. Their charm, comfort, and creative potential make them a must-try project for any crochet enthusiast.
We’d love to hear your thoughts! If you’ve tried this pattern or plan to, leave a sincere opinion and feel free to share any tips or suggestions. Your feedback helps keep this creative community growing.

