The Crochet Gnome Granny Square – Free tutorial is a charming and versatile project perfect for adding a whimsical touch to your crochet creations.
Whether you’re crafting cozy blankets, quirky bags, or festive decorations, this design combines the classic granny square style with the playful appeal of gnomes.
It’s an ideal project for both beginners looking to expand their skills and experienced crocheters eager to try something unique.
Creating a Crochet Gnome Granny Square allows you to explore color combinations and textures, making each square uniquely yours.
This project not only celebrates the beloved gnome motif but also provides an excellent opportunity to use up yarn scraps creatively. Plus, granny squares are timeless in their appeal, making this a project that suits any season or purpose.
In this guide, we’ll explore everything you need to know to create your own Crochet Gnome Granny Square, including materials, step-by-step instructions, design variations, and practical applications. Let’s get started with this delightful crochet journey.
1. Materials and Tools for the Crochet Gnome Granny Square
Before diving into the Crochet Gnome Granny Square – Free tutorial, gather these essential materials to ensure a smooth crafting experience:
- Yarn Selection
Opt for medium-weight yarn in a variety of colors to bring your gnome design to life. Traditional gnome colors include red for the hat, white for the beard, and neutral tones for the face. - Crochet Hook
Use a hook size recommended for your yarn weight, typically between 4mm and 5mm for medium-weight yarn. - Tapestry Needle
A blunt-tip needle is essential for weaving in ends and adding facial details. - Scissors
Keep a sharp pair of scissors on hand for precise cuts. - Stitch Markers
These are helpful for keeping track of your rounds or sections in the pattern. - Optional Embellishments
Add tiny buttons, pom-poms, or beads for extra personality.
Having the right materials ensures your Crochet Gnome Granny Square project is both enjoyable and successful.
2. Step-by-Step Instructions for the Gnome Granny Square
Follow this detailed Crochet Gnome Granny Square – Free tutorial to create a delightful granny square featuring a cute gnome:
- Begin the Base Square
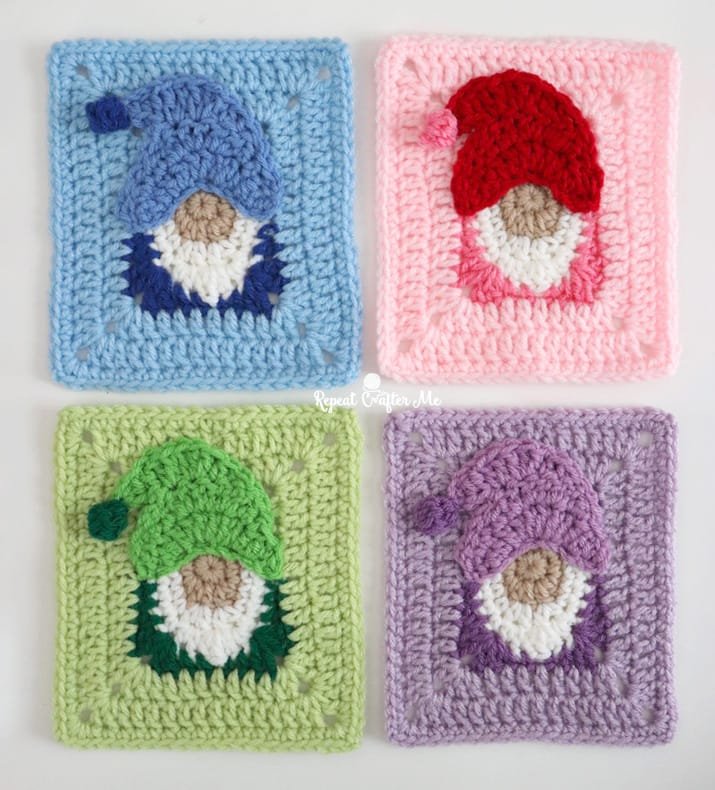
Start with a classic granny square using your chosen background color. This provides a sturdy base for your gnome design. - Create the Gnome’s Hat
Use a contrasting yarn to crochet a triangle shape at the top of the square, forming the gnome’s iconic pointy hat. - Add the Beard
Crochet a semi-circle or triangular shape below the hat in white or gray yarn to represent the beard. Use textured stitches like loop stitches for added dimension. - Define the Face
Fill the space between the hat and beard with a neutral yarn color. Simple stitches create a smooth surface for attaching facial features. - Attach the Nose
Crochet a small, round nose and sew it in place between the hat and beard. Pink or peach yarn works well for this detail. - Embellish the Square
Add decorative elements like snowflakes, buttons, or embroidery to enhance the festive vibe.
By following these steps, you’ll have a completed Crochet Gnome Granny Square that’s ready to be incorporated into larger projects.
3. Creative Variations of the Gnome Granny Square
The Crochet Gnome Granny Square – Free tutorial is versatile and can be adapted in numerous ways. Here are some creative ideas to make your squares stand out:
- Seasonal Themes
Create gnomes with seasonal hats, such as Santa hats for Christmas or floral crowns for spring. - Color Variations
Experiment with non-traditional colors like pastels, metallics, or ombre yarn for a unique twist. - Textured Stitches
Incorporate textured stitches like puff or bobble stitches to add depth to the beard or hat. - Miniature Accessories
Crochet tiny scarves, glasses, or mittens for your gnomes to give them extra personality. - Background Patterns
Use variegated yarn or simple motifs in the background to make the gnome design pop. - Mix-and-Match Designs
Combine gnome squares with other themed granny squares, such as stars or snowflakes, to create a cohesive quilt or afghan.
These variations allow you to customize your Crochet Gnome Granny Square to suit any occasion or personal preference.
4. Practical Uses for Crochet Gnome Granny Squares
Once your Crochet Gnome Granny Square is complete, the possibilities for its use are endless. Here are some ideas:
- Blankets and Throws
Assemble multiple squares into a cozy blanket that’s perfect for chilly evenings. - Tote Bags
Sew several squares together to create a quirky and functional tote bag. - Pillow Covers
Use a few squares to make festive pillow covers for your home. - Table Runners
Arrange the squares in a row to create a charming table runner for holiday dinners. - Wall Hangings
Frame a single square or combine several into a decorative wall hanging. - Gift Wrap or Tags
Use a single gnome square to wrap small gifts or as a reusable gift tag.
These applications showcase the versatility of the Crochet Gnome Granny Square and its ability to enhance your home and gifts.
Frequently Asked Questions (FAQ)
Q1: Is the Crochet Gnome Granny Square suitable for beginners?
Yes, with basic crochet skills, beginners can follow this tutorial. The granny square base and simple shapes make it accessible.
Q2: How long does it take to make one square?
On average, each square takes 1-2 hours, depending on your skill level and design complexity.
Q3: Can I use leftover yarn for this project?
Absolutely! This project is a great way to use up yarn scraps and experiment with color combinations.
Q4: What size does the finished square measure?
The size depends on your yarn and hook choice but typically measures 6-8 inches.
Q5: Can I make larger projects with these squares?
Yes, join multiple squares to create blankets, bags, or wall hangings.
Q6: How do I care for items made with these squares?
Wash in cold water on a gentle cycle and air dry to maintain their shape and texture.
Join our VIP broadcast list and gain access to exclusive patterns, all for free. As a VIP member, you’ll receive the best patterns daily, delivered directly to your device. ✨📱 It’s a unique opportunity to stay up-to-date with the latest trends and designs, curated just for you. Don’t miss out on enhancing your projects and discovering new inspirations with the best patterns every day! 🎨🔝
Conclusion
The Crochet Gnome Granny Square – Free tutorial is a delightful project that blends creativity with functionality. From selecting materials to exploring design variations, this guide has everything you need to craft unique and charming granny squares. Whether you use them for home décor or thoughtful gifts, these squares are sure to bring joy.
Have you tried this tutorial? Share your thoughts, suggestions, or photos of your creations in the comments. Your feedback inspires us and the crochet community. Happy crocheting!

