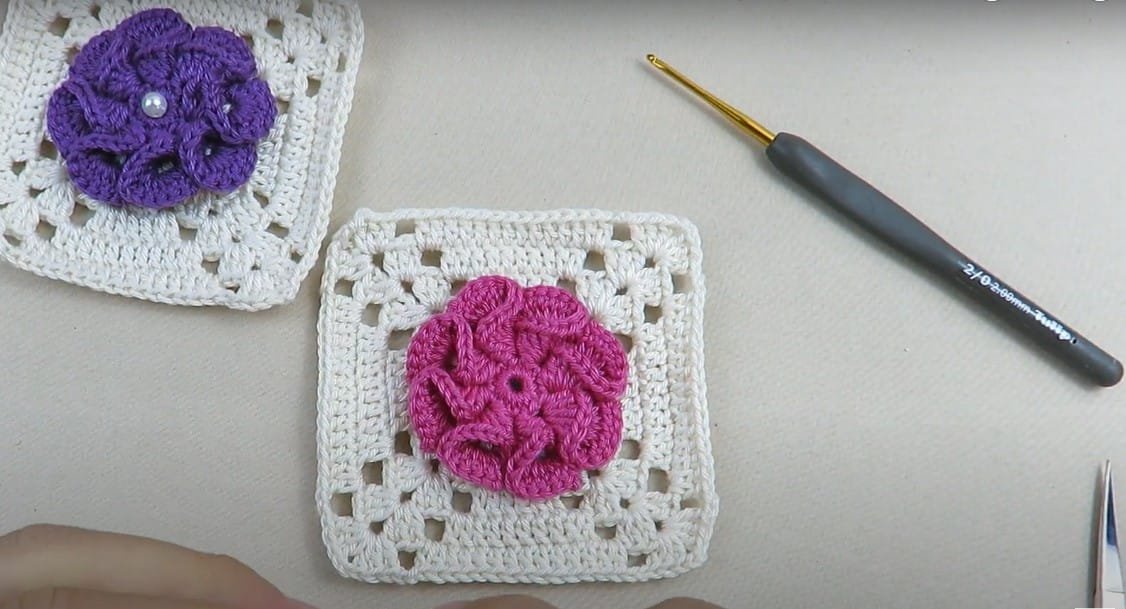
If you’re looking to add a touch of charm to your crochet projects, then this Crochet Flower Granny Square free pattern is just what you need. Granny squares have been a beloved staple in the crochet community for generations, celebrated for their versatility and ease of use.
This particular pattern combines the classic granny square design with beautiful floral motifs, making it a perfect choice for blankets, bags, and home decor items. Whether you’re a seasoned crocheter or just starting, you’ll find joy in creating these delightful squares.
Granny squares are not only functional but also serve as a canvas for creativity. You can use various colors and yarn types to create unique combinations that reflect your personal style.
The Crochet Flower Granny Square pattern can easily be customized to suit any project, making it an ideal choice for those who love to experiment with color and design. As you work on this pattern, you will find that each square can tell its own story, bringing together the beauty of floral designs with the traditional aspects of crochet.
In this article, we will guide you through the process of making your very own Crochet Flower Granny Square. We’ll cover everything from materials needed to step-by-step instructions, and we’ll even share some tips to enhance your crafting experience. So grab your crochet hook and yarn, and let’s get started on this colorful journey of creating beautiful granny squares!
1. Materials You Will Need
Before you begin your Crochet Flower Granny Square, it’s essential to gather all the necessary materials. Having everything on hand will make your crocheting experience smooth and enjoyable.
- Yarn: Choose a medium-weight yarn, typically categorized as worsted weight (like a 4). Cotton yarn is an excellent choice for its durability and vibrant colors, but acrylic yarn can also work well, especially for beginners. Consider selecting a few different colors to bring your flowers to life.
- Crochet Hook: A size H/8 (5 mm) crochet hook is recommended for this project, but you can adjust the size based on your yarn thickness and tension preferences. Ensure that your hook feels comfortable in your hand to prevent fatigue during long crocheting sessions.
- Scissors: A good pair of scissors will be necessary to cut your yarn after finishing each square. Make sure they are sharp enough to ensure clean cuts.
- Yarn Needle: Also known as a tapestry needle, this tool is essential for weaving in loose ends after you finish each square. Opt for a needle with a large eye to accommodate thicker yarn.
- Measuring Tape: This tool is useful for measuring your squares to ensure they are consistent in size. It’s particularly handy if you plan to join multiple squares together into a larger project.
- Stitch Markers: While not necessary, stitch markers can be helpful in keeping track of your rounds, especially if you’re easily distracted or if this is your first time working with granny squares.
2. Step-by-Step Instructions
Now that you have your materials ready, it’s time to dive into the Crochet Flower Granny Square pattern. Follow these step-by-step instructions to create your beautiful squares.
- Start with a Magic Ring: Begin by creating a magic ring (or adjustable loop). This method allows you to work in the round and create a tight center for your granny square. If you’re unfamiliar with the magic ring technique, you can start with a chain of four and slip stitch to form a ring.
- First Round: Chain three (this counts as your first double crochet), then double crochet into the magic ring. Make three more double crochets into the ring, followed by a chain two. Repeat this pattern three more times to form four groups of double crochets, each separated by a chain two. Slip stitch into the top of the beginning chain to close the round.
- Second Round: Slip stitch into the next chain two space. Chain three and double crochet into the same space. Make two double crochets in the same chain two space, followed by a chain two and three more double crochets in the same space. This creates a corner. Repeat this in each chain two space around the square. Slip stitch into the top of the beginning chain to finish.
- Third Round – Adding the Flower: To add the flower, start in any corner. Slip stitch into the space, chain three (for the first double crochet), then make two more double crochets in the same space. Chain two, then make three more double crochets in the same space.
- Create Petals: In the next chain two space, make a slip stitch to join. Then, in the following chain two space, repeat the flower petal instructions. You should have a petal formed in every corner of the square. Continue this until you have completed all four corners.
- Finishing Touches: After you’ve created all your flower petals, slip stitch to the top of the first double crochet in the round. Cut the yarn, leaving a tail, and pull through to secure. Weave in any loose ends using your yarn needle.
3. Customizing Your Crochet Flower Granny Square
One of the best aspects of the Crochet Flower Granny Square is its versatility. You can customize the pattern in various ways to make it truly your own. Here are some ideas to inspire you:
- Color Combinations: Experiment with different color schemes to match your decor or personal style. You can use a single color for each square or alternate colors for the flowers and backgrounds.
- Size Variations: Adjust the size of your granny square by changing the number of rounds or the yarn weight. You can create larger squares for bigger projects or smaller ones for a more delicate look.
- Flower Variations: Feel free to change the flower design or add additional embellishments, such as beads or buttons, to give your squares a unique touch.
- Joining Techniques: When you’re ready to assemble your squares, consider different joining techniques, like whip stitch, slip stitch, or even crochet joins, to create a cohesive look.
- Borders: Adding a border around your finished squares can enhance their appearance and make them more visually appealing. A simple single crochet border or a more intricate shell stitch can elevate your design.
- Themed Projects: Use this flower granny square pattern to create themed projects for different seasons or holidays. For example, use pastel colors for spring or vibrant hues for summer.
4. Tips for Success
To ensure your journey with the Crochet Flower Granny Square is enjoyable and successful, consider these helpful tips:
- Practice Tension: Pay attention to your tension as you crochet. Consistent tension will help your squares lay flat and fit together nicely when assembled.
- Use a Gauge Swatch: If you’re unsure about your tension, make a small gauge swatch before starting your squares. This will help you determine if you need to adjust your hook size or yarn.
- Take Breaks: Crocheting can be a lengthy process, so take breaks to prevent fatigue and to keep your creativity flowing.
- Join a Community: Engaging with fellow crocheters can provide motivation and inspiration. Consider joining online forums or local crafting groups where you can share your work and learn from others.
- Follow Online Tutorials: If you’re a visual learner, seek out video tutorials for additional guidance. Many crocheters share their methods and tips online, which can be incredibly helpful.
- Have Fun: Most importantly, remember to enjoy the process. Crocheting is a wonderful way to express creativity and make something beautiful.
FAQ
Q: What is a Crochet Flower Granny Square?
A: The Crochet Flower Granny Square is a decorative square made by crocheting flower motifs into a classic granny square design. It’s versatile and can be used in various projects.
Q: Can I use any type of yarn?
A: While medium-weight yarn is recommended, you can experiment with different yarn types, such as cotton or acrylic, to achieve various textures and looks.
Q: How many squares do I need to make for a blanket?
A: The number of squares depends on the desired size of your blanket. A common size for a throw blanket might require around 30-50 squares.
Q: Can I add a border to my squares?
A: Yes! Adding a border enhances the appearance of your squares. You can use a simple single crochet stitch or get creative with more intricate stitches.
Q: What can I create with my finished squares?
A: Finished squares can be joined to create blankets, bags, pillows, or wall hangings. The possibilities are endless!
Q: Is this pattern suitable for beginners?
A: Yes! The Crochet Flower Granny Square pattern is beginner-friendly, making it an excellent choice for those new to crocheting.
Join our VIP broadcast list and gain access to exclusive patterns, all for free. As a VIP member, you’ll receive the best patterns daily, delivered directly to your device. ✨📱 It’s a unique opportunity to stay up-to-date with the latest trends and designs, curated just for you. Don’t miss out on enhancing your projects and discovering new inspirations with the best patterns every day! 🎨🔝
Conclusion
In this article, we’ve explored the delightful world of the Crochet Flower Granny Square, providing you with a free pattern and helpful tips to get started. From gathering your materials to customizing your squares, we’ve covered everything you need to create stunning floral designs.
Remember to embrace your creativity and have fun with this project. We encourage you to share your thoughts and suggestions in the comments below. Happy crocheting!

