If you’ve ever dreamed of making a beautiful accessory by hand, this Crochet Flower Granny Square Bag Tutorial is the perfect place to start. Whether you’re new to crochet or already have some experience, this guide will take you step by step through the process of creating a charming and stylish bag using floral granny squares. The best part? It’s customizable, beginner-friendly, and incredibly rewarding to make.
The Crochet Flower Granny Square Bag Tutorial combines timeless technique with a modern flair. The iconic granny square gets a refreshing floral twist, resulting in a design that is not only elegant but also durable and practical. With just some yarn, a hook, and creativity, you can transform simple materials into a one-of-a-kind piece you’ll be proud to carry.
In this detailed tutorial, we’ll break down every part of the bag-making process, from choosing the right yarn to assembling your squares and adding the final touches. Our aim is to provide clear and encouraging guidance so that every reader, regardless of skill level, can confidently follow along and enjoy the journey.
Choosing Yarn and Materials for Your Crochet Flower Granny Square Bag
When starting your Crochet Flower Granny Square Bag Tutorial, the first decision you’ll need to make is choosing the right yarn. Opt for a medium-weight cotton yarn for durability and a clean finish. Cotton holds shape better and is less likely to stretch out, which is ideal for bags.
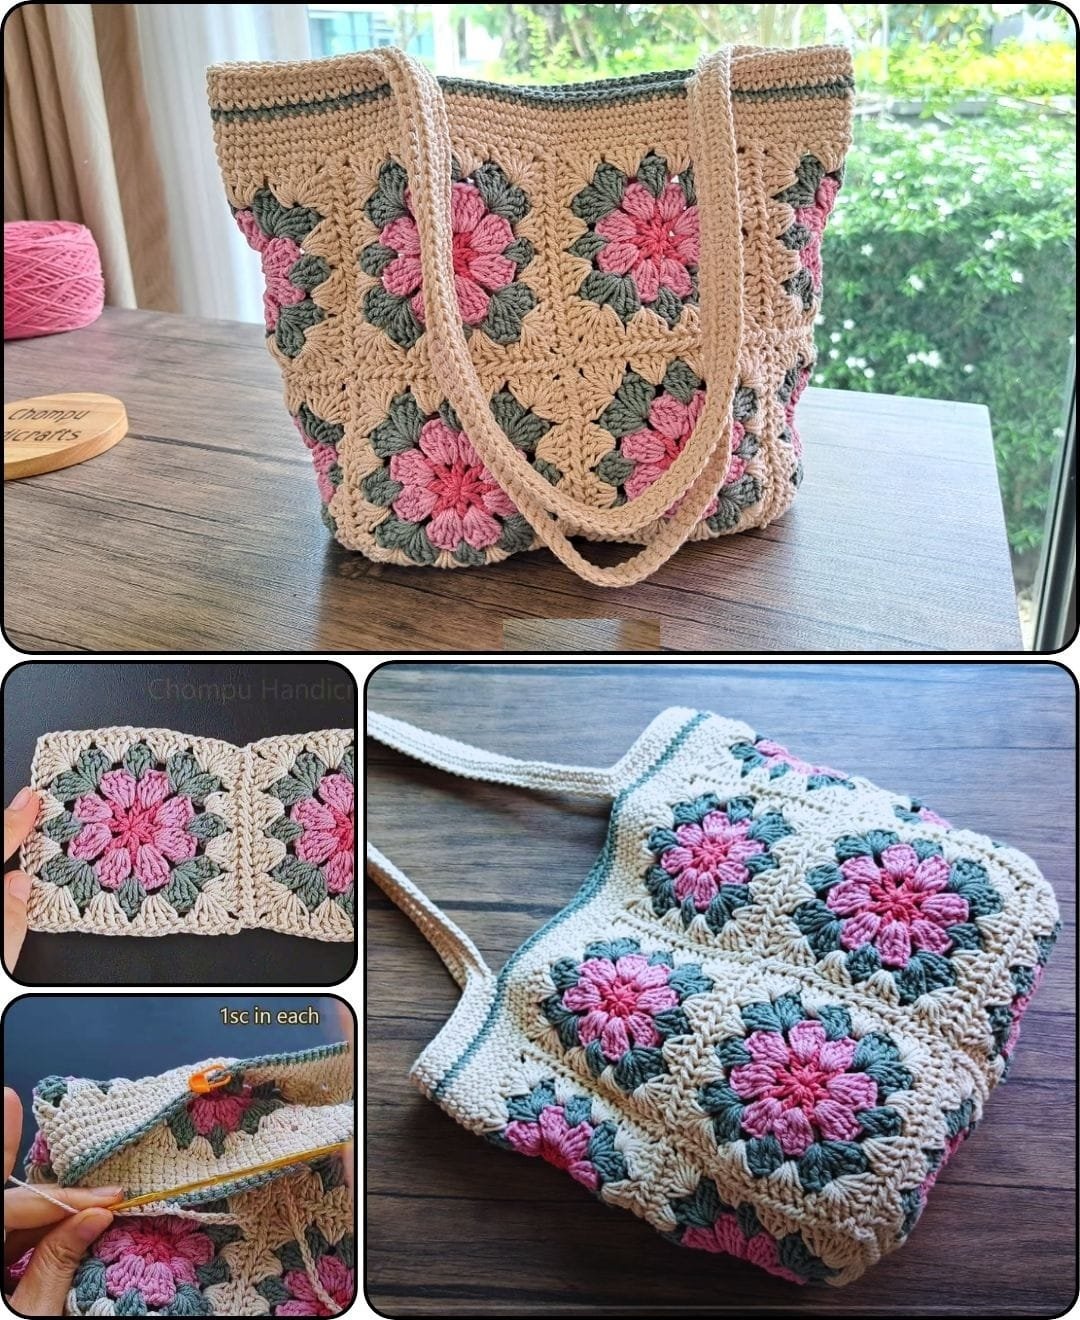
Select colors that reflect your personal style. Many crafters enjoy mixing soft pastels or vibrant shades with neutral tones for the background. The floral center of each square can pop beautifully when surrounded by a contrasting color.
You’ll also need a crochet hook that matches your yarn’s weight—usually a 4.0 mm (G-6) or 4.5 mm hook is a safe bet. Make sure it feels comfortable in your hand, as you’ll be crocheting multiple squares.
In addition to yarn and hook, you’ll need a pair of sharp scissors, a yarn needle for weaving in ends, and stitch markers to help track your rounds. Optional materials include a lining fabric for the interior of the bag and a magnetic snap or button for closure.
Once you have your materials, consider creating a few practice squares. This will help you find your rhythm and ensure consistency in size and stitch tension across all the pieces of your bag.
Planning your colors in advance also helps prevent mismatched patterns and ensures a cohesive design. Layouts can be arranged in rows or a more abstract collage, depending on your vision for the final look.
How to Make the Flower Granny Square
Now that you’re ready to begin your Crochet Flower Granny Square Bag Tutorial, it’s time to dive into making the actual granny squares. Each square begins with a floral center that is both decorative and functional. The flower adds structure and charm to the classic granny square.
Start with a magic ring and crochet the center of the flower using a cluster stitch or puff stitch to give texture and dimension. This is the standout feature of each square and the focal point of your design.
After completing the center flower, switch to a background color and begin working the traditional granny square round structure. Most patterns include three or four rounds beyond the flower to shape the square.
Pay close attention to your corners. Clear, well-defined corners help the squares align neatly when assembled into the bag. Use chain stitches between clusters to maintain a square shape and avoid curling.
Once you’ve completed a square, fasten off the yarn and weave in the ends neatly. This ensures your bag looks polished and prevents unraveling over time.
Repeat the square-making process until you have enough for the size of bag you want. Typically, a small handbag uses 13-15 squares, while a tote might use 20 or more. Make a few extra in case you want to adjust your layout later.
Assembling and Shaping the Bag
With all your squares ready, the next stage of this Crochet Flower Granny Square Bag Tutorial is assembling the pieces. Lay them out on a flat surface and experiment with different arrangements. Play with color balance, symmetry, and the direction of the flower motifs.
Once you’re happy with the layout, begin joining the squares. The whip stitch and slip stitch join are both great options. The whip stitch gives a flatter seam, while the slip stitch adds a little more structure. Choose based on your aesthetic preference.
Work row by row or in long strips, then connect those strips together. Make sure all your joins are tight and even to keep the shape clean and professional.
After the panels are complete (typically front, back, sides, and base), sew or crochet them together to shape the bag. Reinforce the bottom with extra stitching or a double layer of squares if you want added support.
If you’re adding a lining, now is the best time to measure and cut your fabric. Hand stitch or use a sewing machine to insert the lining into the interior of the bag. This helps prevent stretching and secures your belongings inside.
For handles, you can crochet sturdy straps using single crochet or use pre-made leather or rope handles. Make sure to securely attach them at reinforced points for strength and comfort.
Adding Finishing Touches to Your Granny Square Bag
The final step of your Crochet Flower Granny Square Bag Tutorial is all about the details. A few thoughtful touches can take your bag from handmade to high-end. Start by checking for any loose threads and weaving them in tightly.
Consider adding a decorative border around the top edge of the bag. A simple scalloped or picot edge gives a beautiful, finished look and helps maintain structure. Choose a border color that complements the rest of your squares.
You may also want to attach a button, magnetic clasp, or even a zipper for closure. Closures not only improve functionality but also elevate the bag’s aesthetic. Make sure the closure is centered and well-aligned.
If you’re feeling creative, embellish your bag with crochet leaves, tassels, or beads. Personal touches make your bag unique and allow your personality to shine through.
Don’t forget the inside! If you’ve added a fabric lining, consider adding a small pocket for items like keys or phones. It’s a simple upgrade that makes the bag more practical.
Finally, give your finished bag a gentle steam block to shape and soften the edges. Let it dry completely before using or gifting. Now you have a beautiful, functional accessory made with your own hands—something to truly be proud of.
FAQ: Crochet Flower Granny Square Bag Tutorial
How many granny squares do I need to make a bag?
It depends on the size of your bag. For a small purse, you might need 13-15 squares. For a larger tote, aim for 20-24 squares, including the sides and bottom.
What is the best yarn for a crochet bag?
Cotton yarn is best for bags due to its strength and minimal stretch. It holds its shape well and gives a clean finish. Avoid very soft or stretchy yarns.
Can I make this bag without lining it?
Yes, but lining adds structure and keeps small items from falling through gaps. It’s recommended for durability and professional finish.
What size hook should I use?
Use the hook size recommended for your yarn—usually 4.0 mm to 4.5 mm for medium-weight cotton. Always make a test square to check tension.
How long does it take to complete the bag?
Beginners might take a few evenings over a week. Experienced crocheters may finish it in a day or two. Time depends on the number of squares and complexity of assembly.
Is this bag suitable for beginners?
Absolutely! This Crochet Flower Granny Square Bag Tutorial is beginner-friendly. If you know basic stitches like double crochet and slip stitch, you can follow along confidently.
Can I use leftover yarn?
Yes! Granny squares are perfect for using up scrap yarn. Just make sure the yarn weights match for even stitching and size.
Should I block my squares before assembling?
Blocking is optional but helps squares lie flat and match in size. Steam blocking is recommended for cotton yarn.
Can I machine wash the finished bag?
If using cotton yarn and a strong lining, yes—on a gentle cycle. But hand washing is safer to maintain the shape and colors.
What if my squares don’t all match in size?
Try blocking them to adjust the size. If still uneven, use the larger ones for the front/back and trim or rework smaller ones as needed.
Conclusion
In this Crochet Flower Granny Square Bag Tutorial, we’ve walked through every step of creating a stunning handmade accessory—from selecting yarn and materials to assembling and finishing your project. With just a bit of patience and creativity, you can make a bag that is not only functional but also beautiful and personal.
This tutorial is designed to empower you with the skills and confidence needed to complete your own floral granny square bag. The versatility of this project means you can customize size, colors, and finishing touches to suit your taste or make meaningful gifts.

