Crochet Doily Wristlets are a charming and delicate accessory that brings elegance to your outfit while keeping your wrists cozy.
Whether you’re looking to create a thoughtful gift or simply want to add something special to your own wardrobe, these wristlets are the perfect project.
Using the Crochet Doily Wristlets – FREE PATTERN, you can create a beautiful, intricate design that will be a delightful addition to any occasion.
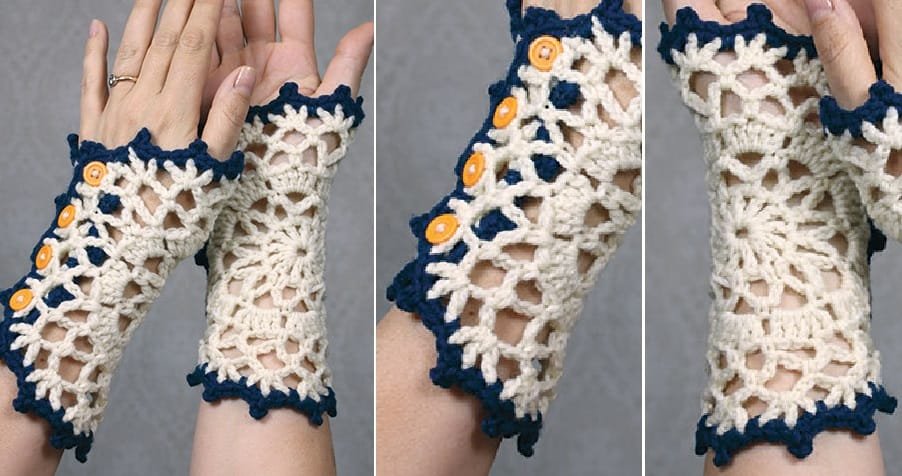
Crocheting wristlets in the doily style adds a unique twist to traditional wristwear. The doily pattern is known for its intricate lacework, making it ideal for creating lightweight and stylish accessories.
With a combination of crochet stitches and techniques, you’ll be able to create a piece that’s both functional and decorative.
Before diving into the step-by-step guide, let’s explore what makes these Crochet Doily Wristlets stand out.
Their design is not only beautiful but also versatile, allowing for customization in colors, yarn types, and embellishments.
This tutorial will guide you through the process from start to finish, ensuring that you can confidently craft your own wristlets. Let’s begin with the materials and tools you’ll need for this fun and creative crochet project.
1. Materials Needed for Crochet Doily Wristlets
To begin your Crochet Doily Wristlets, you’ll need a few essential materials. These include crochet yarn, a crochet hook, scissors, and a darning needle for weaving in the ends. You can choose any yarn you like, though cotton yarn works particularly well for a delicate yet durable finish.
First, select a color of yarn that complements your personal style. Pastels, vibrant hues, or neutral tones—there’s no limit to the options. For the best results, choose yarn with a medium thickness, as it will allow you to create detailed lacework without being too stiff.
Next, you’ll need the right size crochet hook to match the thickness of your chosen yarn. A G-6 (4.0 mm) hook is often ideal, but be sure to adjust this based on your yarn thickness and personal crochet tension. You’ll also need a darning needle for finishing touches and weaving in any loose ends when your wristlets are complete.
Once you’ve gathered your materials, you’re ready to start crocheting. Let’s move on to the steps involved in creating your own beautiful Crochet Doily Wristlets.
2. Step-by-Step Instructions for the Crochet Doily Wristlets
Start by creating a foundation chain. The number of chains you’ll need will depend on the circumference of your wrist and the desired width of your wristlet. You may need to adjust the chain length to make the wristlet snug or slightly loose.
Once you have your foundation chain, begin working in a series of crochet stitches such as single crochet, double crochet, or slip stitch, depending on the design of the doily. The key to creating the intricate look of the doily is alternating between these stitches to form the lacey pattern. Don’t worry if the pattern seems tricky at first; the beauty of crochet is in its repetition.
As you continue crocheting in rounds, you’ll begin to see the circular doily shape form. Be sure to keep your stitches consistent and evenly spaced to achieve a clean and professional-looking finish. If you’re following a specific FREE PATTERN, it’s helpful to refer to the pattern instructions for any special stitches or techniques that will give your wristlets that distinct doily effect.
The pattern for your Crochet Doily Wristlets will involve creating several rounds, each round building upon the previous one to create the lace effect. When you reach the desired size, you’ll then work to shape the wristlet into a wearable piece. Adjust the size to fit comfortably around your wrist.
3. Adding the Final Touches to Your Crochet Doily Wristlets
Once your wristlet is crocheted to the appropriate size and shape, it’s time to add the final touches. The finishing steps include weaving in any loose ends and securing the doily pattern’s last stitches. Use a darning needle to carefully weave the yarn ends through the stitches, ensuring they’re tucked in neatly to prevent any fraying.
For added style, consider adding decorative elements such as buttons, beads, or lace trim. These small embellishments can elevate the design and add a personalized touch. Additionally, you can experiment with different colors of yarn for each round of the doily to create a gradient effect or multi-colored wristlet.
If your wristlet is meant for a specific occasion, like a wedding or party, choose elegant, metallic yarns or pearls to add sophistication. For everyday wear, softer colors like pastels or earth tones work wonderfully.
Finally, after completing the wristlet, try it on to ensure a comfortable fit. If needed, adjust the size by adding or removing a few stitches, or by stretching it slightly. You now have a beautifully crafted Crochet Doily Wristlet that you can wear with pride.
4. Tips for Perfecting Your Crochet Doily Wristlets
As you crochet your wristlets, keep these tips in mind to ensure a flawless finish. First, always crochet with even tension. If your stitches are too tight, the wristlet may become too stiff, while loose stitches can make it sag. Practicing consistent tension will result in a well-formed piece.
Secondly, take your time with each round. Rushing through the project may lead to uneven stitches or a distorted pattern. It’s better to go slow and carefully craft your wristlet to ensure the doily pattern shines through.
Third, don’t be afraid to experiment with different crochet techniques to personalize the design. You can change the shape or size of the doily by altering the number of chains or stitches in each round. It’s a fun way to make the wristlet uniquely yours.
Lastly, make sure to block your wristlet once it’s finished. Blocking helps to even out the stitches and gives your piece a polished, professional appearance. Lay your wristlet flat, spray it with water, and pin it to the desired shape. Let it dry completely before wearing.
FAQ about Crochet Doily Wristlets
Q1: Can I make these wristlets with any type of yarn?
Yes, you can use different types of yarn for your Crochet Doily Wristlets. However, it’s best to use yarn that’s not too bulky. Cotton or linen yarn works well for this project as they provide a nice balance between texture and flexibility.
Q2: How do I know if my wristlet will fit properly?
To ensure your wristlet fits well, measure your wrist before starting. Then, crochet the foundation chain based on your wrist measurement and continue until the wristlet fits comfortably around your wrist. Adjust the size by adding or removing stitches as necessary.
Q3: How do I keep my stitches even while crocheting the doily?
Maintaining even tension is key to consistent stitches. Try to relax your hands and crochet at a steady pace. If needed, practice on a small swatch before starting your wristlet to get the tension right.
Q4: Can I use this pattern for other crochet projects?
Yes! The doily pattern used in this wristlet can be adapted for a variety of projects such as coasters, table runners, or even decorative wall hangings. Feel free to experiment with the pattern and size.
Q5: How can I make my wristlet more durable?
For more durability, consider using a stronger yarn, such as a cotton blend, or even adding a lining to your wristlet once it’s complete. This will ensure that the wristlet holds up over time.
Join our VIP broadcast list and gain access to exclusive patterns, all for free. As a VIP member, you’ll receive the best patterns daily, delivered directly to your device. ✨📱 It’s a unique opportunity to stay up-to-date with the latest trends and designs, curated just for you. Don’t miss out on enhancing your projects and discovering new inspirations with the best patterns every day! 🎨🔝
Conclusion
In this tutorial, we explored how to create Crochet Doily Wristlets, a beautiful and practical accessory that adds elegance and charm to any outfit. We covered the materials needed, step-by-step instructions, and how to add finishing touches for a polished look. Whether you’re crocheting these wristlets for yourself or as a gift, this project is both rewarding and stylish.
We hope you enjoyed learning how to make these wristlets and feel inspired to try the FREE PATTERN for your own creations. Please leave a sincere comment below with your thoughts or any suggestions for future projects. Happy crocheting!

