Creating a Crochet Crown Headband is a delightful project for both beginners and experienced crafters. This free pattern will guide you step by step to make a stunning accessory that can be worn for parties, photoshoots, or just for fun. With the right yarn and hook, you can create a piece that feels both elegant and playful.
The Crochet Crown Headband combines the charm of a crown with the practicality of a headband. It’s a perfect gift for children and adults alike. Making your own headband allows for customization in size, color, and embellishments.
Using this free pattern, you’ll gain confidence in working with basic stitches and learn new techniques that can be applied to other crochet projects. This tutorial ensures a smooth crafting experience, even for beginners.
Materials Needed for Crochet Crown Headband
To begin your Crochet Crown Headband, you will need some basic materials. Choosing the right tools makes a big difference in the final result. Start with high-quality yarn to ensure comfort and durability.
You will need a crochet hook that matches your yarn weight. A common choice for this project is a 3.5 mm to 4.5 mm hook, which works well for soft, medium-weight yarns.
Scissors are essential to trim the yarn neatly. Keeping your yarn ends clean improves the overall appearance of the finished headband.
A yarn needle is also required for weaving in the ends. This step ensures that your Crochet Crown Headband has a polished, professional finish.
Optional embellishments such as beads, small pearls, or sequins can add a personal touch. These can be sewn onto the crown after completing the basic headband.
Measuring tape is helpful to ensure the headband fits comfortably around the head. Adjust the size as needed for a snug yet flexible fit.
Step-by-Step Instructions
Start your Crochet Crown Headband by creating a foundation chain. This will form the base of your crown. Make sure your chain matches the desired length of the headband.
Work single crochet stitches along the foundation chain. This creates a stable base and prevents the crown points from collapsing.
Once the base is complete, begin forming the crown points. Each point can be made by increasing stitches gradually to create a triangular shape.
Continue crocheting the points until you reach the desired number of peaks. Typically, five to seven points create a balanced look.
After completing the crown points, join the ends of the headband using slip stitches. Ensure the join is tight but flexible for comfort.
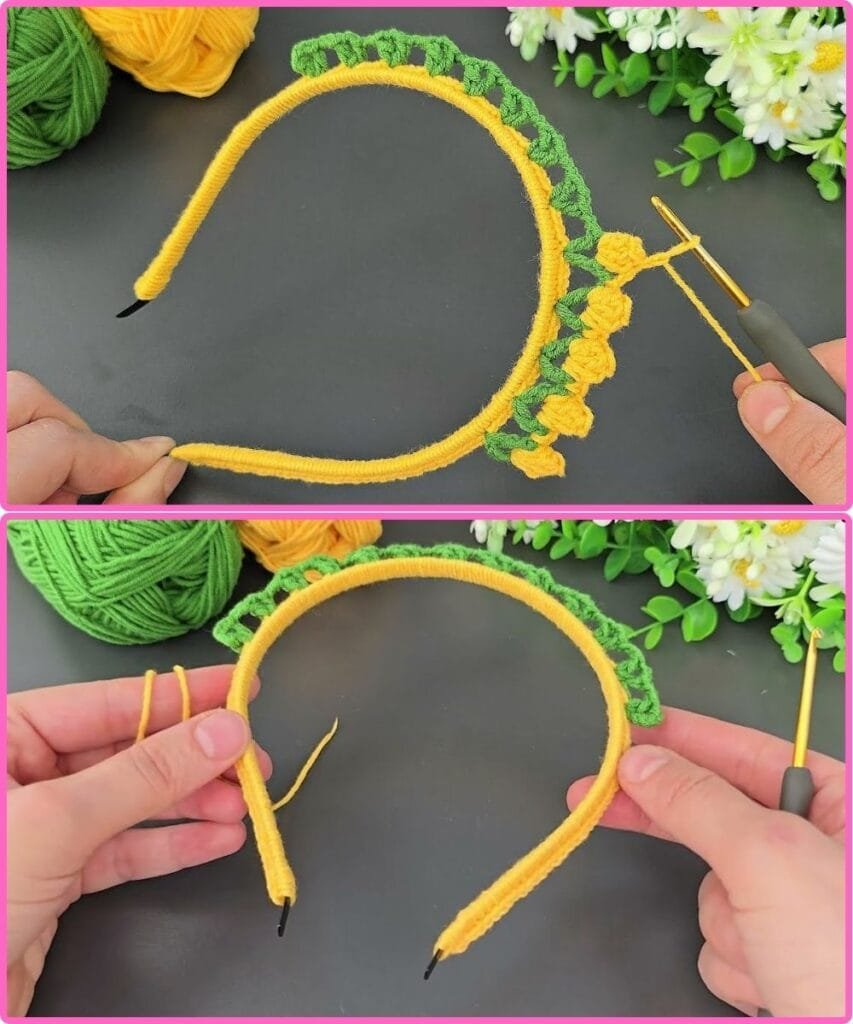
Finally, weave in any loose yarn ends and add optional embellishments. Your Crochet Crown Headband is now ready to wear.
Tips for Choosing Yarn and Hook
Selecting the right yarn is crucial for your Crochet Crown Headband. Soft yarns such as cotton or acrylic are ideal for comfort. Avoid rough or itchy yarns that might irritate the skin.
Consider the color and texture of your yarn. Vibrant colors make the crown eye-catching, while pastel shades create a delicate, elegant look.
Matching the hook size to the yarn ensures proper tension. Too small a hook can make the crown stiff, while too large can make it floppy.
If you plan to wash the headband frequently, choose a yarn that is machine washable. This makes maintenance easier and prolongs the life of your project.
Experimenting with different yarn weights can produce interesting effects. Thin yarns create a delicate, lacy appearance, while thick yarns give a bold, structured look.
Adding metallic or glitter yarn can make your crown sparkle, perfect for special occasions or costume events.
Customizing Your Crochet Crown Headband
One of the best features of a Crochet Crown Headband is the ability to customize it. Adjusting the size ensures it fits children, teens, or adults comfortably.
Changing the color scheme can match any outfit or theme. Consider alternating colors for a striped effect or using a single color for a classic look.
Embellishments like beads, sequins, or small flowers add uniqueness. Attach them securely to avoid falling off during wear.
You can also experiment with the shape of the crown points. Taller points create a dramatic effect, while shorter points give a subtle, cute look.
Adding a decorative edge along the bottom of the headband enhances its overall appearance. Simple scallops or picot stitches work beautifully.
Customizing your headband allows you to create a truly one-of-a-kind accessory that reflects your personal style.
Common Mistakes to Avoid
When making a Crochet Crown Headband, beginners often make common mistakes that can be easily avoided. Maintaining even tension is critical. Uneven stitches result in a lopsided crown.
Skipping stitches accidentally can alter the number of points and ruin symmetry. Count your stitches carefully with each row.
Joining ends too tightly can make the headband uncomfortable. It should stretch slightly for comfort but remain secure.
Using the wrong hook size may affect the overall look. Always test a small swatch before starting the full project.
Not weaving in ends properly can make your headband look unfinished. Take the time to hide all yarn tails neatly.
Choosing a yarn that is too soft or slippery can make the crown floppy. Select a yarn with some structure to maintain the shape of the points.
Frequently Asked Questions (FAQ)
Q1: Can I make a Crochet Crown Headband for a toddler?
Yes, simply reduce the foundation chain length and adjust the number of crown points to fit a smaller head.
Q2: What type of yarn works best for this project?
Soft cotton or acrylic yarn is ideal for comfort and durability. Avoid rough or scratchy yarns.
Q3: Can I add decorations to my crown?
Absolutely. Beads, sequins, or small flowers can be sewn on for a personalized look.
Q4: How do I wash my Crochet Crown Headband?
If using machine-washable yarn, wash gently in cold water. Otherwise, hand wash and lay flat to dry.
Q5: Can I make this headband stretchable?
Yes, use slightly elastic yarn or adjust the hook size to create a comfortable stretch.
Q6: How many points should a crown have?
Typically, five to seven points create a balanced design, but you can customize based on preference.
Q7: Can I make multiple crowns in different colors?
Definitely. Using different yarn colors can match various outfits or themes.
Q8: How long does it take to make one headband?
Depending on experience, a Crochet Crown Headband can be completed in 2–4 hours.
Q9: Can I sell these headbands?
Yes, handmade headbands are popular for gifts and boutique sales.
Q10: Is this pattern suitable for beginners?
Yes, the pattern uses basic stitches and includes detailed step-by-step instructions.
Conclusion
In this article, we explored how to create a beautiful Crochet Crown Headband using a free pattern.
We discussed the necessary materials, step-by-step instructions, tips for yarn and hook selection, customization options, and common mistakes to avoid.
The tutorial ensures even beginners can confidently make a headband that looks professional and stylish.
VIDEO TUTORIAL
Now that you’ve completed your Crochet Crown Headband, consider sharing your creations and experimenting with different colors, yarns, and embellishments. Your feedback and suggestions are welcome. Leave a comment with your honest opinion about this tutorial and ideas for future patterns. Happy crocheting!

