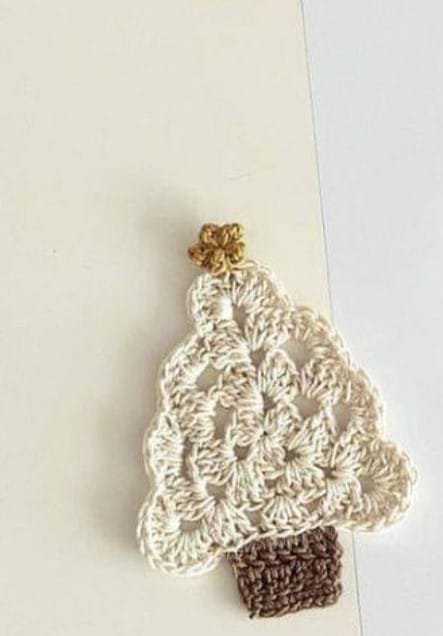
Looking to create a festive decoration that adds a personal touch to your holiday décor? This Crochet Christmas tree with star – free pattern is the perfect project for anyone wanting to bring a bit of handmade magic to the Christmas season.
Whether you’re a seasoned crocheter or just starting, this pattern is easy to follow and allows for creative flexibility. The Christmas tree with a star design is a fun and unique way to show off your crochet skills, and the best part? It’s entirely customizable!
In this guide, we’ll walk you through each step of creating a beautiful crochet tree topped with a star. You can use different colors, yarns, and embellishments to make it truly your own.
Plus, this free pattern is ideal for making multiple trees to gift or decorate around the house. Let’s get started on crafting your own crochet Christmas tree with star to spread holiday cheer.
By the end of this post, you will have a gorgeous handmade Christmas tree that can be a centerpiece for your holiday décor. And remember, this free pattern is suitable for beginners and advanced crocheters alike. So, grab your yarn, and let’s dive into this fun and festive project!
1. Materials Needed for the Crochet Christmas Tree with Star
Before you begin your crochet Christmas tree with star, it’s essential to gather all the necessary materials. Here’s what you’ll need:
- Yarn: For this pattern, you can choose any color that represents the holiday spirit. Most people prefer green for the tree, yellow for the star, and white or gold for decorations, but feel free to get creative. Thicker yarn will give your tree a fuller appearance.
- Crochet Hook: The hook size will depend on the thickness of the yarn you choose. For standard yarn, a 4.0mm or 5.0mm hook works well. The key is to ensure your stitches are tight enough to give the tree structure.
- Stuffing: If you want your crochet Christmas tree to stand up on its own, you’ll need some stuffing to fill it. Polyfill or cotton works best for this purpose.
- Scissors and Tapestry Needle: These are standard tools for any crochet project, essential for cutting yarn and weaving in loose ends after finishing the pattern.
- Optional Embellishments: If you want to add extra flair to your tree, consider using beads, sequins, or small buttons as decorations. These can be sewn onto the tree for a sparkling effect.
- Star Pattern: To finish off your tree, we’ll guide you through crocheting a small star to place on top. The crochet star is simple and quick, adding a festive touch.
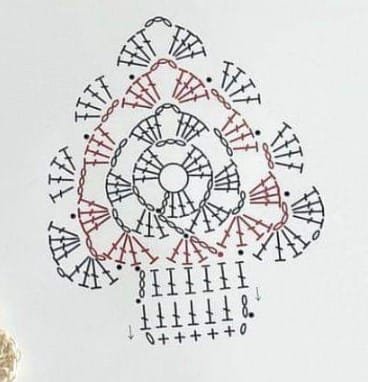
2. How to Crochet the Christmas Tree
Now that you’ve gathered your materials, it’s time to start crocheting the Christmas tree. This tree is worked in the round, which gives it a lovely 3D effect. Let’s break it down step by step:
- Start with a Magic Ring: Begin by creating a magic ring, which will serve as the foundation of your tree. In this magic ring, crochet 6 single crochets (sc). This creates the tip of your tree.
- Increasing Stitches: For the next few rounds, you’ll increase stitches by crocheting two sc into each stitch. Continue increasing in each round to give the tree its cone shape. You’ll want to increase evenly to ensure the tree stays balanced.
- Shaping the Tree: As you progress, you can start adding fewer increases to shape the tree. For example, in round 4, you might sc in one stitch, then increase in the next. This method creates a gradual widening of the tree’s base.
- Creating the Branches: You can add “branches” by chaining a few stitches at certain intervals to give the tree a more textured look. This is optional but adds dimension.
- Final Rounds: When you’ve reached your desired tree height, begin to taper the tree by reducing the number of stitches. Continue decreasing until the base of the tree is complete.
- Stuffing and Closing: Before fully closing the bottom, add your stuffing to give the tree some shape. Once stuffed, finish by closing the bottom of the tree with slip stitches.
3. Crocheting the Star for the Christmas Tree
No crochet Christmas tree is complete without a star on top! This part of the project is quick and easy, making it a fun addition to the overall design.
- Starting the Star: Begin with a magic ring and crochet 10 single crochets into the ring. Pull tight to close the center.
- Creating Points: To make the points of the star, chain 5, then slip stitch back into the base of the previous stitch. Repeat this process around the circle, creating 5 points in total.
- Adding Dimension: If you want a thicker star, you can create two identical stars and sew them together for a 3D effect. Stuff it lightly if you’d like the star to have some volume.
- Attaching to the Tree: Once your star is complete, use a tapestry needle to attach it securely to the top of your crochet Christmas tree. Make sure it sits nicely on the tree tip.
- Customizing the Star: You can use different colors for the star or add glittery yarn for extra sparkle. This is a chance to get creative!
- Final Touches: Secure the star, weave in any loose ends, and your crochet Christmas tree with star is ready to shine!
4. Decorating and Displaying Your Crochet Christmas Tree
Now that your Christmas tree with star is complete, it’s time to think about how to decorate and display it. Here are a few ideas to help you get the most out of your handmade creation:
- Adding Ornaments: You can crochet mini ornaments like balls, bells, or candy canes to hang on your tree. Small beads or embroidery can also be used as decorations.
- Garlands and Tinsel: Use a contrasting color of yarn to crochet a garland or some tinsel for your tree. A simple chain stitch in gold or silver can wrap around the tree for a festive touch.
- Display Options: Place your crochet Christmas tree on a mantle, window sill, or as a centerpiece on your dining table. Its small size makes it versatile for any space.
- Gifting Ideas: These trees make fantastic handmade gifts! Customize the colors to suit the recipient’s taste, and package it up nicely for a thoughtful present.
- Holiday Decor Set: Why not create an entire set of crochet holiday decor? Along with your crochet Christmas tree, you could crochet stockings, wreaths, or snowflakes to complement the theme.
- Care Tips: To keep your crochet Christmas tree looking its best, store it in a cool, dry place when the season is over. This will ensure it stays intact for years to come.
FAQ
How long does it take to crochet a Christmas tree?
The time varies depending on your crochet speed and experience. For most people, this crochet Christmas tree with star can be completed in a few hours.
What yarn is best for this project?
You can use any yarn, but thicker yarn will make the tree more substantial. Acrylic yarns work well for a sturdy, festive tree.
Can I make the tree in different sizes?
Absolutely! You can adjust the size by using thicker or thinner yarn, or by adding more rounds to the tree to make it taller or shorter.
Do I need to know advanced crochet techniques?
No, this pattern is beginner-friendly! It only requires basic stitches like single crochet, increases, and decreases.
Can I add lights to the crochet Christmas tree?
Yes, small battery-powered fairy lights can be woven through the tree for a magical effect.
Is this pattern suitable for kids?
With supervision, older kids who are learning to crochet could definitely follow along and make their own trees!
Join our VIP broadcast list and gain access to exclusive patterns, all for free. As a VIP member, you’ll receive the best patterns daily, delivered directly to your device. ✨📱 It’s a unique opportunity to stay up-to-date with the latest trends and designs, curated just for you. Don’t miss out on enhancing your projects and discovering new inspirations with the best patterns every day! 🎨🔝
Conclusion
This crochet Christmas tree with star – free pattern is a fantastic way to add a handmade touch to your holiday décor. Whether you’re making it for yourself or as a gift, it’s sure to bring joy and warmth to any space. With simple materials and easy-to-follow steps, you’ll have a beautiful crochet Christmas tree ready in no time.
PATTERN HERE
Have you tried making your own crochet Christmas tree? Let us know in the comments below! We’d love to hear your thoughts and suggestions for future patterns. Happy crocheting!

