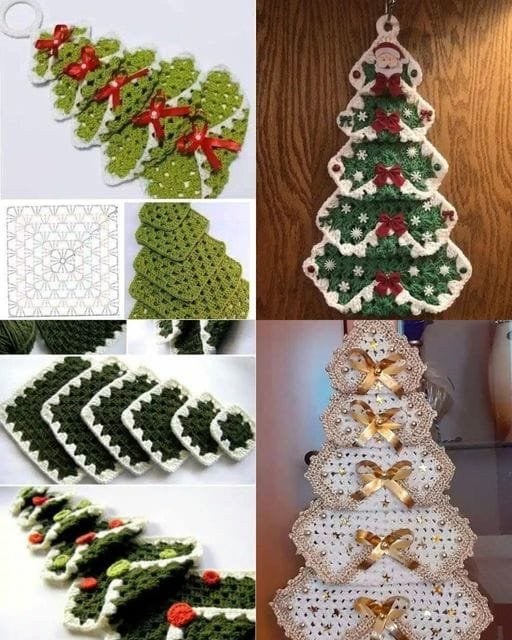
If you’re looking for a festive way to decorate your home this holiday season, the Crochet Christmas Tree with Granny Squares Ideas is an excellent choice.
This delightful project not only adds a charming touch to your holiday decor but also allows you to express your creativity through the vibrant colors and patterns of granny squares.
Crochet enthusiasts of all skill levels can enjoy this project, making it a wonderful way to gather friends and family for some holiday crafting.
The beauty of a Crochet Christmas Tree with Granny Squares lies in its versatility. You can create trees of various sizes, from small tabletop decorations to larger statement pieces for your living room.
Moreover, the granny square technique offers endless possibilities for color combinations and designs, allowing you to personalize your tree to match your holiday theme. In this article, we’ll explore several ideas and tips for creating your own crochet Christmas tree using granny squares.
As we dive into this festive project, we’ll cover everything from choosing the right materials to various design ideas, ensuring you have all the information you need to craft a stunning crochet Christmas tree. Let’s get started on this exciting journey into the world of crochet!
1. Materials Needed for Your Crochet Christmas Tree
Before you begin crafting your Crochet Christmas Tree with Granny Squares, it’s essential to gather all the necessary materials. Here’s what you’ll need:
- Yarn: Choose a worsted-weight yarn in festive colors like green, red, gold, or white. These colors will help create a traditional holiday look. You may also opt for variegated yarn for added visual interest.
- Crochet Hook: Select a hook size that matches your yarn. Typically, a 4.0 mm (G) or 5.0 mm (H) hook works well for worsted-weight yarn.
- Scissors: A good pair of scissors is essential for cutting yarn and trimming any loose ends.
- Yarn Needle: This will be used for weaving in ends and sewing your granny squares together.
- Stuffing (optional): If you want your tree to have some dimension, consider using stuffing material to fill it out.
- Decorative Embellishments: Think about adding beads, buttons, or sequins for extra flair on your tree.
Having all your materials on hand before you start crafting will streamline the process and make your crochet experience more enjoyable.
2. Creating Granny Squares for Your Tree
Granny squares are the heart of the Crochet Christmas Tree with Granny Squares Ideas. They are simple to make and can be customized in countless ways. Here’s how to create your own granny squares:
- Basic Granny Square Pattern: Start with a slip knot and chain four stitches to form a ring. Work three double crochets into the ring, followed by two chains. Repeat this process until you have four clusters of three double crochets, finishing with a slip stitch to close the round.
- Changing Colors: For a festive look, change yarn colors every round. This creates a beautiful contrast and allows you to incorporate various colors into your design.
- Square Size: Determine how large you want your granny squares to be. For a Christmas tree, medium-sized squares typically work best. Aim for squares that are about 4 to 6 inches.
- Creating a Variety: Experiment with different patterns by adding stitches or altering the number of chains between double crochets. This will give your tree a unique appearance.
- Joining Squares: Once you have several granny squares, you can join them together. Lay out your squares in the desired pattern and use a yarn needle to sew them together, ensuring that they fit snugly.
- Final Touches: After assembling your squares, consider adding a border around your tree to give it a finished look. This can be done with single crochet stitches in a contrasting color.
Creating granny squares is a fun and creative process that sets the foundation for your Crochet Christmas Tree. The more squares you create, the more options you have for your tree’s design!
3. Assembling Your Crochet Christmas Tree
Now that you have your granny squares ready, it’s time to assemble your Crochet Christmas Tree. Here are some steps to follow:
- Layout: Start by arranging your granny squares into a tree shape. You can create a simple triangular shape or get creative with a more whimsical design.
- Layering: For a fuller tree, layer your squares from largest at the bottom to smallest at the top. This not only adds depth but also mimics the natural shape of a Christmas tree.
- Sewing Together: Use your yarn needle and matching yarn to sew the squares together, ensuring a secure fit. Make sure to reinforce the edges so that your tree holds its shape.
- Creating a Base: Consider crafting a sturdy base for your tree. This can be done using a wooden dowel or cardboard covered in yarn. Attach the bottom layer of granny squares to the base for stability.
- Adding Dimension: If you want a more three-dimensional look, consider stuffing the squares lightly with fiberfill or using a cardboard template for support.
- Decorating Your Tree: Once your tree is assembled, it’s time for the fun part—decorating! Add ornaments made from yarn, beads, or even small bells to enhance the festive spirit.
Assembling your tree is where your vision truly comes to life. Take your time to ensure each piece fits perfectly, creating a beautiful finished product.
4. Displaying and Caring for Your Crochet Christmas Tree
Once you’ve completed your Crochet Christmas Tree, it’s important to think about how you will display and care for it:
- Choosing a Location: Find a prominent spot in your home where the tree can be showcased. Whether it’s on a mantel, table, or shelf, ensure it’s visible to guests and family.
- Lighting: Consider adding small fairy lights to your tree for a magical touch. Wrap them around your crochet tree or place them underneath for a soft glow.
- Protecting from Damage: Keep your tree away from direct sunlight or damp areas to prevent fading and mildew.
- Storage: After the holiday season, carefully store your tree in a cool, dry place. Avoid cramming it into tight spaces to maintain its shape.
- Cleaning: If your tree collects dust, gently shake it out or use a lint roller to remove any debris. Hand wash it if necessary, but make sure to let it dry completely before storing.
- Personal Touches: Feel free to modify or add new decorations each year. This can create a sense of nostalgia and make your crochet Christmas tree a treasured holiday tradition.
Displaying your Crochet Christmas Tree with Granny Squares can become a cherished part of your holiday decor. With care, your creation will last for years to come.
FAQ
Q1: Can I use any type of yarn for my crochet tree?
A: While you can use any yarn, worsted-weight acrylic or cotton yarn is recommended for durability and ease of care.
Q2: How long does it take to complete a crochet Christmas tree?
A: The time it takes depends on your skill level and the size of your tree. Generally, it can take a few hours to a couple of days.
Q3: Are there specific patterns for granny squares?
A: Yes! There are many granny square patterns available online. You can also create your own designs by experimenting with different stitch combinations.
Q4: How do I attach the granny squares together?
A: You can sew them together using a yarn needle and matching yarn. Alternatively, you can use slip stitches to join them as you crochet.
Q5: Can I create a larger tree using more squares?
A: Absolutely! The beauty of granny squares is that you can create trees of any size. Simply adjust the number of squares accordingly.
Q6: What if I’m new to crochet? Can I still make this tree?
A: Yes! This project is suitable for beginners. Start with basic granny squares and take your time. There are many resources available to help you learn.
Join our VIP broadcast list and gain access to exclusive patterns, all for free. As a VIP member, you’ll receive the best patterns daily, delivered directly to your device. ✨📱 It’s a unique opportunity to stay up-to-date with the latest trends and designs, curated just for you. Don’t miss out on enhancing your projects and discovering new inspirations with the best patterns every day! 🎨🔝
Conclusion
In this article, we explored the delightful world of the Crochet Christmas Tree with Granny Squares Ideas. From gathering materials and creating granny squares to assembling and displaying your tree, you now have all the tools you need to embark on this festive project.
Crafting a crochet Christmas tree is not only a creative endeavor but also a way to bring holiday cheer into your home. We hope you feel inspired to create your own unique tree, and we encourage you to share your experiences. Please leave your honest opinions and suggestions in the comments below. Happy crocheting and Merry Christmas!

