Creating a Crochet Christmas Tree Pattern is one of the most delightful ways to bring warmth, creativity, and a touch of handmade charm into your home during the holiday season. Nothing feels quite as cozy as decorating your home with crochet crafts that you’ve made with your own hands.
There’s something magical about combining yarn and a crochet hook to craft beautiful pieces that symbolize the spirit of Christmas. A handmade crochet tree can be used as a table centerpiece, an ornament, a wall decoration, or even as part of a garland.
Moreover, crocheting a Christmas tree is not just about making decorations; it’s about creating memories. When you sit down with your yarn during the cold December days, every stitch becomes a moment of peace, reflection, and creativity.
Choosing the Right Materials for Your Crochet Christmas Tree Pattern
To begin any Crochet Christmas Tree Pattern, choosing the right materials is essential. The yarn, hook, and accessories you select will influence not only the appearance of your tree but also its durability and texture.
First, select a yarn that fits the size and style of the tree you want to create. For smaller ornaments, lightweight yarns such as cotton or acrylic work best. They provide clean stitch definition, making your crochet tree pattern appear detailed and refined. For larger projects, consider medium or bulky yarns to add volume and structure.
Next, you’ll need to choose the right crochet hook size. The hook size should complement your yarn choice. A smaller hook will give your stitches a tighter look, perfect for keeping the tree’s shape sturdy. A slightly larger hook, on the other hand, will create a softer, looser texture. Always check the yarn label for recommended hook sizes, and make a small test swatch before starting your Crochet Christmas Tree Pattern.
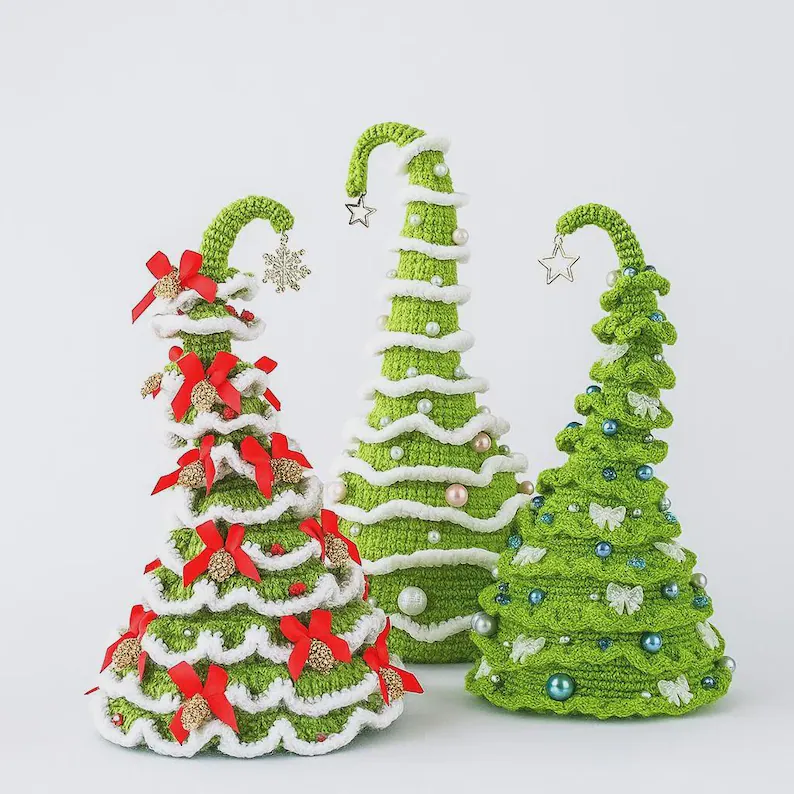
Color selection also plays a major role in your final design. Classic Christmas colors such as green, red, gold, and white never go out of style. However, don’t be afraid to get creative—pastels or metallic tones can give your tree a modern twist. Using multiple shades of green can even make your tree look more realistic.
You can also enhance your crochet tree with decorative elements like sequins, small beads, ribbons, or miniature ornaments. These can be sewn or glued onto the finished piece for extra sparkle. A golden star or a pom-pom at the top will complete your handmade Crochet Christmas Tree Pattern beautifully.
Finally, prepare a stuffing material if your project is three-dimensional. Polyester fiberfill works best for plush-style crochet trees. For a flat or appliqué-style design, blocking your finished work helps it hold its shape and gives it a polished look.
Step-by-Step Guide to Making Your Crochet Christmas Tree
Now that you have your materials, it’s time to bring your Crochet Christmas Tree Pattern to life. Even if you’re new to crochet, don’t worry—this project can be easily adapted for beginners and experts alike.
Begin by creating a foundation chain, which will serve as the base of your tree. The length of the chain determines how wide your tree will be. For a small ornament, a chain of about 20 stitches might be enough, while a larger decoration could require 40 or more.
Next, work in rows or rounds depending on your chosen pattern. For a flat tree, you’ll typically crochet in rows, decreasing stitches on each side as you move upward to form a triangle shape. For a 3D design, crochet in continuous rounds to build up layers that resemble tree branches.
Use basic crochet stitches like single crochet (sc), half double crochet (hdc), and double crochet (dc). Mixing these stitches can create texture and depth, giving your tree a more natural look. For added detail, you can incorporate techniques like picot stitches for the edges, mimicking pine needles.
When your tree shape is complete, it’s time to add decorations. Sew on beads or small buttons as ornaments. You can also make tiny crochet balls, stars, or snowflakes to hang from the branches.
Creative Variations of the Crochet Christmas Tree Pattern
One of the most exciting aspects of a Crochet Christmas Tree Pattern is how versatile it can be. Once you master the basics, you can experiment with endless variations to suit your creativity.
A popular choice is the miniature crochet tree, perfect for hanging on the Christmas tree, decorating gifts, or making festive garlands. You can make several small trees in different shades of green and gold, and even add initials to personalize them for family and friends.
Another idea is a layered crochet tree, where each tier is crocheted separately and then stacked. This gives the tree a beautiful 3D look and allows you to mix colors creatively. Adding lace-like stitches or openwork patterns can make it look delicate and elegant.
For a more rustic aesthetic, use natural-colored yarns like beige, brown, and olive green. You can even add wooden beads or twine bows for a farmhouse-inspired decoration. This style pairs beautifully with neutral holiday décor.
If you enjoy working with texture, try textured stitches such as puff stitch or bobble stitch to mimic the fullness of real pine branches. These stitches add dimension and make your crochet tree stand out in any setting.
Tips for Perfecting Your Crochet Christmas Tree Pattern
Even simple crochet projects can benefit from a few expert tips to make them look more refined and polished. These insights will help you take your Crochet Christmas Tree Pattern to the next level.
First, always keep consistent tension throughout your work. Uneven stitches can distort the tree’s shape and make it harder to assemble. Practicing tension control will make your final result smooth and professional.
Second, block your finished piece. Whether your tree is flat or dimensional, blocking helps it maintain shape and gives a clean appearance. Simply dampen your crochet tree lightly, pin it into shape on a foam board, and let it dry completely.
Third, choose high-quality yarn. Even simple stitches can look elegant with good yarn. Soft, durable materials ensure your crochet tree lasts for years and can be reused every Christmas.
Fourth, add personal touches. Handmade items are most special when they reflect your personality. Use your favorite colors, add names or initials, and make each piece unique.
Fifth, if you plan to sell your creations or gift them, consider packaging your crochet trees beautifully. Wrap them in tissue paper, place them in a small box, and tie with a ribbon for a charming presentation.
Lastly, remember that practice makes perfect. Don’t be discouraged if your first Crochet Christmas Tree Pattern doesn’t turn out exactly as you hoped. Every attempt improves your skills and brings you closer to mastering the art of crochet.
FAQ: Crochet Christmas Tree Pattern
1. What materials do I need to start a Crochet Christmas Tree Pattern?
You’ll need yarn (cotton or acrylic), a crochet hook, scissors, a yarn needle, and optional decorations such as beads, ribbons, or sequins.
2. Is this pattern beginner-friendly?
Yes! A Crochet Christmas Tree Pattern can be easily adjusted for beginners. Start with basic stitches like single crochet and double crochet.
3. How long does it take to complete one crochet tree?
Depending on size and skill level, a small tree may take about one hour, while a larger one could take several hours.
4. Can I use leftover yarn for this project?
Absolutely! This is a great project to use leftover yarn, especially in festive colors. It’s eco-friendly and creative.
5. How can I make my crochet tree stand up?
Use stiff yarn or add a bit of starch spray to keep it firm. For 3D trees, lightly stuff them with fiberfill.
Conclusion
Creating a Crochet Christmas Tree Pattern is more than just a craft project—it’s a celebration of creativity, warmth, and the holiday spirit. With just yarn, a hook, and a bit of patience, you can make beautiful decorations that last for years and bring smiles to everyone who sees them. From simple flat designs to intricate 3D creations, the possibilities are endless.

