The holiday season is the perfect time to show off your creativity, and what better way to do it than with a Crochet Christmas tree earring pattern? These handmade earrings are festive, lightweight, and add the perfect touch of cheer to any holiday outfit.
Creating crochet jewelry might seem complicated at first, but this Crochet Christmas tree earring pattern is perfect for both beginners and experienced crafters. You’ll only need a small amount of yarn, a crochet hook, and a few basic materials to make these festive accessories.
Besides being a fun DIY craft, the Crochet Christmas tree earring pattern can also become a great way to start a small handmade business.
Materials and Tools for the Crochet Christmas Tree Earring Pattern
To bring your Crochet Christmas tree earring pattern to life, you’ll need just a few essential materials. Most of them are easy to find in any craft store or online, and you might already have them if you crochet regularly. Gathering everything before starting will make the process smooth and enjoyable.
First, choose your yarn carefully. Lightweight cotton or embroidery thread works best for earrings since it keeps them delicate and comfortable to wear. Green shades are traditional for Christmas trees, but you can also try metallic threads or variegated yarns for a sparkling effect. Thinner yarn will give a dainty look, while thicker threads will make the earrings bolder and more visible.
Next, select the right crochet hook size. Usually, a 1.5 mm or 2.0 mm hook is ideal for making small and precise stitches. This helps the Christmas tree shape stay neat and defined. Make sure your tension is consistent so the earrings come out even and sturdy.
You’ll also need earring hooks or fishhook findings, which you can find in silver, gold, or bronze tones. Small jump rings help attach the crochet tree to the hooks easily. If you want to enhance your earrings further, add mini beads, sequins, or tiny stars as ornaments to your crocheted tree. A small needle will help you sew or attach decorations neatly.
Another great tip is to use a fabric stiffener or diluted glue to make the earrings firm enough to hold their shape. Once your earrings are crocheted and dried, this step ensures they won’t curl or lose structure over time. Finally, keep a pair of scissors, pliers, and a tapestry needle nearby for finishing touches. With these materials ready, you’re all set to begin your Crochet Christmas tree earring pattern project.
Step-by-Step Guide to Making Crochet Christmas Tree Earrings
Now that you have your materials, it’s time to follow the Crochet Christmas tree earring pattern step by step. Even if you are a beginner, this project is straightforward and enjoyable to create.
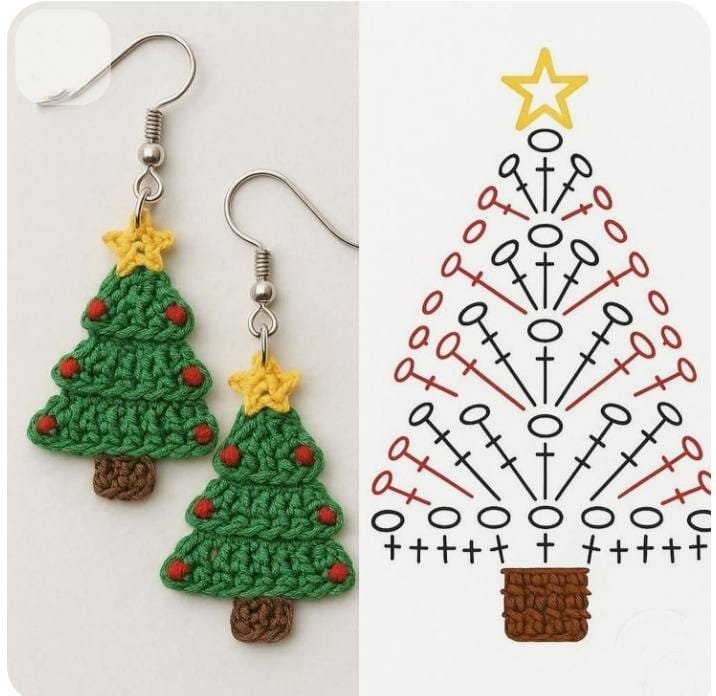
Start by making a magic ring — this will form the base of your tree. Work a few chain stitches and then crochet double crochets into the ring to create the first triangle layer. The key is to build the triangle shape gradually. Each new row adds width and helps the tree form naturally. You can increase by adding stitches evenly on both sides.
As you continue, adjust the number of rows depending on how large you want your Christmas tree to be. A small tree usually has 4 to 5 rows. Once your base shape is ready, you can add details. Use slip stitches or single crochets around the edges to make the border cleaner and more finished.
To make the tree trunk, use brown thread and crochet a small rectangle at the bottom center of your triangle. You can attach it with a few neat stitches using a needle. Then, sew or glue small beads or sequins across the tree as ornaments. Gold and red accents look particularly festive, but you can use any colors you like.
When your tree is decorated, apply a light coat of fabric stiffener or a mixture of white glue and water. Let it dry flat on a plastic surface to avoid sticking. Once dry, attach a jump ring to the top of the tree and connect it to your earring hook. Repeat the process to make the second earring.
Finally, check that both earrings are the same size and shape. Adjust if needed, and enjoy your new Crochet Christmas tree earrings — a handmade touch that spreads holiday cheer wherever you go!
Creative Variations and Personalization Ideas
One of the best things about using a Crochet Christmas tree earring pattern is the endless room for creativity. You can customize your earrings to fit your style or the preferences of someone special.
Try experimenting with different yarn colors. Traditional green is timeless, but you could use white for a snowy effect, gold for an elegant look, or even red for a playful twist. Metallic yarn adds shimmer, while cotton threads create a natural handmade charm.
If you enjoy extra sparkle, incorporate tiny pearls or rhinestones. They can mimic Christmas lights beautifully. You can also crochet a mini star and attach it to the top of your tree for a finishing touch. Another fun idea is to add mini tassels or fringes at the bottom to create movement when you wear them.
For a rustic style, use jute twine or natural hemp cord instead of yarn. This gives your earrings a cozy, farmhouse Christmas look. Combine that with wooden beads, and you’ll have an eco-friendly accessory that’s both trendy and festive.
Tips for Beginners and Maintenance of Crochet Earrings
If you’re new to crocheting, don’t worry — this Crochet Christmas tree earring pattern is ideal for learning and practicing basic stitches. The project is quick and forgiving, making it a great confidence booster for beginners.
Start slowly, and focus on keeping your tension consistent. Uneven stitches can distort the tree’s shape, so practice making uniform loops before starting your earrings. Watching tutorials or practicing with scrap thread can help you feel more comfortable.
It’s also helpful to use stitch markers to keep track of your rows and increases. This simple tool prevents mistakes and helps your work stay symmetrical. If you make an error, don’t be afraid to unravel and redo — crochet is flexible and forgiving.
Once your earrings are finished, it’s important to maintain them properly. Store them flat in a jewelry box or hang them to avoid bending. Keep them away from water, as moisture can weaken the stiffener and alter the shape.
If your earrings lose firmness over time, apply another light coat of fabric stiffener and reshape them. This will make them look brand new again. With minimal care, your Crochet Christmas tree earrings will stay beautiful for many holiday seasons to come.
Finally, enjoy wearing your creation proudly! Nothing compares to the satisfaction of wearing something made with your own hands, especially when it captures the spirit of Christmas.
FAQ: Crochet Christmas Tree Earring Pattern
1. Is the Crochet Christmas tree earring pattern suitable for beginners?
Yes, absolutely! This pattern uses basic stitches like chain, single crochet, and double crochet, making it perfect for anyone just starting their crochet journey.
2. What kind of yarn is best for making crochet Christmas tree earrings?
Lightweight cotton yarn or embroidery thread is ideal. It keeps the earrings small, neat, and comfortable to wear while allowing detailed stitches.
3. Can I sell earrings made from this Crochet Christmas tree earring pattern?
Yes! Handmade crochet earrings are popular items at craft fairs and online shops. Just make sure to take clear photos and package them nicely.
Conclusion
Making your own Crochet Christmas tree earring pattern is not only a fun craft but also a meaningful way to celebrate the holiday season. With just a few materials and a bit of creativity, you can create beautiful handmade earrings that spread joy and festive charm. These earrings make thoughtful gifts, stylish accessories, or even the start of a small handmade business.

