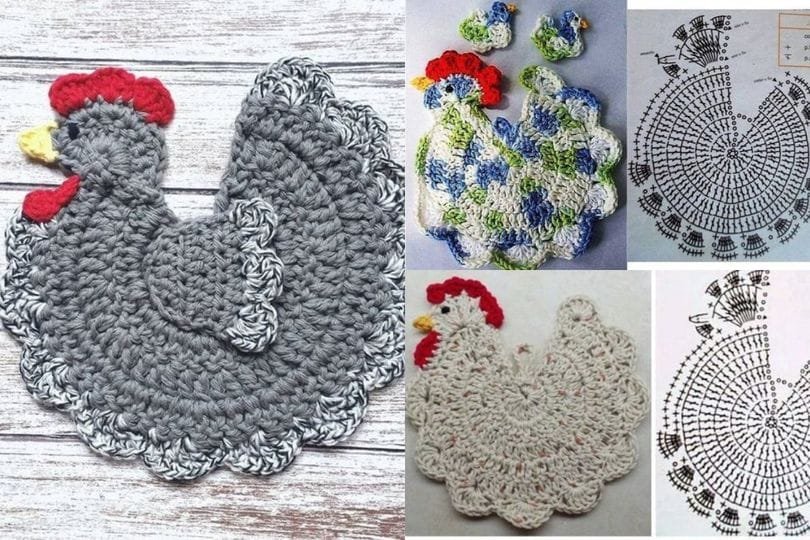
The Crochet Chicken Pot Holder – Free Tutorial is a delightful project for crochet enthusiasts, combining charm with functionality. This pattern is perfect for adding a touch of farmhouse whimsy to your kitchen, and it makes an adorable, practical addition to your cooking essentials.
Whether you’re looking to create something unique for your own kitchen or a thoughtful handmade gift, this crochet chicken pot holder is the ideal project.
This free tutorial will guide you through the process step-by-step, making it easy to follow even for beginners. With its cute chicken shape and colorful design, this pot holder can be customized to match any kitchen decor.
Crocheting this pot holder is a fun way to practice crochet techniques while creating something you’ll love using every day.
In this guide, we’ll cover everything you need to make the Crochet Chicken Pot Holder – Free Tutorial a breeze. From choosing materials to shaping the chicken, these easy-to-follow instructions will ensure that your finished pot holder is both durable and charming.
1. Choosing Materials and Preparing Your Workspace
The first step in creating your Crochet Chicken Pot Holder is gathering the right materials. Selecting the right yarn and tools will help make your pot holder both functional and decorative.
Selecting Yarn
When choosing yarn, consider a cotton yarn that is durable and heat-resistant, which is essential for a pot holder. Cotton yarn holds its shape well, is easy to clean, and withstands the heat from hot pots and pans. Popular cotton yarn brands are often available in a variety of colors, so feel free to choose shades that match your kitchen theme.
Color Choices
The Crochet Chicken Pot Holder looks best with a vibrant color palette. For a traditional chicken look, use a white or cream base with red and yellow accents. However, you can get creative and pick any colors you like. Bold colors or a two-tone style can add extra charm.
Necessary Tools
Along with the yarn, gather a crochet hook, typically a size G (4.0 mm) or H (5.0 mm), which works well with cotton yarn. You’ll also need a yarn needle to weave in the ends and some stitch markers if you’d like extra guidance while working on the chicken’s shape.
Setting Up Your Workspace
Find a well-lit, comfortable workspace to keep everything organized. Gather all your materials, including the yarn, crochet hook, scissors, and stitch markers. Setting up an organized workspace helps you follow the Crochet Chicken Pot Holder – Free Tutorial without interruptions.
Practice Stitches
If you’re new to crochet, it may help to practice the basic stitches first. This pattern will use chain stitches, single crochet, and double crochet. Practicing these stitches before starting will make the process smoother and quicker.
2. Starting the Body of the Chicken
With your materials ready, it’s time to start the main part of your Crochet Chicken Pot Holder. The body is the largest section and will serve as the base shape.
Creating the Foundation Chain
Start by making a foundation chain to form the base of the chicken. This chain will determine the width of the pot holder, so make sure it’s long enough to serve as a protective layer against heat. Follow the free tutorial pattern to see how many chains to start with.
Building the Body with Single Crochet
Once the foundation chain is complete, build up the body using rows of single crochet stitches. This stitch creates a sturdy fabric, ideal for protecting hands from hot surfaces. Continue crocheting in rows until you reach the desired height for the chicken’s body.
Shaping the Chicken’s Body
To give the pot holder its chicken shape, follow the tutorial’s instructions on increasing and decreasing stitches. This shaping will create a rounded, soft look. The pattern may require you to add stitches at the start or end of rows to create the chicken’s round body.
Adding Texture with Double Crochet
Incorporate double crochet stitches to add texture and variety to the body. You may alternate between rows of single and double crochet to give the pot holder an interesting look and feel. Double crochet stitches also make the fabric slightly thicker, adding extra protection.
Checking for Size and Adjusting
Pause periodically to check the size of the pot holder. If it’s becoming too large or small, adjust by adding or removing rows. Remember, it’s better to make adjustments as you go to avoid redoing large sections later.
3. Creating the Chicken’s Head and Tail Feathers
With the body complete, it’s time to add the Chicken Pot Holder’s distinctive head and tail features. These details give the pot holder its charming chicken appearance.
Starting the Head Section
To create the chicken’s head, you’ll crochet a smaller section attached to the top of the body. Begin by working in a smaller circular pattern for a rounded head shape. This will involve creating a magic circle or starting with a small chain and building outwards.
Adding the Beak and Eyes
The beak is a small triangle shape, which you can create with just a few stitches. Yellow or orange yarn works well for a realistic look. For the eyes, you can either use small black stitches or, for a more playful design, sew on small black buttons.
Shaping the Comb
The chicken’s comb adds an adorable detail. Using red yarn, crochet small, round shapes to create the comb on top of the head. This step may involve working in small, tight stitches to form rounded bumps.
Tail Feathers
To give the chicken pot holder its characteristic tail feathers, crochet a series of small, pointed shapes attached to the back end. These can be made using simple crochet techniques and should be arranged in a fan shape. Red, yellow, or orange yarns make the tail feathers stand out.
Assembling the Details
Once all these details are crocheted, use your yarn needle to attach each piece securely to the pot holder. Make sure everything is securely fastened to handle daily use in the kitchen.
4. Adding Finishing Touches and Final Assembly
The final steps in the Crochet Chicken Pot Holder – Free Tutorial include adding functional elements like a hanging loop and making sure the pot holder is ready for use.
Creating a Hanging Loop
To make the pot holder easy to store, crochet a small loop at the top. A simple chain of stitches, secured at the top of the head, makes it easy to hang the pot holder on a kitchen hook. This small addition makes the pot holder more practical for everyday use.
Reinforcing the Edges
To reinforce the edges, work a round of single crochet stitches around the entire perimeter of the pot holder. This will create a clean, finished look and provide additional stability to the shape. Reinforced edges also help the pot holder maintain its structure over time.
Weaving in Loose Ends
Once the crochet work is complete, weave in any loose ends with a yarn needle. This step prevents fraying and keeps the pot holder looking neat and durable. Take care to secure each end tightly, as loose threads can affect the overall look.
Final Inspection and Adjustments
Give the Crochet Chicken Pot Holder a final inspection, checking for any loose stitches or uneven areas. Make any necessary adjustments before using it in the kitchen or giving it as a gift.
Washing and Blocking
To ensure your pot holder looks its best, wash and block it. Cotton yarn can be machine washed, but air drying is recommended to prevent shrinkage. Blocking the pot holder will help it keep its shape, making it look polished.
FAQ
Q1: How much yarn is needed for the Crochet Chicken Pot Holder?
A1: You’ll need approximately one skein of cotton yarn for the main body color, plus small amounts of contrasting colors for details like the comb, beak, and tail feathers.
Q2: What size crochet hook should I use?
A2: A size G (4.0 mm) or H (5.0 mm) hook is recommended, but you can adjust based on your tension and the desired size of the pot holder.
Q3: Can I use other types of yarn for this project?
A3: Cotton yarn is best because it withstands heat, but you can use other yarns if the pot holder will be decorative rather than functional.
Q4: How do I make the pot holder thicker for extra heat protection?
A4: You can add an extra layer by crocheting a double-thick body or lining the pot holder with a second layer.
Q5: Can I machine wash this pot holder?
A5: Yes, cotton yarn is machine washable, but air drying is recommended to keep its shape.
Join our VIP broadcast list and gain access to exclusive patterns, all for free. As a VIP member, you’ll receive the best patterns daily, delivered directly to your device. ✨📱 It’s a unique opportunity to stay up-to-date with the latest trends and designs, curated just for you. Don’t miss out on enhancing your projects and discovering new inspirations with the best patterns every day! 🎨🔝
Conclusion
Creating a Crochet Chicken Pot Holder is a fun and rewarding project that combines both form and function. This guide has covered each step, from gathering materials to adding finishing details, making it easy to craft a beautiful pot holder.
Try out different colors and yarns to make it uniquely yours. We’d love to hear your thoughts and see your creations—leave a comment below with your feedback and suggestions for future tutorials!

