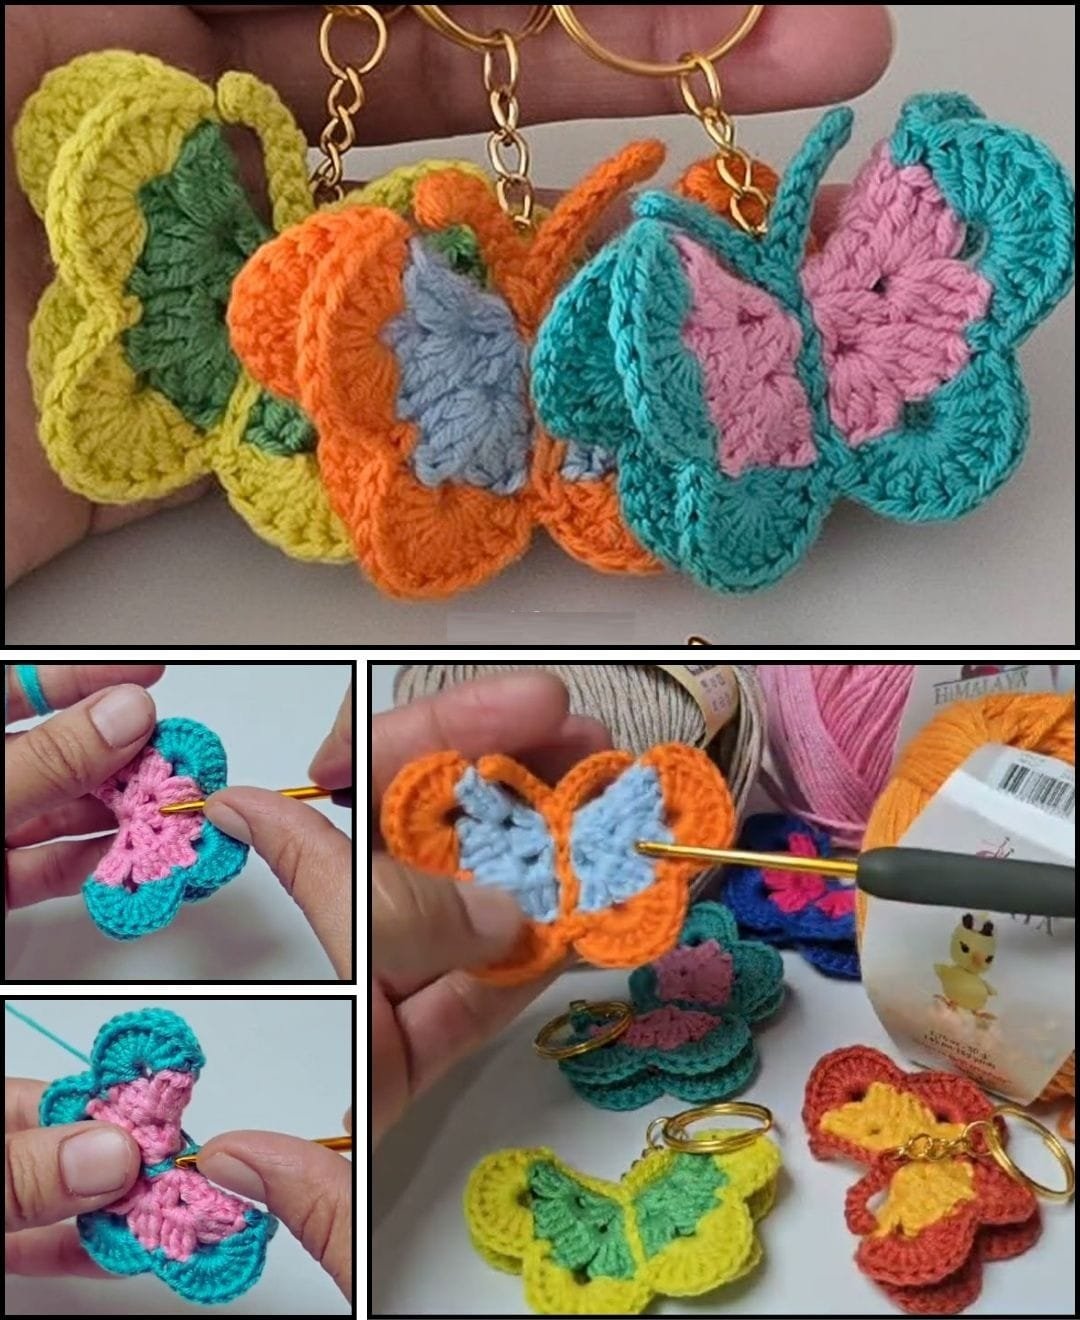
If you’re looking for a fun and easy project, this Crochet Butterfly Keychain – Free Pattern is the perfect way to add a handmade touch to your everyday accessories. Whether you’re a beginner or a seasoned crocheter, making a crochet butterfly keychain is a satisfying experience that doesn’t require much time or yarn. Plus, it’s a great way to use up leftover yarn scraps while creating something both beautiful and functional.
This crochet butterfly keychain pattern is ideal for gifts, party favors, craft fairs, or simply brightening your own keys, bags, or backpacks. The small size makes it portable and quick to crochet, and the butterfly shape adds a charming pop of color and texture. You can customize each one with different color combinations, giving each keychain its own personality and style.
In this article, we will guide you through everything you need to know about creating your own crochet butterfly keychain using this free pattern, from materials and tools to techniques and tips. Get ready to enjoy a relaxing project that brings a lot of joy in a little package.
Materials Needed to Make a Crochet Butterfly Keychain
Before you begin your crochet butterfly keychain, it’s important to gather all the necessary materials. Having everything ready will make the process smooth and enjoyable.
You will need small amounts of cotton or acrylic yarn in at least two contrasting colors. Choosing vibrant shades will make your butterfly stand out and look cheerful.
A crochet hook suitable for your yarn weight is essential. Most commonly, a 3.0 mm or 3.5 mm hook works well with medium-weight yarn for this kind of keychain.
You’ll also need a tapestry needle for sewing in the ends and shaping the butterfly once it’s crocheted. This helps give your butterfly a clean and professional finish.
A metal keyring or lobster clasp will be needed to turn your butterfly into a keychain. These are easily found at craft stores or online in packs.
Optional items include beads or buttons if you’d like to decorate your butterfly’s body or add a cute accent to the wings.
Finally, keep a small pair of scissors nearby for trimming your yarn tails and snipping away any excess.
Step-by-Step Guide to Crochet the Butterfly Shape
Creating the butterfly starts with making a simple circle that will later be folded and shaped. You’ll use basic stitches, making it perfect for beginners.
Start with a magic ring and crochet a small round using double crochet or treble crochet stitches. This will form the wings once folded.
Continue crocheting in the round for two or three more rows, switching colors if you want a layered effect for the butterfly wings.
Once you’ve completed the rounds, fasten off your yarn and leave a long tail. You’ll use this tail later to shape and secure the butterfly.
Fold the crocheted circle in half, then in half again to create the butterfly’s wing structure. This is the magic moment when a simple circle transforms into a beautiful butterfly.
Take your yarn tail and wrap it tightly around the center of the folded circle to form the butterfly’s body and secure the wings in place.
Finally, sew the ends securely, and attach your butterfly to the keyring or clasp using a few strong stitches or a small jump ring.
Tips to Customize Your Crochet Butterfly Keychain
One of the best things about this crochet butterfly keychain is how easy it is to personalize. You can make each one look completely different.
Try using gradient or ombre yarn for an elegant color blend across the wings. This creates a beautiful natural transition of shades.
Experiment with textures by using different yarn types like metallic, velvet, or even sparkly thread to add extra flair to your butterfly.
Add embellishments like small beads, sequins, or embroidery thread to decorate the wings or make antennas for a whimsical finish.
Make mini or jumbo butterflies by adjusting your hook size and yarn weight. Tiny butterflies look delicate, while larger ones are more eye-catching.
You can even stitch a face onto the butterfly body with small safety eyes and a smiling mouth if you want to give it a cute personality.
Create themed sets, such as pastels for spring, red and green for holidays, or school colors for graduation gift ideas.
Why Crochet Butterfly Keychains Are So Popular
There’s a good reason why the crochet butterfly keychain has become a trending project among crafters of all ages. It combines beauty and utility.
First, it’s a great stash buster. You can make several butterflies using leftover yarn, which means no waste and lots of color variety.
Second, it’s incredibly fast. Most people can complete one keychain in under an hour, making it ideal for quick gifts or last-minute crafts.
They’re also popular because they can be sold at craft fairs, online shops, or charity events. Handmade items like this are always appreciated.
The butterfly itself is a symbol of transformation and joy, making this keychain both meaningful and decorative at the same time.
Their small size makes them perfect for kids, teens, and adults alike. They easily attach to backpacks, keyrings, or zippers.
Lastly, they offer a calming and mindful crafting experience. Crocheting small items like these is therapeutic and satisfying.
FAQ About Crochet Butterfly Keychain – Free Pattern
Q: Can beginners make a crochet butterfly keychain?
A: Yes, this project is beginner-friendly. It uses basic stitches like chain, slip stitch, and double crochet, making it a perfect starting point.
Q: What type of yarn works best for a butterfly keychain?
A: Cotton yarn is ideal due to its stiffness and durability, but acrylic yarn also works well, especially if you’re aiming for soft texture and vibrant colors.
Q: How long does it take to make one keychain?
A: Most crocheters complete one in 30 minutes to 1 hour. It’s a great quick project that’s fun to repeat in different colors.
Q: How do I attach the butterfly to the keyring?
A: You can use the yarn tail or a jump ring to secure the butterfly tightly to the keyring or lobster clasp. Stitch or knot it securely to avoid it coming loose.
Q: Can I wash my crochet butterfly keychain?
A: Yes, but hand washing is recommended, especially if you’ve added beads or embellishments. Let it air dry to maintain its shape.
Q: Can I sell butterfly keychains I make using this free pattern?
A: Absolutely! Handmade items like these are perfect for selling, just be sure to credit the inspiration and avoid mass commercial use unless permitted by the pattern source.
Conclusion
We hope this complete guide to the Crochet Butterfly Keychain – Free Pattern has inspired you to pick up your hook and start creating. This little project offers the perfect balance of creativity, relaxation, and practical use. Whether you’re making one for yourself, a loved one, or a customer, this charming butterfly is sure to bring smiles.
From materials and instructions to tips and customizations, this article has covered everything you need to know. Now it’s your turn—grab some yarn, try different colors, and enjoy the process.
If you found this tutorial helpful or have suggestions for future crochet projects, feel free to leave a sincere comment with your thoughts. Your feedback helps improve and shape more content like this, and we’d love to hear how your butterflies turned out! 🦋

