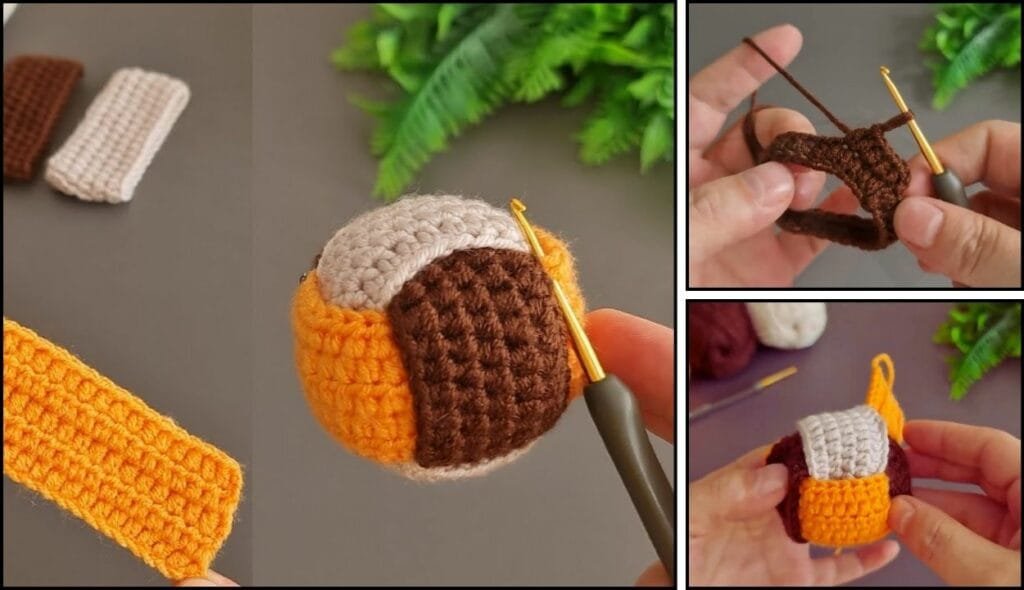
Are you ready to create a cute and personalized accessory? This Crochet Ball Keychain Free Pattern will help you craft a charming keychain that’s perfect for keys, bags, or as a thoughtful gift.
A crochet ball keychain is a small, simple project that can be completed in a few hours. The best part is that it’s easy to customize by experimenting with different yarn colors or adding embellishments like beads or charms.
In this article, you will learn how to create your very own crochet ball keychain. From gathering materials to finishing touches, we’ll cover everything you need to know. Let’s get started on your new favorite crochet project!
Materials Needed for the Crochet Ball Keychain
Before you begin, gather all the materials needed for this project. You won’t need many supplies, making this a budget-friendly and quick project to complete.
-
Yarn: Choose a medium-weight yarn (worsted weight) for the best results. You can use any color you like, but bright or bold colors work well for making the keychain pop. You can also experiment with variegated or multi-colored yarns for a striped effect.
-
Crochet Hook: A 3.5 mm or 4.0 mm crochet hook will work well for this project. You can adjust the hook size based on the yarn thickness, but these sizes are ideal for worsted weight yarn.
-
Keychain Ring: You’ll need a keychain ring to attach your finished crochet ball. These can be purchased at any craft store or online.
-
Yarn Needle: A yarn needle is necessary to weave in the loose ends once you finish the project. This ensures your keychain stays neat and secure.
-
Scissors: You’ll need a pair of scissors to trim any excess yarn.
Once you have all the materials ready, you’re set to start. This project is simple and doesn’t require a lot of supplies, which makes it perfect for a quick, satisfying crochet project.
Basic Stitches You’ll Need to Know
Before diving into the pattern, make sure you’re familiar with a few basic crochet stitches. These are the essential stitches you’ll use throughout the project. Don’t worry if you’re new to these—they’re easy to learn!
-
Slip Knot: This is the first stitch you’ll make in any crochet project. It’s used to secure the yarn to the hook.
-
Chain Stitch (ch): The chain stitch is used to create a foundation or starting point for many crochet projects. In this pattern, it will help form the magic ring.
-
Single Crochet (sc): Single crochet is the most common stitch in this pattern. It creates a dense, tight fabric that will help form the ball.
-
Increase (inc): An increase happens when you crochet two single crochet stitches into the same stitch. This allows you to increase the size of the ball as you go.
-
Invisible Decrease (inv dec): This technique is used to decrease the size of your ball, closing it neatly without leaving gaps.
Once you’re comfortable with these basic stitches, you’ll be ready to start your crochet ball keychain. Now, let’s get into the step-by-step process of making your own!
Step 1: Create the Magic Ring
To start your crochet ball keychain, you’ll begin by creating a magic ring. This ring serves as the base of your crochet ball. The magic ring is important because it allows you to start crocheting in the round without leaving a hole in the center.
To create the magic ring, hold the yarn in your hand and form a loop. Insert the crochet hook into the loop, yarn over, and pull the yarn through to form a loop on the hook. Then, chain 1 to secure the ring. Now you’re ready to begin crocheting into the ring.
In the next step, you’ll crochet six single crochets into the magic ring. Be sure to pull the yarn tightly to close the center of the ring. After completing the six single crochets, pull the tail of the yarn to tighten the ring, and you’ll have a small, tightly closed circle. You’ve now completed the first round of your crochet ball.
Step 2: Increase Every Stitch
For the second round, you’ll be increasing each stitch to start forming the ball. To do this, crochet two single crochets into each stitch from the previous round. This will help the ball expand evenly.
So, in this round, you’ll make two single crochets in each of the six stitches from the first round. By the end of this round, you should have twelve single crochet stitches. Be sure to keep the stitches tight and even so that your ball will maintain its shape. Don’t forget to mark the beginning of your round with a stitch marker to keep track of where each new round starts.
Step 3: Alternate Between Single Crochet and Increase
Now that you’ve expanded the ball, it’s time to continue shaping it. For the third round, you’ll alternate between single crochet and increase. This helps gradually increase the size of the ball without making it too large too quickly.
To do this, work one single crochet, then make an increase (two single crochets in the same stitch). Repeat this pattern for the entire round. After finishing this round, you should have eighteen stitches. This pattern allows the ball to grow in a smooth and even way.
Step 4: Continue Increasing for the Desired Size
In the next round, continue to alternate between two single crochets and an increase. Repeat this pattern around the ball until it reaches the size you want. As you increase the stitches, the ball will begin to take shape, becoming larger and rounder.
After the fourth round, you should have 24 stitches. At this point, the ball should be starting to look more rounded and begin forming the keychain shape. Keep working in rounds, increasing when necessary, until your ball reaches the desired size. You can stop when it’s about the size of a small ping pong ball, or make it larger depending on how you want your keychain to look.
Step 5: Begin Decreasing the Stitches
Once your ball has reached the desired size, it’s time to start decreasing. Decreasing is essential for closing the ball and shaping it into a smooth, round form. You’ll use the invisible decrease technique to make the decreases as seamless as possible.
To decrease, work two single crochets together by inserting the hook into both the next stitch and the one after it. This technique helps reduce the stitch count and gradually closes up the hole. Continue decreasing until only a few stitches remain.
Step 6: Close the Ball and Secure the Yarn
When there are only a few stitches left, cut the yarn, leaving a long tail. Use a yarn needle to thread the tail through the remaining stitches and pull tightly to close the hole at the top of the ball. This will secure the ball and ensure it maintains its shape.
Now that your crochet ball is complete, it’s time to attach the keychain ring. Take the long yarn tail and thread it through the top of the ball. Then, tie a knot to secure the yarn to the keychain ring. Make sure the knot is tight so that the ball stays attached to the ring.
Step 7: Finishing Touches
Now that your crochet ball keychain is assembled, you can add finishing touches to make it even more personalized. If you want, you can add a little decorative flair by attaching small beads, sequins, or charms to the ball for extra sparkle. You can also make multiple crochet balls in different colors and create a set of keychains.
Once you’re happy with how your keychain looks, use your yarn needle to weave in any remaining yarn ends, trimming them neatly with scissors. Your crochet ball keychain is now ready to be used!
Conclusion
In this guide, you’ve learned how to create a Crochet Ball Keychain Free Pattern from start to finish. By following these simple steps, you can make a charming and personalized keychain that will add a unique touch to your accessories.
Whether you decide to make one for yourself or as a gift for someone else, this project is a fun way to practice your crochet skills and create something useful. Don’t be afraid to experiment with different colors and designs to make your keychain truly your own. Happy crocheting, and enjoy your new crochet ball keychain!

