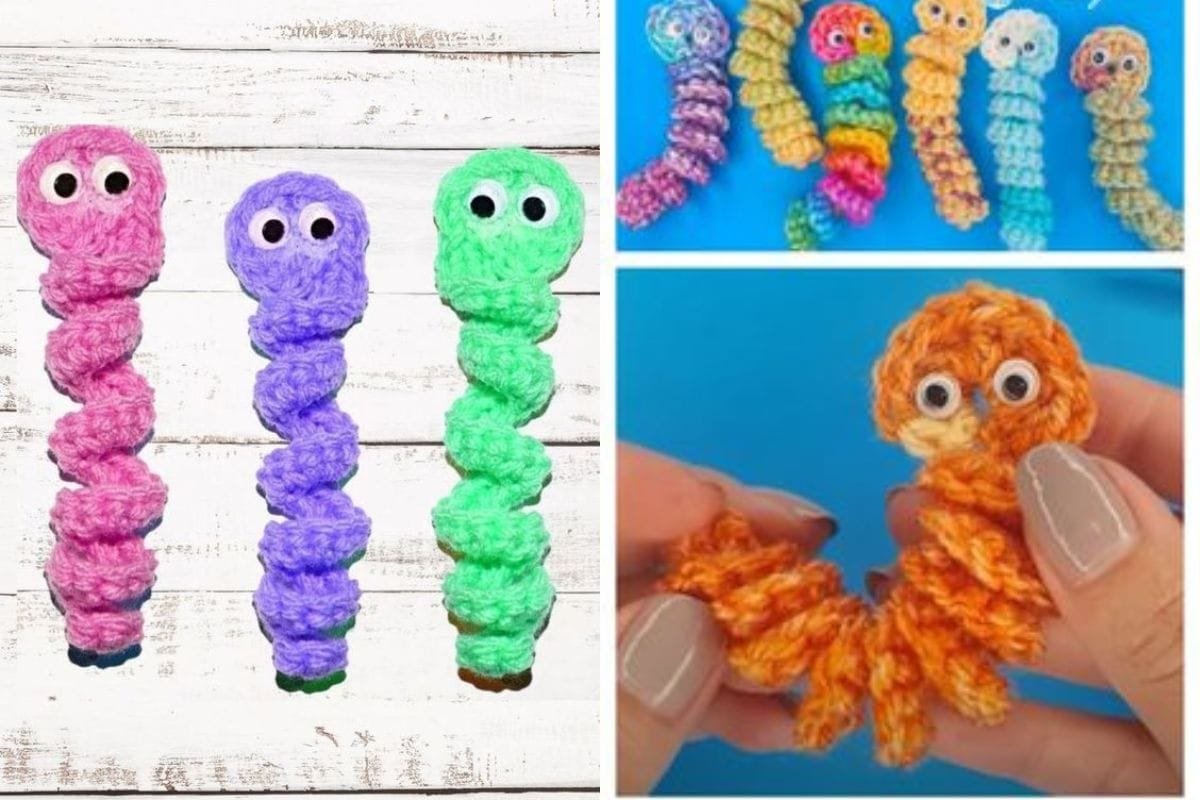
If you’re looking for a simple and thoughtful project, learning to crochet a worry worm is a rewarding experience. These small, adorable creations are perfect for gifting, spreading joy, or even selling as handmade items.
In this easy DIY guide, we’ll walk you through everything you need to know to crochet a worry worm step by step. This project is beginner-friendly and a great way to explore your creative side while making something meaningful.
Worry worms are more than just cute—they are often used as comfort objects, shared during difficult times, or given as tokens of friendship. With their simple design and endless customization possibilities, they have become a beloved crochet project worldwide.
Whether you’re a seasoned crocheter or a complete beginner, this guide is tailored to help you create a beautiful worry worm with ease.
In this tutorial, we’ll cover all the essentials, including materials, basic crochet techniques, and tips for adding personal touches to your worry worms. By the end, you’ll have the confidence and skills to make your own unique creations. Let’s dive into the Crochet a Worry Worm – Easy DIY Guide!
1. Materials Needed to Crochet a Worry Worm
Creating a worry worm doesn’t require expensive supplies, making it an accessible craft for anyone. Here’s what you’ll need:
- Yarn Selection: Choose soft, lightweight yarn, such as acrylic or cotton. Bright colors or variegated yarns can make your worm stand out.
- Crochet Hook: Use a size suitable for your yarn—commonly a 3.5mm or 4mm hook.
- Stuffing (Optional): For a more plush feel, you can lightly stuff the head of the worm.
- Embroidery Thread or Safety Eyes: Add personality to your worry worm by stitching eyes or attaching small safety eyes.
- Scissors and Tapestry Needle: These will help with finishing touches and weaving in loose ends.
- Extras: Small beads or ribbons for decoration can make your worry worm unique.
Before starting, ensure you have all the tools ready to streamline the process. If you’re missing something, substitutes can often work as long as the materials are compatible with your design.
Yarn Choices Matter
Selecting the right yarn can significantly affect the final look of your worry worm. Softer yarns create cuddly worms, while sturdier materials are ideal for keychain versions.
Crochet Hook Size
The hook size plays a role in the worm’s texture. A smaller hook results in tighter stitches, while a larger hook gives a looser, softer feel.
Personalizing Details
Safety eyes are ideal for children’s gifts, while embroidered details give a handmade touch. You can even crochet tiny accessories like hats or bows to make your worm stand out.
Affordable Crafting
One of the best parts of this project is how budget-friendly it is. Many crocheters use leftover yarn from other projects, making this a great way to reduce waste.
Organizing Supplies
Having a small basket or pouch for your tools can make crafting more enjoyable, especially if you like to crochet on the go.
Experimentation
Don’t hesitate to experiment with materials you already have. From glittery yarn to multicolored threads, the possibilities are endless.
2. Basic Stitches and Techniques
Crocheting a worry worm requires only a few basic stitches. Here’s what you need to know:
- Chain Stitch (ch): This is the foundation of your worry worm. Practice making even, consistent chains.
- Single Crochet (sc): A simple stitch that forms the body of the worm.
- Slip Stitch (sl st): Used for joining and finishing your work.
- Increase and Decrease: Adding or reducing stitches helps shape the head and body.
- Magic Ring: Ideal for starting the head of the worm seamlessly.
- Fastening Off: Properly finishing your work ensures durability.
Learning the Basics
If you’re new to crochet, take your time to practice each stitch before starting the project. These foundational skills will make the process smoother.
Shaping the Head
The head of the worry worm is typically round. Using increases in each round helps create a gradual, spherical shape.
Creating the Body
The body is often made with a combination of chain stitches and single crochet rows. This simple technique gives the worm its signature curled appearance.
Adding Eyes and Features
Eyes and other details bring the worry worm to life. Position these elements carefully to enhance its charm.
Practice Makes Perfect
Don’t worry if your first attempt isn’t perfect. Crocheting improves with practice, and each worry worm will be better than the last.
Joining Pieces
When attaching parts like the head to the body, use a strong, invisible stitch to ensure they stay securely connected.
3. Step-by-Step Instructions to Crochet a Worry Worm
Follow these steps to complete your worry worm:
- Start with the Head: Create a magic ring and work single crochets in a circular pattern, increasing each round.
- Shape the Head: Continue increasing until the desired size is reached, then work even rounds.
- Form the Neck: Slightly decrease to transition from the head to the body.
- Make the Body: Use chain stitches to create the worm’s length. Add a slight curl by adjusting tension.
- Add Features: Attach eyes, embroider a smile, or glue small decorations.
- Finish: Weave in loose ends and trim excess yarn for a clean look.
Tips for Beginners
Don’t rush! Crocheting should be a relaxing activity. Watch tutorials if needed for visual guidance.
Customization
Experiment with length, colors, and embellishments to create worry worms that suit different personalities.
Consistent Tension
Keep your stitches uniform to avoid uneven or lumpy sections.
Assembly
Carefully sew the head to the body for a seamless finish.
Final Touches
Double-check all parts are securely attached before gifting or using your worry worm.
4. Creative Ways to Use Your Worry Worm
Once your worry worms are ready, there are countless ways to use or share them:
- Gifts: Spread joy by giving them as tokens of care or friendship.
- Charity: Donate worry worms to hospitals, shelters, or schools.
- Decorations: Use them to brighten up your workspace, car, or home.
- Keychains: Add a keyring to make portable worry worms.
- Teach Kids: Introduce children to crochet through this simple project.
- Sell Them: Worry worms are popular at craft fairs and online marketplaces.
Versatility
Their small size and simplicity make worry worms perfect for various uses, from heartfelt gifts to quirky décor.
Spreading Positivity
Attach a note with an uplifting message to your worry worm to make someone’s day.
Collectible
Create a series of themed worry worms, such as seasonal or animal-inspired designs.
Group Activities
Crocheting worry worms is an excellent group activity for crafting clubs or family gatherings.
Low-Cost Gifts
These handmade items are budget-friendly yet heartfelt presents for any occasion.
A Personal Touch
Adding custom messages or unique designs ensures each worm is one of a kind.
FAQ about Crochet a Worry Worm – Easy DIY Guide
What is a worry worm?
A worry worm is a small crochet creation often used as a comforting object or token of positivity.
Do I need crochet experience to make one?
No, this project is beginner-friendly and requires only basic stitches.
How long does it take to crochet a worry worm?
On average, it takes 30 minutes to an hour, depending on your experience.
Can I sell worry worms?
Yes, worry worms are popular items for craft fairs and online shops.
What size should the worry worm be?
Typically, they are about 4–6 inches long, but you can adjust the size as desired.
Are worry worms suitable for kids?
Yes, but ensure any small parts, like eyes, are securely attached to prevent choking hazards.
Join our VIP broadcast list and gain access to exclusive patterns, all for free. As a VIP member, you’ll receive the best patterns daily, delivered directly to your device. ✨📱 It’s a unique opportunity to stay up-to-date with the latest trends and designs, curated just for you. Don’t miss out on enhancing your projects and discovering new inspirations with the best patterns every day! 🎨🔝
Conclusion
Crocheting a worry worm is a delightful and meaningful project. This easy DIY guide has provided everything you need to create your own unique worry worms, from materials and stitches to customization ideas. Whether you’re making them for yourself, as gifts, or for charity, these small creations are sure to bring smiles and comfort.
We’d love to hear from you! Share your thoughts, feedback, or suggestions for future projects in the comments below. Happy crocheting!

