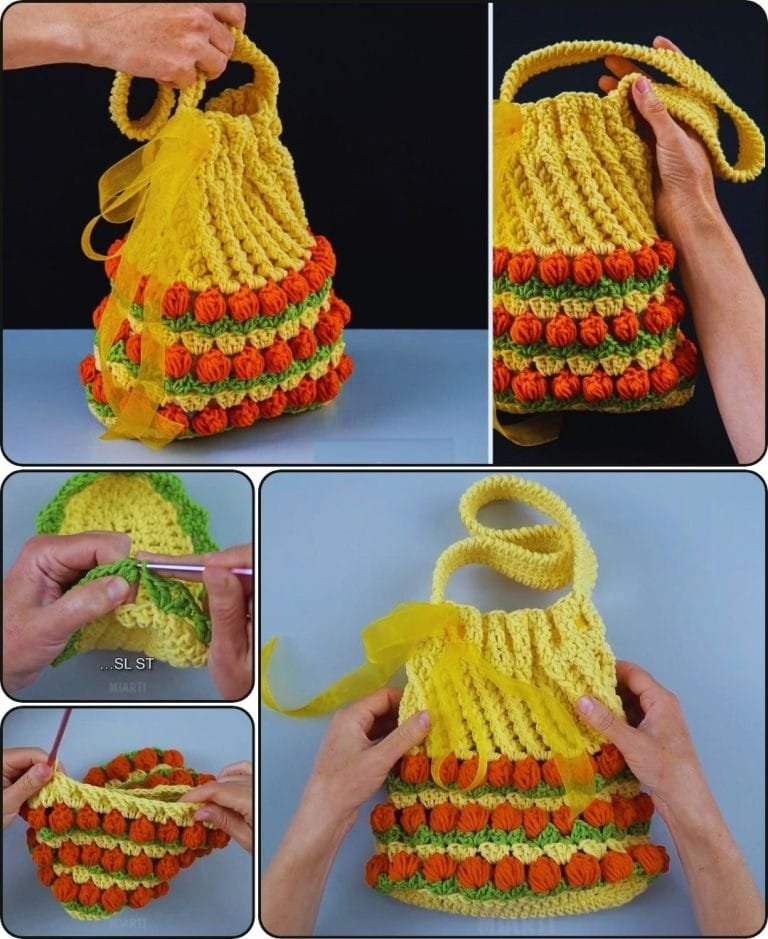
Crochet a Strawberry Flower Tote Bag with Striped Color is a charming and creative project perfect for those who love unique handmade accessories. This stylish tote bag combines the playful look of strawberry-shaped flowers with the elegance of colorful stripes, resulting in a piece that is both functional and eye-catching. Whether you are a beginner or an experienced crocheter, this tutorial will guide you through the process of making your own beautiful bag that you can proudly use or gift to someone special.
Creating a Strawberry Flower Tote Bag with Striped Color is more than just a crochet project—it’s an opportunity to express your creativity through color, texture, and pattern. By mixing soft floral designs with vibrant striped sections, you get a bag that is not only practical for daily use but also a fashion statement. Plus, this style can be customized with your favorite colors, yarn types, and handles to suit your personal taste.
In this tutorial, you will learn how to select the right yarn, crochet the strawberry flower motifs, create the striped sections, and assemble your tote bag for durability and style. We will also cover tips for beginners and creative ideas to make your tote unique. So, get your hooks ready—it’s time to bring this colorful bag to life!
Choosing Materials and Tools for Your Crochet Project
When making a Crochet Strawberry Flower Tote Bag with Striped Color, selecting the right materials is the first step to success. The yarn you choose will affect the texture, durability, and overall look of the bag. Cotton yarn is an excellent choice because it’s sturdy, holds its shape well, and provides a crisp stitch definition that makes both the flowers and stripes stand out beautifully.
You will also need a crochet hook that matches your yarn weight. A hook that is too large will create loose stitches, making the bag less sturdy, while a smaller hook will make tighter stitches, perfect for structure but potentially harder for beginners to work with. Always check the yarn label for the recommended hook size and do a small swatch before starting the full project.
In addition to yarn and hook, you will need scissors, a yarn needle for weaving in ends, and possibly stitch markers to help you keep track of your pattern repeats. Handles can be crocheted directly onto the bag or purchased in materials like wood, leather, or bamboo for a polished finish.
The color palette is a crucial part of your tote bag design. For the strawberry flowers, shades of red, pink, and green work best, while the striped sections can be done in pastel or bold contrasting colors depending on your style. Choosing complementary colors will make your design pop and give your bag a cohesive look.
Before beginning, it’s also important to plan the size of your tote. Will it be a small handbag for quick errands or a larger carryall for groceries and beach trips? Adjusting your stitch count and number of motifs will help you create the perfect size.
Lastly, having a printed or written pattern can help you stay on track. Even if you are following this tutorial, taking notes and marking rows will ensure your project goes smoothly and avoids unnecessary unraveling.
Crocheting the Strawberry Flower Motifs
The heart of the Crochet a Strawberry Flower Tote Bag with Striped Color design lies in its adorable strawberry flowers. These motifs bring a playful and fresh vibe to the bag while showing off your crochet skills. Each flower is shaped to resemble a strawberry, with tiny “seeds” created using special stitches or embroidery.
To start, make a magic ring and work your first round of stitches in red or pink yarn. This will form the main body of the strawberry. Using a combination of double crochet and half double crochet stitches, shape the bottom wider and the top narrower for a realistic strawberry outline.
Once the main body is complete, switch to green yarn to create the leafy top. The leaves can be made with small chains and slip stitches, giving them a delicate yet structured look. Some crocheters like to add a few extra loops to make the leaves curl slightly, adding charm to the design.
For added detail, use a contrasting yellow or white yarn to embroider small seed-like stitches over the red section. This step makes the motif instantly recognizable as a strawberry and adds a professional finish to your work.
You will need multiple strawberry flower motifs for your tote bag, depending on your desired size. Arrange them in rows or a scattered pattern before attaching them to ensure even spacing. This planning step makes the final assembly much easier.
Once you have all your motifs ready, set them aside until it’s time to attach them to the striped base of your tote. Keeping them separate until then will prevent tangling and ensure the motifs maintain their shape.
Creating the Striped Base of the Tote Bag
The striped color section is where your bag will truly stand out. This part is worked in rows or rounds, depending on your preferred bag shape. For a tote, working in rounds from the bottom up is a common method, as it creates a seamless, sturdy base.
Start with a foundation chain that matches the desired width of your bag. For a rounded bottom, you can work in continuous rounds, increasing evenly until you reach the bag’s full base size. Then, continue working up the sides without increases to create the body.
When adding stripes, decide whether you want thin, frequent color changes or thicker, bold bands. Thin stripes create a delicate look, while thick stripes make a strong fashion statement. To change colors neatly, always finish the last stitch of a row with the new color, ensuring clean transitions.
Using contrasting colors for the stripes will make the strawberry flowers pop even more. For example, pastel backgrounds with bright flowers or bold backgrounds with soft-colored flowers can completely change the bag’s vibe.
It’s important to keep your tension consistent when changing colors to avoid puckering or uneven sections. Using a yarn bobbin can help keep your strands organized and prevent tangling during frequent color changes.
Once the striped body is complete, make sure it’s the correct height before attaching the motifs. This is your chance to adjust if you want the bag taller or shorter.
Assembling and Finishing the Tote Bag
Now that you have your strawberry motifs and striped base, it’s time to bring the Crochet a Strawberry Flower Tote Bag with Striped Color together. Placement is key—lay your motifs on the striped section to decide the arrangement before sewing them on.
Use a yarn needle and matching yarn to carefully stitch each motif to the bag. Work through both loops of the motif and only the outer loops of the bag’s stitches to prevent visible seams inside the bag. Take your time to make sure each motif is secure, especially if you plan to carry heavier items.
Once the motifs are attached, it’s time to add handles. Crocheted handles can be worked directly into the top edge of the bag, or you can sew on pre-made handles. Make sure they are reinforced so they can handle the bag’s weight.
Adding a lining to your tote can make it more durable and prevent stretching. Choose a fabric that complements your colors, and sew it to the inside of the bag before attaching the handles.
Weave in all yarn ends and block the bag if needed. Blocking helps shape the bag and makes the stitches look even and polished.
Your bag is now ready to use! Whether for shopping, picnics, or as a unique handmade gift, it’s sure to attract compliments.
FAQ
1. How long does it take to crochet a Strawberry Flower Tote Bag with Striped Color?
It depends on your skill level and available time, but most crafters can complete it in one to two weeks with a few hours of work each day.
2. Can I use acrylic yarn instead of cotton?
Yes, but cotton yarn is preferred for structure and durability. Acrylic may stretch more over time.
3. How do I make my stripes look neat?
Always change colors in the last step of the stitch and maintain even tension throughout the row.
4. Can I wash my tote bag?
If made with cotton yarn, it can usually be hand washed and laid flat to dry. Always check the yarn label for care instructions.
5. Do I need to line the bag?
Lining is optional but recommended for durability and to prevent small items from poking through stitches.
6. Can I adjust the size of the bag?
Yes, simply increase or decrease the number of stitches and motifs to make it larger or smaller.
Conclusion
Making a Crochet a Strawberry Flower Tote Bag with Striped Color is a delightful project that combines fun motifs with bold stripes for a bag that’s both practical and stylish. You’ve learned how to choose materials, crochet strawberry flower motifs, create the striped base, and assemble everything into a finished tote. I’d love to hear your honest opinion and suggestions for future tutorials—share your thoughts and let’s keep the creativity going!

