If you’ve ever wanted to crochet a simple crochet tote bag, now is the perfect time to dive into this fun and rewarding project. A tote bag made with crochet is not only stylish and customizable, but it’s also practical and eco-friendly. Whether you’re new to crochet or have some experience under your belt, learning how to crochet a simple crochet tote bag can be a relaxing way to create something functional and beautiful. This tutorial will walk you through everything you need to know to start stitching your own tote today.
Creating your own tote bag through crochet allows you to personalize every detail — from color and size to texture and shape. The simplicity of the pattern means you don’t need to master advanced techniques to complete it. With a few basic stitches, a hook, and some yarn, you can create a durable and beautiful accessory that you’ll be proud to carry everywhere.
In this article, you’ll learn the full process to crochet a simple crochet tote bag, including what materials you need, the basic stitch pattern, assembly steps, and tips to customize your project. Let’s explore each stage so you can confidently begin your next favorite handmade item.
Choosing the Right Yarn and Tools
When you’re ready to crochet a simple crochet tote bag, selecting the right materials is the foundation of your success. Yarn choice can make a big difference in how your tote turns out — both in terms of appearance and durability.
For a strong and reusable tote, cotton yarn is highly recommended. Cotton holds its shape well, is machine-washable, and provides the firmness you’ll want in a bag. Opt for worsted weight or thicker yarn to give the tote bag more structure. Bright or neutral colors both work beautifully, depending on your style.
The hook size you choose will also affect the final product. A medium-size hook like 5.0mm or 5.5mm pairs well with worsted weight yarn. The smaller the hook, the tighter the stitches, which means your bag will be sturdier. Be sure to test your gauge by making a small square before diving into the full pattern.
Other tools you’ll want on hand include scissors, a yarn needle for weaving in ends, and stitch markers to help keep track of your rows and stitch counts. These small items make the crocheting process smoother and more enjoyable, especially if you’re working on your first tote.
Don’t forget comfort when choosing your materials. Ergonomic hooks and soft yarn can make a big difference in how long you can crochet without strain. With all your supplies ready, you’re one step closer to creating your own beautiful tote.
Starting with high-quality materials will set your tote bag apart and ensure it lasts for years to come. It’s worth taking the time to select tools that are comfortable, sturdy, and well-suited to your style.
Step-by-Step Tote Bag Pattern
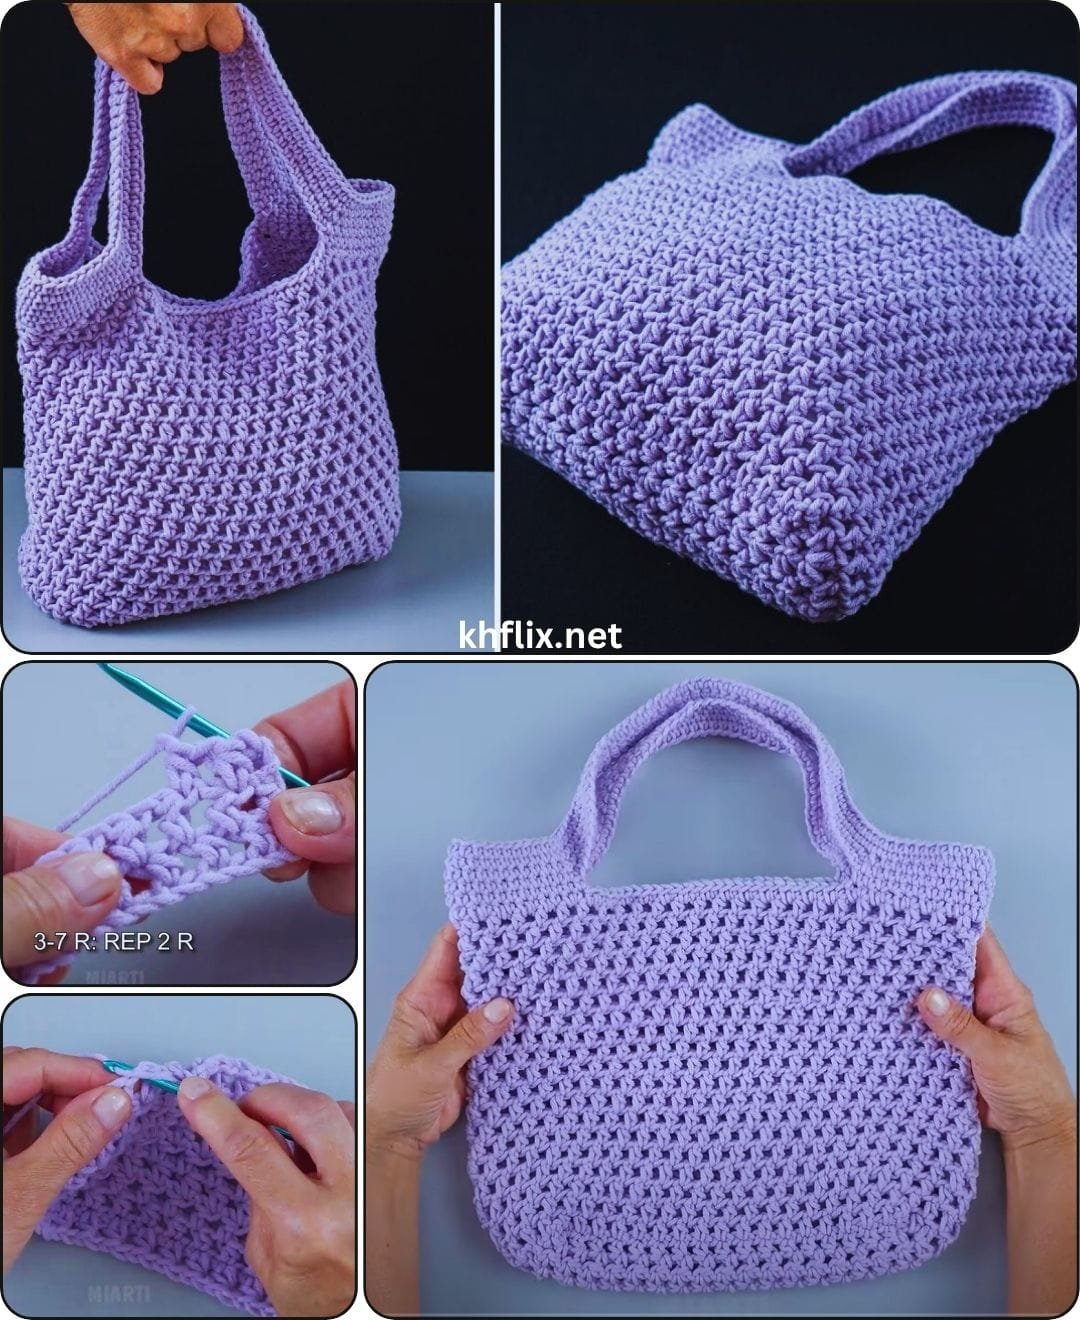
Let’s move on to the most exciting part — the pattern! This guide to crochet a simple crochet tote bag will follow a basic, beginner-friendly pattern. You can always build on it later with your own customizations.
Start by chaining around 35 stitches. This will create the base length of your tote. Once your chain is done, single crochet into the second chain from the hook and all the way across. When you reach the end, crochet around to the other side of the chain to begin forming an oval.
Continue crocheting in rounds. Use single crochets to build up the body of the bag, and place stitch markers at the beginning of each round to track your progress. As the rounds stack up, you’ll start seeing the sides of the bag rise up from the base.
Once you’ve reached your desired height (usually around 30-35 rounds), it’s time to shape the handles. This is done by chaining a number of stitches and skipping a section of the bag. On the following round, crochet across the chain to build the handle structure.
To make your tote more durable, consider doing a few rounds of slip stitches around the top. This reinforces the opening and prevents it from stretching over time. Reinforced handles can also be stitched around for extra strength.
Finish off your bag by weaving in all loose ends with a yarn needle. You can block the bag if you’d like it to hold a particular shape. With that, your handmade tote is ready to use!
Tips for Customizing Your Tote Bag
While the basic steps to crochet a simple crochet tote bag are easy to follow, the fun really begins when you start customizing it to your own taste and needs. The great thing about handmade bags is that no two need to be the same.
One of the simplest ways to personalize your tote is through color. Use stripes, color blocking, or even gradient yarn to give your bag a vibrant, eye-catching look. You can even make themed totes for different seasons or occasions.
Another idea is to adjust the size of your bag. By adding more chains at the start or working more rows, you can create a tote perfect for groceries, books, or even a beach day. The pattern is flexible and adapts well to changes in dimension.
Adding texture is another great customization. Try alternating rows of single crochet and half-double crochet to create a more dynamic surface. You can also experiment with bobble stitches or shell patterns for a decorative touch.
Want to go a step further? Sew in a fabric lining to make the inside of your tote even more polished and functional. A lining can help prevent items from poking through the stitches and adds a nice finished look.
You can also crochet small pockets onto the front or inside of your tote for added functionality. These are great for holding keys, phones, or small essentials that you want easy access to.
Finally, embellish your tote with tags, appliqués, or buttons. A handmade tag or flower accent can add personality and charm, making your creation truly one-of-a-kind.
Benefits of Making Your Own Tote Bag
Choosing to crochet a simple crochet tote bag comes with many benefits beyond just the satisfaction of creating something with your hands. It also offers practical, economic, and environmental advantages.
First, a handmade tote is reusable and washable. This helps reduce reliance on single-use plastic bags and contributes to a more sustainable lifestyle. Every time you bring your tote to the market, you’re making a greener choice.
Economically, crocheting your own bag is budget-friendly. With just a couple of skeins of yarn, you can produce a bag that would cost much more in stores — and it’ll be far more meaningful.
There’s also the therapeutic aspect. Crochet is known to reduce stress and anxiety. As you work through each row, you’ll likely find a rhythm that calms your mind and boosts your mood.
Creating a bag from scratch builds skills and confidence. Whether you’re new to crochet or coming back after a break, completing a project like this can remind you of what your hands are capable of.
You’re not limited to one bag, either. Once you master the basics, you can gift tote bags to friends and family or even sell them if you’re looking to start a small handmade business.
Lastly, using a bag you made yourself is simply satisfying. Knowing that every stitch came from your own hands adds a personal story to a practical item you’ll use every day.
Frequently Asked Questions (FAQ)
Can beginners crochet a simple crochet tote bag?
Absolutely! This project is perfect for beginners since it only uses basic stitches like single crochet and simple shaping techniques. With a little patience, anyone can complete it.
What type of yarn is best for tote bags?
Cotton yarn is ideal because it’s sturdy, holds its shape, and is easy to wash. Avoid stretchy yarns like acrylic if you want a bag that maintains its form over time.
How long does it take to crochet a tote bag?
Depending on your skill level and how much time you spend crocheting daily, it can take anywhere from a few hours to a couple of days to finish your tote bag.
Can I make the bag bigger or smaller?
Yes! To resize, adjust the starting chain for length and add or reduce the number of rows for height. You can easily tailor the tote to your personal needs.
Do I need to line my crochet tote bag?
It’s optional but recommended if you want extra durability. A fabric lining prevents smaller items from slipping through and can make your bag feel more finished.
What if my bag stretches over time?
To prevent stretching, use tight stitches and sturdy yarn. Reinforcing the handles and adding a top border with slip stitches can also help the bag keep its shape.
Conclusion
Learning to crochet a simple crochet tote bag is a rewarding project that combines creativity, function, and eco-conscious living. With basic tools, a bit of yarn, and this step-by-step guide, you’re fully equipped to create your own stylish and practical tote.
We’ve covered everything from material selection and stitch-by-stitch instructions to customization ideas and common FAQs. Whether you’re making a tote for yourself, a friend, or even to sell, this versatile pattern is a fantastic addition to any crocheter’s skillset.
If you enjoyed this tutorial, please leave a sincere opinion and share any suggestions you have — your feedback helps make future crochet patterns and guides even better!

